How to Set a Proxy for Wget? The 2024 Interactive Guide


Simona Lamsodyte
Last updated -
In This Article

Ready to get started?
You can use wget to download files and pages programmatically. But let’s take it to the next level and use wget with a proxy server to scrape the web without getting blocked.
Wget is very similar to cURL. It allows you to send a command using the terminal and download files from a URL. This means that you can schedule this command to run automatically every day and never worry about it again.
But if you want to make this truly automated, you need a proxy. It’s very easy to get blocked when you are scraping sites. And using proxies is a quick way to prevent this. Therefore, today we will explore how you can use wget, how to use proxies with it, how to install it, how to deal with the most common issues, and more.
The best part is that this is an interactive guide, so you can follow along and test the commands using a site we are linking to.
Let’s get started!
Wget Proxy Command Line
The wget command has a simple syntax. It’s
wget [options] [url]When it comes to wget proxy usage, you have two main options. You can pass the proxy data in your command as an option, or you can save the proxy data globally, so you don’t need to initiate it every time.
But before we explore the wget proxy itself, let’s see how you can use wget in general. Run this command:
wget -VAnd unless you have wget installed you’ll see an error. Let’s fix this first.
Wget Command Not Found
Some operating systems have wget installed by default. In particular, most Linux distros. But if you are running macOS or Windows, you’ll probably see an error when you try to run wget at first. This just means that you don’t have it installed. It’s an easy fix, though.

Macbook Wget and Wget in macOS
The easiest way to install wget on a Mac is using homebrew. You can run this command in your terminal:
brew install wgetAnd that’s it. There are other options in case you don’t have homebrew though. You can simply download the library (even using cURL!) and install it.
Wget in Windows
You can download wget for windows directly from the GNU project. Then you can just open the setup program and follow the onscreen instructions. Now you are ready to use wget. But should you? Why not use cURL? Let’s see which one is the best option for you.
Wget vs. cURL
The short version of this comparison is that wget is easier to use (more options enabled by default), while cURL is more flexible, allowing many different protocols and connection types.
In terms of real features, cURL can use 26 different protocols, while wget uses just the basic HTTP, HTTPS, and FTP protocols. You can use wget proxy authentication as well as cURL proxy authentication. But wget has simpler connection types, and you are bound to its limitations.
In general, wget works fine for simple scraping work. You can get pages, follow redirections, follow links. On the other hand cURL can do all that and some other tasks, due to its flexibility.
Now let’s see some real examples of wget commands and how you can use them to get pages.
Wget Through a Proxy - Web Scraping Without Getting Blocked
If you are playing around with wget, even with harmless calls, you might get blocked. That’s because site owners don’t want to deal with web scrapers, even though they are perfectly legal.
The simplest way to check if a user is a bot is by checking their browsing habits on your site. Thus, you can check the visited pages of an IP address, then see if they are checking too many pages, if they do it at the same time, or other signs that this might be a bot.
But notice how a crucial point to detect users is by looking at connections coming from the same IP address. Therefore, you can use IPRoyal’s residential proxy service to hide your IP address. Thus, website owners won’t be able to track down which pages you’ve visited, since they will see completely different IP addresses for each visit.
Once you sign up, go to your client area, and in it, you can find the connection details:
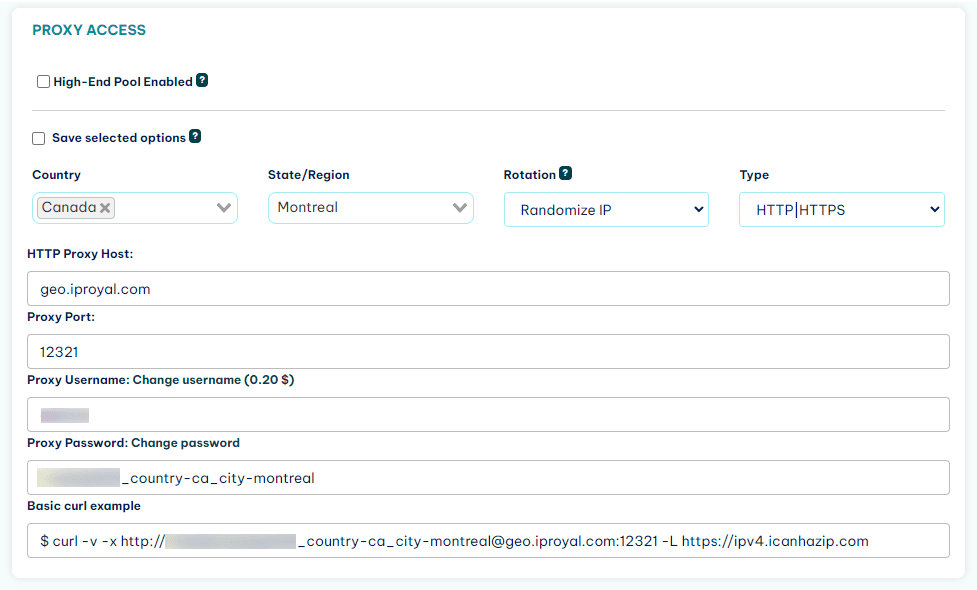
Now you just need to use this information along with wget to connect to a proxy and hide your IP address. You can do it by using the http_proxy or https_proxy variable before the wget command, like this:
http_proxy=http://[username]:[password]@geo.iproyal.com:12321 wget -v http://ipv4.icanhazip.com/( Try it )
There are other similar approaches, such as using -e, or even an alias. For example, save the entire proxy call as an alias, then call it before the wget command.
In general, one-line commands are great ways to use a wget proxy if you don’t want this to affect your entire OS. You get proxy connections only in the current terminal, and that’s it. But if you want to store this information, you can do so.
How to Store the Wget http_proxy Variable
Wget uses the http_proxy and https_proxy variables. Thus, you can edit these permanently and change how all wget commands run. Keep in mind that this affects how other commands run as well, such as cURL.
There are a couple of files that your system looks at (in this order):
- ~/.wgetrc : User startup file.
- /etc/wgetrc : Global startup file.
- ~/.bash_profile : User-specific environment.
- /etc/profile : System-wide environment.
Thus, your system looks at the ~/.wgetrc file. If no proxy information is set, then it looks at the /etc/wgetrc file. Then it keeps moving down the list until it finds this information.
You can edit any of these files and uncomment/add these lines:
use_proxy=yes
http_proxy=http://username:password@domain:port/
https_proxy=https://username:password@domain:port/
ftp_proxy=http://username:password@domain:port/
For the .bash_profile and /etc/profile files, you’ll need to use the shell command to set up proxies, like this:
export http_proxy=http://username:password@domain:port/
export https_proxy=https://username:password@domain:port/
export ftp_proxy=http://username:password@domain:port/
Replace username/password/address/port with your own information. That’s it! You might need to reset your terminal browser, but your next connections are using your wget proxy information.
Wget Follow Redirect
This isn’t a wget proxy issue directly, but it is related to the kind of issues you will face. One of the most useful ways to use wget is by following redirects, thus allowing it to download a file at the end of the redirection chain.
By default, wget follows redirects. For example, run this command:
wget -v http://google.com( Try it )
And you’ll see something like this in the output:
And you’ll see something like this in the output:
Resolving google.com (google.com)...
Connecting to google.com (google.com)... connected.
HTTP request sent, awaiting response... 301 Moved Permanently
Location: http://www.google.com/ [following]
Resolving www.google.com (www.google.com)...
Connecting to www.google.com (www.google.com)... connected.
HTTP request sent, awaiting response... 200 OK
Saving to: ‘index.html’
Notice that wget first tries to load google.com, and it gets redirected to www.google.com . Not a problem, wget follows the new path immediately and downloads the index.html. If for any reason wget redirects aren’t working for you, check the max_redirects attribute, sometimes it is set as 1, removing any further redirects.
Wget Ignore Certificate
Sometimes we need to switch between http and https, or we need to scrape pages with expired certificates. If you try to load these pages in your browser, you get security errors, and for a good reason. You are mixing plain text content with encrypted content, or maybe you are visiting a page with expired SSL certificates.
But when it comes to web scraping, sometimes you just want to make it work. You can combine the wget proxy command with this one to ignore certificate errors with wget:
wget --no-check-certificate https://google.com( Try it )
This allows you to ignore certificate errors and still see the page’s contents.
Wget –no-proxy
Maybe you saved the proxy information, but you want to disable it just for a specific command. Fear no more, the –no-proxy setting is here to help you. You can use this command to overwrite any proxy data, like this:
wget --no-proxy https://google.com( Try it )
Surely, you can always edit the settings files in case you want to make this change permanent. But this should be a quick fix.
Wget Basic Commands
Here is a simple list of wget commands so you can play with your wget proxy scraper.
- set output filename: wget -o [filename] [url]
The -o command is an alias for –output-file=name.
Therefore, you can save a file with a custom name by using this command:
wget -v -o test.html https://google.com( Try it )
- save to a path: wget -P [path] [url]
You can save your files to a custom path using the -P option. With it, you can run your wget proxy, and save all files from a site in a specific folder, for example:
wget -v -P path https://google.com( Try it )
- set user agent: wget –user-agent=[name] [url]
The user agent is another telling sign of robots. Some of them don’t even bother sending a valid user agent. This behavior is highly suspicious since most browsers send this info.
wget --user-agent=Safari https://google.com( Try it )
- convert links: wget –convert-links [url]
You can download files and convert all links from fixed links from a URL to local links to your local path. This is particularly useful if you want to test the download files using your browser.
wget --convert-links https://google.com( Try it )
You can see this message at the end of your convert-links job:
Converting links in index.html... 0-9
Converted links in 1 file in 0 seconds.
This means that once you visit index.html all past links will reference the respective pages in your server.
- download a list of pages: wget -i links.txt
Another handy feature for web scraping with wget is loading pages from a list. You can create a simple txt file, add links one per line, then use this command:
wget -i links.txt( Try it )
With it, wget downloads each of the links in that list. This can be handy for bulk downloads.
Conclusion
Today you learned how you can use wget proxy for simple file downloads and for web scraping. We hope you’ve enjoyed it, and see you again next time!
FAQ
Https error in wget proxy
Sometimes, you might get a HTTPs error. You can fix it with the ignore certificate setting or make sure that your proxies match the intended protocol. For example, if your proxy is http, make sure it is set to http_proxy and not https_proxy.
How to remove a wget proxy
You can remove the proxy setting by editing one of these files:
- ~/.wgetrc : User startup file.
- /etc/wgetrc : Global startup file.
- ~/.bash_profile : User specific environment.
- /etc/profile : System wide environment.
Your setting might be in one of them (or all), so if you want to just fix the issue without looking at each specific file, just add the proxy removal code in the ~/.wgetrc file, since that’s the first one to be loaded.
Wget: not an http or ftp url
Usually you might get errors when you are using the wrong protocol. So double-check if your download is supposed to be http, https, or ftp. In most cases, it’s just a matter of fixing the URL.
Author
Simona Lamsodyte
Content Manager
Equally known for her brutal honesty and meticulous planning, Simona has established herself as a true professional with a keen eye for detail. Her experience in project management, social media, and SEO content marketing has helped her constantly deliver outstanding results across various projects. Simona is passionate about the intricacies of technology and cybersecurity, keeping a close eye on proxy advancements and collaborating with other businesses in the industry.
Learn more about Simona Lamsodyte