'/%3e%3cellipse%20opacity='0.34'%20cx='327.5'%20cy='339'%20rx='264.5'%20ry='264'%20fill='url(%23paint1_linear_12724_35442)'/%3e%3cdefs%3e%3clinearGradient%20id='paint0_linear_12724_35442'%20x1='327'%20y1='-2.524e-06'%20x2='327'%20y2='389.286'%20gradientUnits='userSpaceOnUse'%3e%3cstop%20stop-color='%2327D9E5'/%3e%3cstop%20offset='0.927406'%20stop-color='%23004047'%20stop-opacity='0'/%3e%3c/linearGradient%3e%3clinearGradient%20id='paint1_linear_12724_35442'%20x1='328.02'%20y1='74.7771'%20x2='328.02'%20y2='395.312'%20gradientUnits='userSpaceOnUse'%3e%3cstop%20stop-color='%2327D9E5'/%3e%3cstop%20offset='0.927406'%20stop-color='%23004047'%20stop-opacity='0'/%3e%3c/linearGradient%3e%3c/defs%3e%3c/svg%3e)
OpenBullet is one of the tools developers use for scraping, automation, and penetration testing. In the wrong hands, it can be used to perform large-scale automated attacks since it’s basically an open-source password sprayer and credential stuffer with plugin architecture, proxy rotation, and CAPTCHA-solving capabilities.
However, due to its flexible design and custom features, you can leverage this wide functionality in an ethical way to test your software in a controlled environment. To make the most of it, proper OpenBullet proxy integration is important.
What is OpenBullet?
OpenBullet is either an open-source testing suite or a cyber weapon, depending how you use it. It allows you to create and run automated tasks against web apps and APIs. You can use OpenBullet to collect data, test login forms or run other scripts.
There are two main versions:
- OpenBullet 1. Easier to set up, runs on older tech (.NET Framework).
- OpenBullet 2. More advanced, built with .NET Core and works on Windows, Linux, and macOS.
There are also two ways to use OpenBullet: with a web client or a native client. The web client runs in your browser and doesn’t need installation. The native client, on the other hand, is a downloadable application that runs directly in your system.
Your choice for which one you’ll use – web client or native client – depends on whether you need speed and features or convenience and portability. In this guide, we’ll focus mostly on the native client.
To run either one of the two versions (OB1 or OB2), you’ll need .NET installed on your system. You also need a good pool of proxies to avoid getting blocked during operations.
Why Do You Need Proxies for OpenBullet?
Running proxies with OpenBullet usually means lower detection rates, more efficient scraping, or penetration testing. Without proxies, your original IP address is exposed and websites can easily detect and block you.
When you use residential proxies, your activity looks like it’s coming from a real household where regular people use the network. As a result, it helps you avoid CAPTCHAs, bans, or IP throttling.
Here’s how performance differs with and without proxies:
- Without proxies. Limited runs, IP blocks, slower operations.
- With proxies. Scalable runs, better speed, stronger privacy.
Adding OpenBullet proxy integration makes your tasks faster and safer. Especially when your goal is to mimic normal user behavior without raising alarms.
Types of Proxies Compatible With OpenBullet
1. Residential Proxies
You’ll need residential proxies for big data tasks. These work great when testing login forms or simulating user sessions.
Here’s a brief overview:
- Comes from real user devices.
- Very hard to detect compared to datacenter proxies.
- Slower, but safer.
2. Datacenter Proxies
You should use these ones when you don’t care much about stealth and speed is all you’re after. They are cheaper than residential ones but are also much easier to detect.
Benefits include:
- Hosted in data centers, which makes them abundant.
- Very fast, but easier to detect.
- Cheap and good for simple jobs.
3. ISP Proxies
They strike a nice balance between stealth and performance. It’s a hybrid option between residential proxies and datacenter proxies. They’re faster than residential IPs and more stealthy than datacenters.
In short:
- A combination of datacenter speed and residential trust.
- Reliable, but more expensive than datacenter proxies.
4. Mobile Proxies
Mobile proxies are some of the most expensive ones but they come with arguably the highest trust signals and most authentic connections.
Overview of mobile proxies:
- They rotate through mobile carriers.
- Extremely hard to detect.
- Very pricey.
- Rather slow.
You can set up rotation with all of these proxies, and rotating residential proxies are likely the best option in terms of price and reliability if you’re doing large-scale projects.
However, choosing the right type ultimately depends on your task. For most use cases, residential proxies offer the best mix of performance and stealth. But if you’re more focused on speed, then datacenter ones could be your best bet.
Step-by-Step: How to Integrate Proxies With OpenBullet
Follow these steps for a smooth proxy integration with OpenBullet:
1. Download and launch OpenBullet. Get the right version (OB1 or OB2) and install .NET if you don’t have it. Use the auto updater and follow the instructions, but remember to place the executable in a new folder as the updater will download lots of files.
2. Go to the “Proxies” section. Once you open the program, look for the proxy tab in the sidebar.
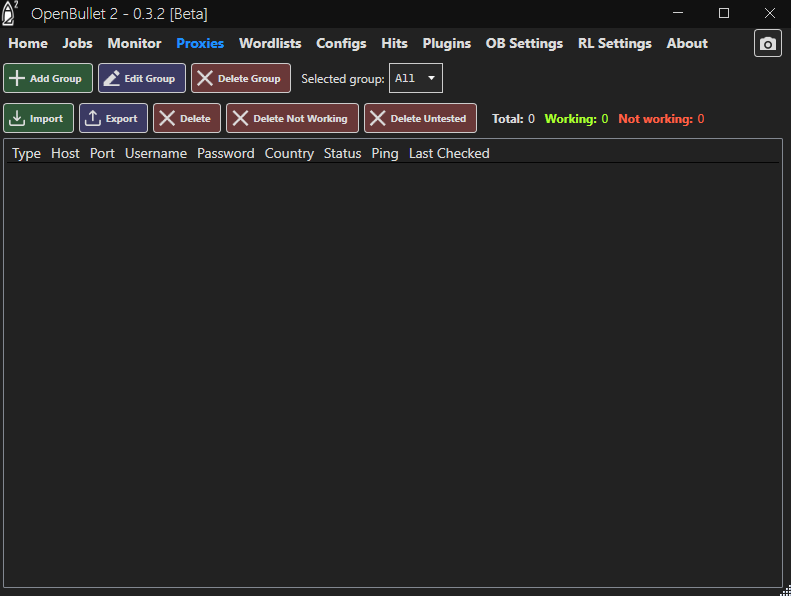
3. Create an OpenBullet proxy group. Click “Add Group” in the top left corner and give it a name you’ll remember. Select the new group by opening the “Selected group” dropdown.
4. Import proxies. Use a text file or paste directly. Make sure you use correct formats in the process.

5. Configure settings. Choose your type: HTTP, HTTPS, or SOCKS5. This step is key to working with a reliable web client.
6. Test proxy connection. OpenBullet will test each proxy. Remove bad ones if necessary and save your group.
That’s it. Your proxy integration with OpenBullet is now done and you can assign that proxy group to your config.