Google Chrome Proxy Manager Quick-Start Guide

The IPRoyal Google Chrome Proxy Manager is a powerful and secure extension that allows you to easily manage and switch between all your proxies within a single browser.
It’s a free tool designed with your privacy in mind—ensuring you don’t have to worry about sharing sensitive credentials with third-party extensions.
Advantages of Using the Google Chrome Proxy Manager
The key advantages of our Proxy Manager are:
- All-in-one proxy management
Create multiple profiles for different proxies, locations, and configurations, and easily switch between them as needed.
- One-click proxy changing
Switch between proxy profiles with a single click, no need to log into your dashboard each time you require a new IP.
- Easy profile customization
Tailor your proxy profiles with features like IP skipping, localization, high-end proxies, and IP rotation to meet your specific needs.
- High compatibility
Use any type of proxy from any provider. If you’re an IPRoyal client, simply log in and don’t worry about usernames or passwords.
How to Install the Google Chrome Proxy Manager
The Proxy Manager extension is available in the Chrome Web Store. To add it to your browser, click the Add to Chrome button.
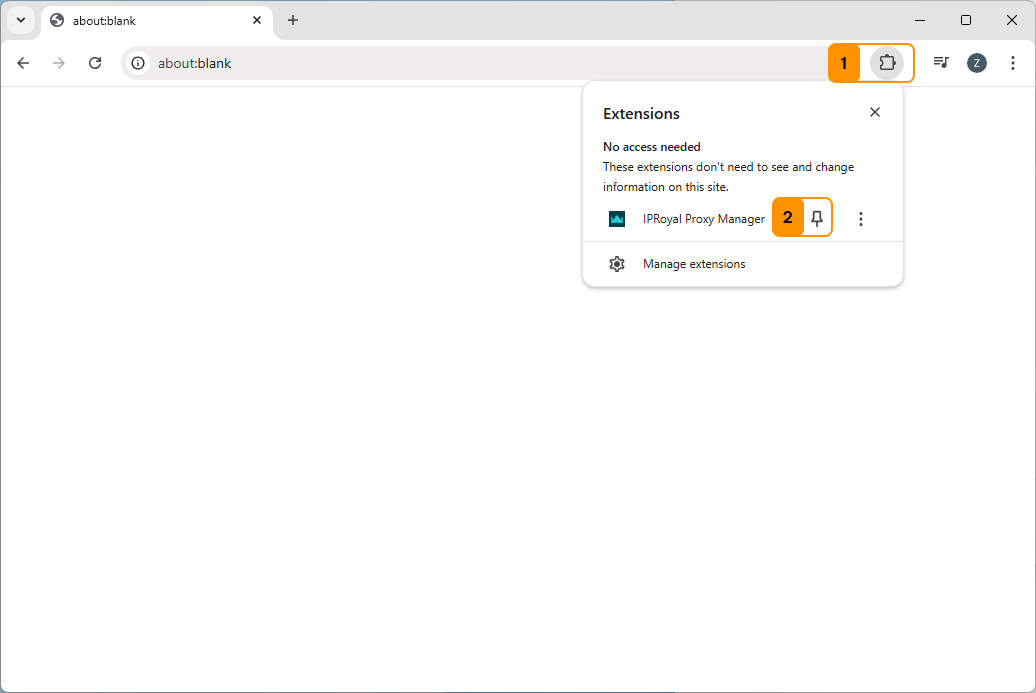
After installing, pin the extension for easy access. Simply click the extensions menu icon (1), then select the pin icon (2) next to the IPRoyal Proxy Manager extension.
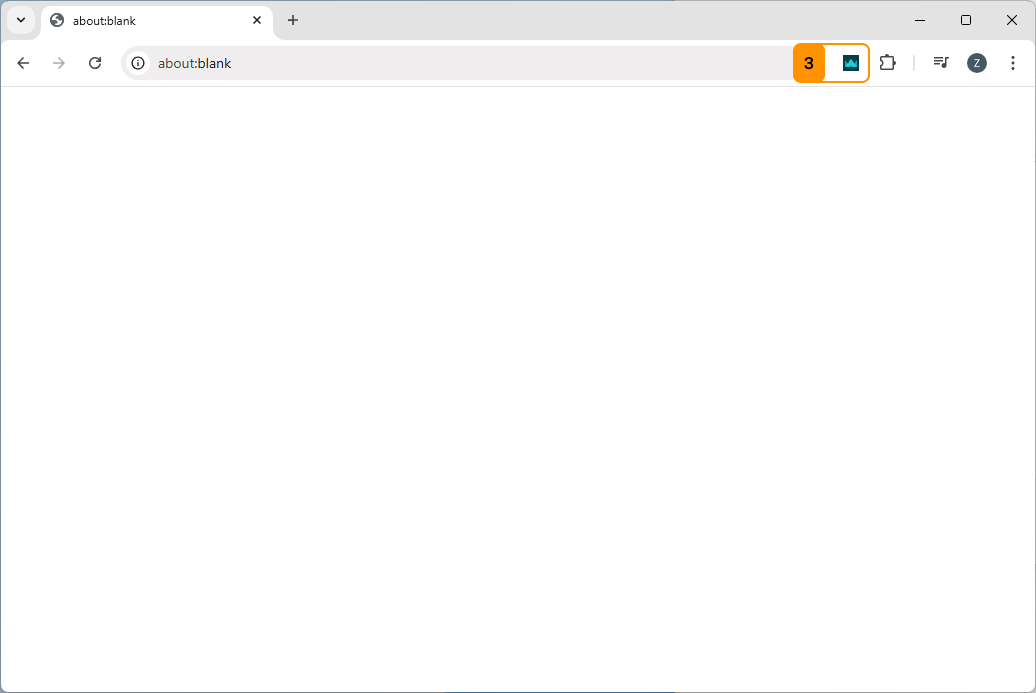
Next, click the Proxy Manager (3) icon, which is now visible in your extensions panel, to get started.
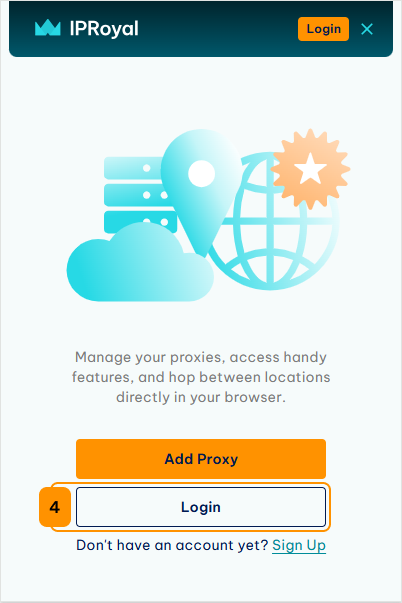
You’ll be prompted to either add a proxy manually or log in. The easiest and the most convenient option is to log in, as your IPRoyal proxy profiles will be automatically authenticated. Click the Login button (4) and a new browser tab will open.
Follow the on-screen instructions to get started.

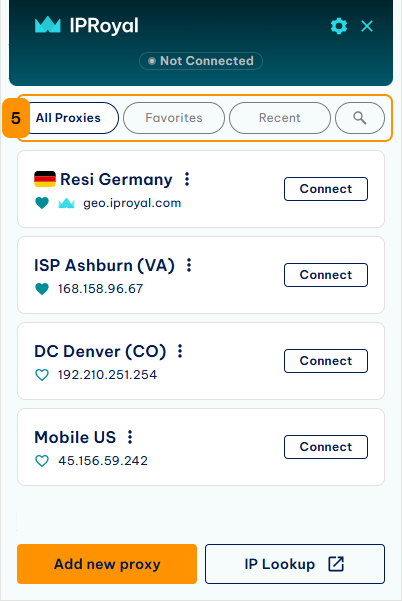
Setting Up Proxy Profiles
You are now ready to start creating your first proxy profile. There are three ways you can do it and we’ll guide you through each one.
1. Quick Proxy Profile Creation
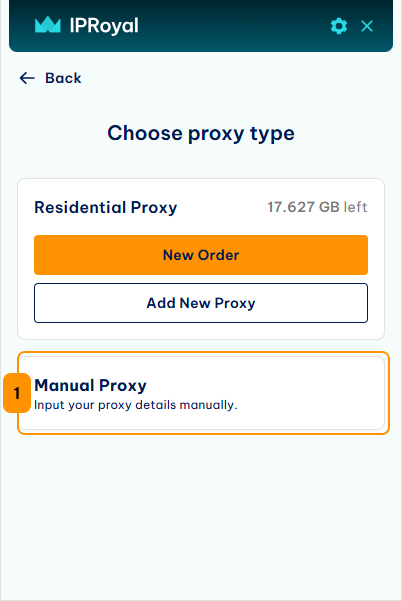
To quickly add a proxy profile simply click the Add new proxy button (1). Then, choose your proxy type (Residential or manual). For our Residential proxies, you can place orders without visiting the dashboard by clicking the New Order button (2). If you already have residential traffic on your account, click on Add New Proxy (3).
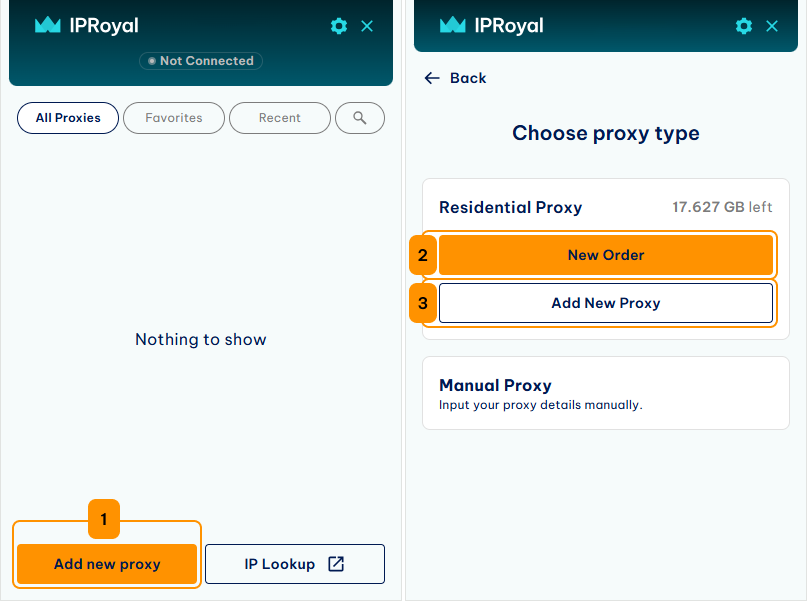
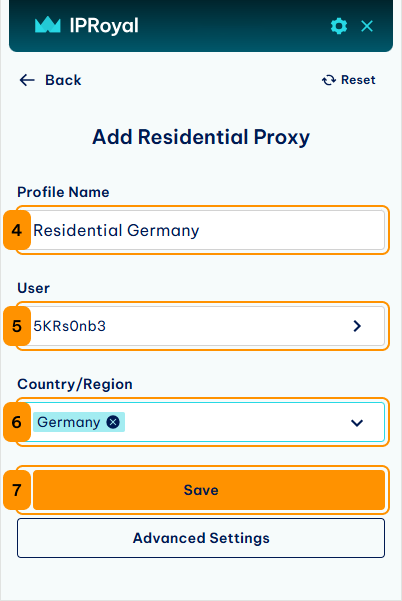
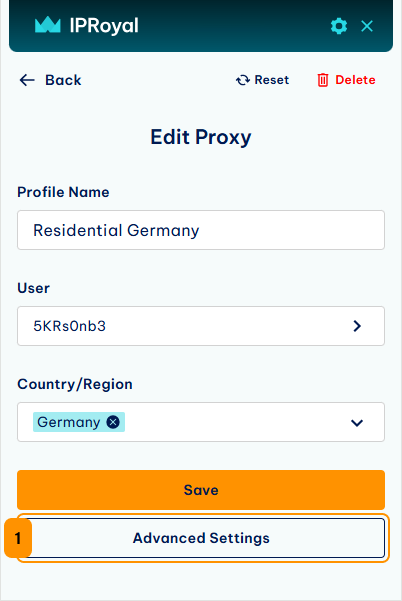
Let’s say you wanted to use a residential proxy from Germany. Start by typing in a Profile Name (4). The extension will use the account (5) you logged in with to generate your credentials. Set Country/Region (6) to Germany and click the Save button (7).
Your newly created proxy profile will now appear in the extension interface. To enable it, click the Connect button (8) next to the profile. Once activated, the status will update to Connected (9).
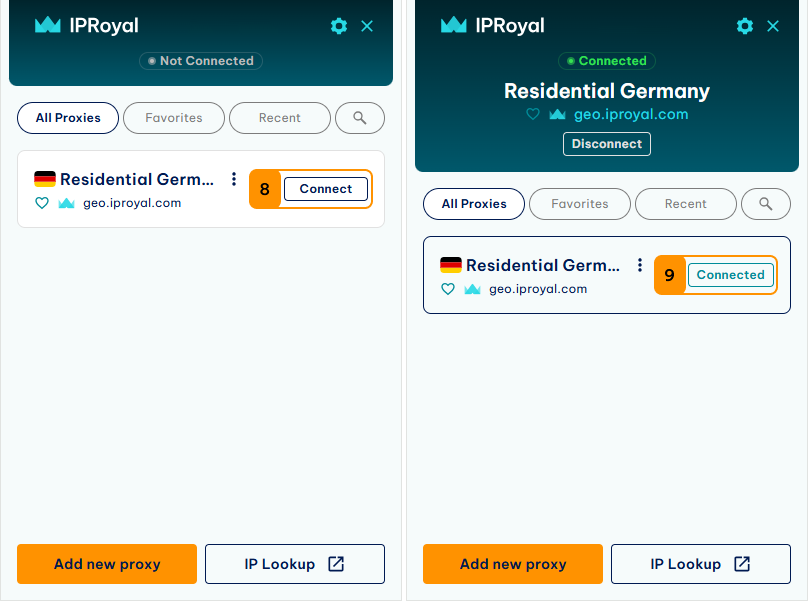
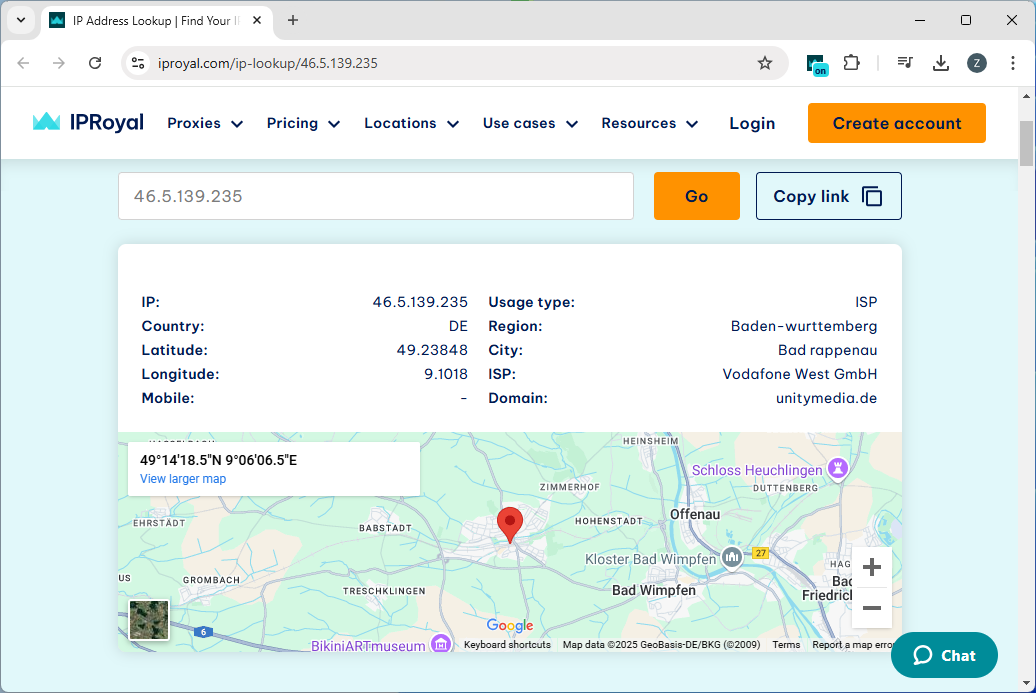
To see if your proxy is working properly, click the IP Lookup button (10).
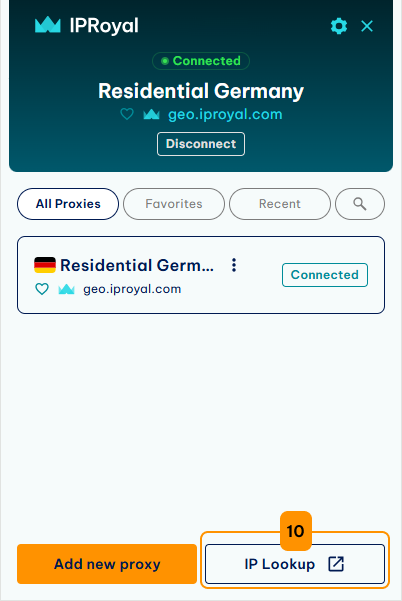
You’ll be directed to our free IP checker tool.
2. Advanced Proxy Profile Creation
If you’re looking for more customization, additional options are available. Simply click on the Advanced Settings button (1).
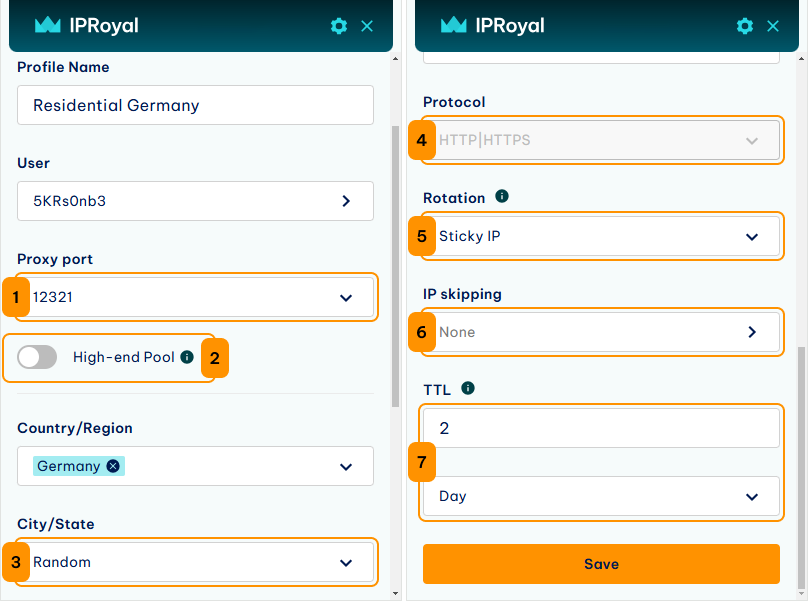
This will enable you to add the following features to your proxy profile:
- Proxy Port (1): select the port you want from the available options.
- High-end Pool (2): access faster and more stable proxies from the selected location. Please note that this option reduces the pool size to ensure the highest performance.
- City/State (3): refine the location of your proxies to a specific city or state within the selected country.
- Protocol (4): set the protocol based on the type of proxy type you’re using (HTTP|HTTPS or SOCKS5).
- Rotation (5): choose between sticky sessions and random IP rotation.
- IP skipping (6): specify if you want certain IP ranges to be automatically bypassed during proxy connections (more on IP skipping).
- TTL (7): - if using sticky sessions, specify the duration (time-to-live) of a session (in seconds, minutes, hours, or days).
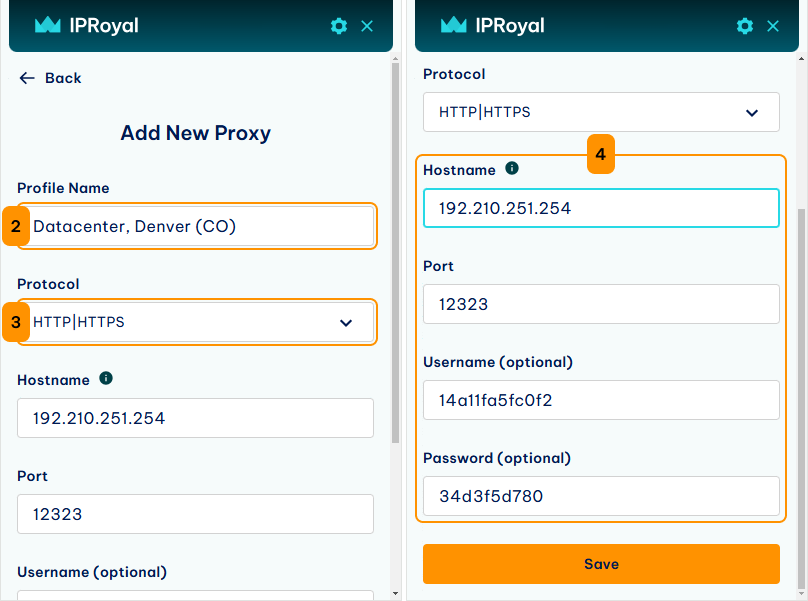
3. Manual Proxy Profile Creation
As mentioned above, you can also add your proxy details manually. You can use this option for our Datacenter, ISP, and Mobile proxies. You can also add proxies from other providers this way. To start, click the Manual Proxy button (1).
The process will remain the same with a few additional steps. As before, you’ll need to come up with a Profile Name (2) and choose your Protocol (3). You’ll also need to enter your proxy details (4). If you paste your details from the clipboard in the host:port:user:pass, the extensions will fill these fields automatically.
And that’s it!
Note
After adding profiles to your Proxy Manager, be sure to use our filters (5) for smoother and more efficient navigation.