Requests is the most popular Python library for interacting with web servers. It enables you to send HTTP requests just like you would using a browser, but in a more efficient way and allows for automation.
This guide will cover the various options and features that Requests has to offer. You’ll learn how to use Python to make requests to web pages and JSON APIs, as well as what things like HTTP status codes, HTTP methods, query parameters, what proxies are, and how to make use of them in Requests.
What Is the Python Requests Library?
Requests is a simple-to-use HTTP client library written in Python. It is used for sending HTTP requests to a server and receiving responses back.
The library works somewhat like a web browser. In fact, browsers are the most common HTTP clients. But they are made for visual browsing of websites, not for automated requesting of information.
For this reason, developers use libraries like Requests. They work much like browsers, but you don’t need to render the responses graphically, which saves a lot of processing power. In addition, they have extra features to automate your work.
Installing the Python Requests Library
To use the Requests library in Python, you first need to install it. This is done with the following command:
pip install requests
After that, you can import the library to use in your Python code. To import the library, you need to put the following at the top of a Python file:
import requests
Sending an HTTP Request to a Web Page
Let’s get started with the library and try to use Requests to download a web page. First, create a new file called example.py and open it in a code editor. Then paste in the following:
import requests

response = requests.get("https://www.google.com/")
print(response.text)
If you run the script with python3 requests.py, it will print out the HTML code behind Google’s main page.
<!doctype html><html itemscope="" itemtype="http://schema.org/WebPage" lang="lv"><head>...
This is the main function of the library. You can use it to send requests to web pages and receive responses. In this case, you asked the server for a web page, and it has returned it to you as a response.
Unfortunately, the Python Requests library doesn’t have built-in parsing functionality to work with the HTML received and find the things you need. For that, you need to use another library. The most common choice for this is Beautiful Soup.
We won’t cover how to do it in this tutorial, but you can read our Python web scraping guide to learn how you can use both Requests and Beautiful Soup to automatically extract information from websites.
Using Requests With JSON APIs
HTML pages are not the only resources that you can use the Requests library for. Another commonly used resource format is JSON (JavaScript Object Notation).
Here’s an example JSON message that contains information about a product:
{
    'id': 1,
    'title': 'iPhone 9',
    'description': 'Quite a nice smartphone.',
    'price': 549,
    'discountPercentage': 12.96,
    'rating': 4.69,
    'stock': 94,
    'brand': 'Apple',
    'category': 'smartphones',
}
HTML is used for web pages since they need to be rendered graphically. In contrast, JSON is more frequently used in APIs, which are connection points where a service can request information from another service. In contrast to HTML, the information returned is structured for use by computers, not humans.
As an example, you can call the mock API from DummyJSON that provides a fake dataset containing various products that can be used for testing purposes.
response = requests.get("https://dummyjson.com/products")
response_json = response.json()
This time, instead of reading the text attribute of a response, you need to call the .json() method. It will convert the response to a Python data type that you can easily interact with — a combination of lists and dictionaries.
If you print the response, you’ll be able to look at the data that the API gives and pick only the things that you need.
print(response_json)
# {'products': [{'id': 1, 'title': 'iPhone 9', 'description': 'An apple mobile which is nothing like apple',...
For example, if you want to print out only the titles and prices of the products, you can first access the list of products via the “products” key and then iterate over the items inside it like this:
response = requests.get("https://dummyjson.com/products")
response_json = response.json()

products = response_json["products"]

for product in products:
    print(f'{product["title"]} - - - {product["price"]}')
Running the code above should return a list of products like this one:
iPhone 9 - - - 549
iPhone X - - - 899
Samsung Universe 9 - - - 1249
OPPOF19 - - - 280
Huawei P30 - - - 499
MacBook Pro - - - 1749
Query Parameters
While working with the DummyJSON’s mock product API, you received a response that contains 30 items. But according to the website, the API can give information about 100 different items.
To access the other 70 products, you can use a query parameter. APIs frequently enable developers to add additional parameters to change the contents of a response according to their needs. These are listed at the end of the URL after a question mark (?) character. There can be multiple parameters. In this case, they are separated by &.
For example, you can use this URL to get information about all 100 products.
But constructing URLs by hand or concatenating strings can lead to mistakes and awkward-looking code.
Requests enables you to provide a params dictionary to a request. If you do, the library will add the query parameters to the end of the URL by itself when making the request.
response = requests.get(
    "https://dummyjson.com/products",
    params={'limit': 100}
)
This makes it easier to change the query parameters or add new ones.
HTTP Status Codes
The response from the server contains not only the information we request, but also some useful meta-information about the contents of the response.
One item that you should pay attention to is the status code of the response. A successful response will have a status code of 200.
response = requests.get(
    "https://dummyjson.com/products",
    params={'limit': 100}
)

# Returns "200"
print (response.status_code)
If you try to access a resource that isn’t there, you’ll get a status code of 404. In this case, you know that the contents of the response don’t contain what you need.
response = requests.get(
    "https://dummyjson.com/unicorns",
    params={'limit': 100}
)

# Returns "404"
print(response.status_code)
These are the two most common codes you’ll encounter, but there are many more. You can learn more about them on MDN Web Docs.
HTTP Methods
The HTTP protocol prescribes a set of methods that HTTP requests can use. So far, you have sent only GET requests, which request a certain resource.
But you can also use HTTP client libraries to send information to a server using the POST method. Or you can delete items on the server using the DELETE method.
Requests provides Python methods with the same names as the HTTP methods for these actions.
For example, you can use Requests to submit a new sneaker pair to the products API of DummyJSON. (Since it’s a mock API, it won’t show up for other users, of course.)
Here’s the Python dictionary containing information about the sneaker pair:
{
    'id': 101,
    'title': 'Limited edition sneakers',
    'description': 'Sneakers to die for.',
    'price': 200,
    'discountPercentage': 12,
    'rating': 4.85,
    'stock': 25,
    'brand': 'Snike',
    'category': 'footwear',
    'thumbnail': 'https://i.dummyjson.com/data/products/101/thumbnail.jpg',
    'images': ['https://i.dummyjson.com/data/products/101/1.jpg', 'https://i.dummyjson.com/data/products/101/2.jpg', 'https://i.dummyjson.com/data/products/101/3.jpg', 'https://i.dummyjson.com/data/products/101/thumbnail.jpg']
}
And you can send it via POST request like this:
response = requests.post(
    "https://dummyjson.com/products/add",
    json=limited_sneakers
)
If we provide the dictionary via the json parameter, the library will automatically convert it to JSON.
Similarly, you can delete items using the requests.delete() method.
response = requests.delete(
    "https://dummyjson.com/products/100"
)
How to Use Proxies With Requests
The Python Requests library can be used for many purposes: contacting your own HTTP server, consuming APIs from the internet, and also scraping web pages.
If you’re contacting someone else’s server, there may be cases where you want to mask your IP address. Usually, this happens when you’re doing web scraping, which is not liked by many site admins. APIs are made for automatic consumption, so much more is permitted there. Still, you might run into API usage limits as well.
For these cases, a proxy is a good solution to mask the source of the request. By adding a proxy to your request, it will first route the request to a different IP address and then send it to the server from there.
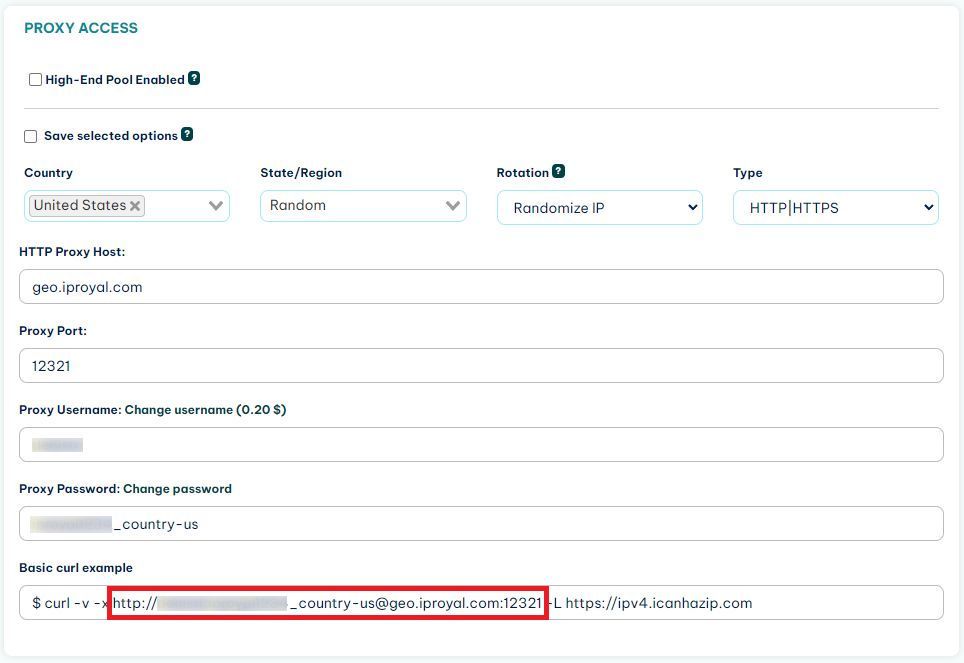
Adding a proxy to a Requests request is simple. The example will use IPRoyal residential proxies. They provide a single URL to contact that rotates IPs on every request, which makes it quick and simple to set them up.
First, you need to find the link you can use to connect to your proxy. If you’re using IPRoyal, you can find it in the dashboard that resides in the client area.

After you have found the link, you need to create a dictionary to hold it.
proxies = {
    'http': 'http://link-to-proxy.com',
    'https': 'http://link-to-proxy.com'
}
Then you can provide the dictionary to the proxies parameter of the requests.get() function.
response = requests.get(
    "https://dummyjson.com/products",
    proxies=proxies
)
This will ensure that your IP remains anonymous to the server that receives the request.
Authentication
Some web pages might be hidden behind an authorization barrier.
If you have the credentials to access these pages, you can add them to the requests sent to be able to access the pages.
Request functions have a parameter called auth, which enables support for authentication with options like HTTP Basic, HTTP Digest, OAuth, and more.
The authentication methods are signified by Python classes (HTTPBasicAuth, HTTPDigestAuth, etc.). To use HTTP authentication, you need to import the respective class from requests.auth.
from requests.auth import HTTPBasicAuth

Then you need to create an object with your credentials using the class.

basic = HTTPBasicAuth('user', 'pass')
Then you can use this object to authenticate a request:
This should lead to a positive response:
{
  "authenticated": true,
  "user": "user"
}
Conclusion
In this guide, you learned about the various features that the Python Requests library has to offer, as well as things like JSON, HTTP methods and status codes, proxies, and more. Requests is a tool that’s both simple to use and extremely versatile.
To try out your knowledge, you can use the library together with Beautiful Soup in a web scraping project. You can read a detailed tutorial on how to do that on our blog on web scraping with python.
Alternatively, there are many free JSON APIs available on the internet. You can try to find one that’s in a field that you’re interested in and use Requests to get information from it.


