'/%3e%3cellipse%20opacity='0.34'%20cx='327.5'%20cy='339'%20rx='264.5'%20ry='264'%20fill='url(%23paint1_linear_12724_35442)'/%3e%3cdefs%3e%3clinearGradient%20id='paint0_linear_12724_35442'%20x1='327'%20y1='-2.524e-06'%20x2='327'%20y2='389.286'%20gradientUnits='userSpaceOnUse'%3e%3cstop%20stop-color='%2327D9E5'/%3e%3cstop%20offset='0.927406'%20stop-color='%23004047'%20stop-opacity='0'/%3e%3c/linearGradient%3e%3clinearGradient%20id='paint1_linear_12724_35442'%20x1='328.02'%20y1='74.7771'%20x2='328.02'%20y2='395.312'%20gradientUnits='userSpaceOnUse'%3e%3cstop%20stop-color='%2327D9E5'/%3e%3cstop%20offset='0.927406'%20stop-color='%23004047'%20stop-opacity='0'/%3e%3c/linearGradient%3e%3c/defs%3e%3c/svg%3e)
How to Scrape Text From a Website Using Python (Beginner Tutorial)
TutorialsLearn how to create a simple text scraper. We provide instructions and code for beginners, including user-agent and proxy rotation features.

Eugenijus Denisov
Web scraping is an automated, highly efficient way to extract online data. It became even more crucial with the emergence of Large Language Model AI technology, which requires enormous datasets for training. LLMs also rely on web crawlers, but web crawling and web scraping are significantly different processes.
But even before the AI boom, scraping was widely deployed for market research, price comparison, and search engine optimization. All these use cases require text scraping. Whether these are public blogs and news sites for LLMs, or financial data for market sentiment analysis, it all consists of words and numbers that scrapers collect.
Of course, you can also scrape visual and audio data, but in this guide, we will focus on how to scrape text from websites. Below you will find beginner-level text scraping tips, from setting up a scraping environment to understanding website structure to adding proxies to maximize data gathering success rates.
Setting up the Environment
Modern web scraping is much more beginner-friendly. You don’t have to be an experienced data analyst or front-end developer to do it. There are numerous professional and beginner-friendly tools to help you out, but we recommend having at least basic Python knowledge or learning it as you go.
Python is the best choice because it’s the go-to programming language for scraping tasks. Start by downloading it from the official Python website for your operating system. The latest recommended version is 3.14.3. Also, make sure you select the standalone installer, which is a better option for web scraping.
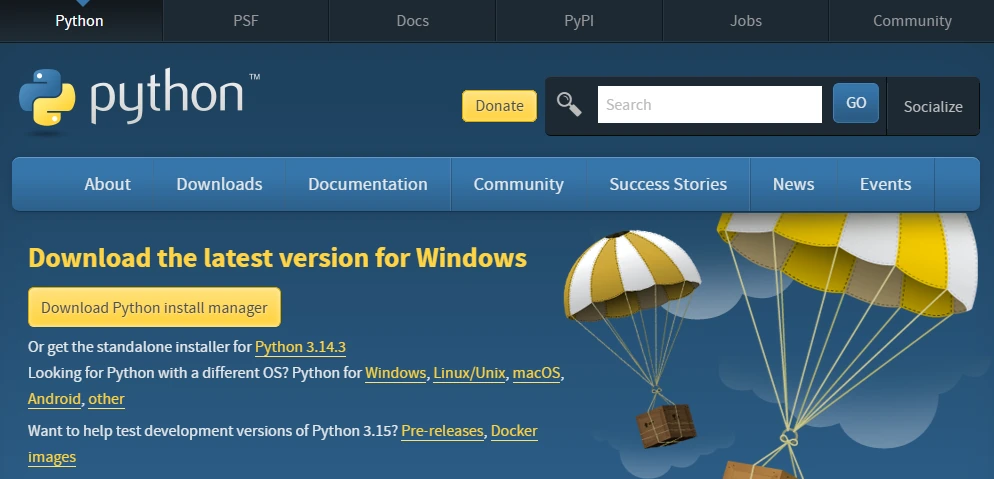
Launch the downloaded file and install Python. It is best to use the suggested installation directory. However, make sure to check the ‘Add python.exe to PATH’ box below. It allows you to run Python commands from the terminal, once again, essential for web scraping.
You should also download and install a preferred integrated development environment (IDE) tool for writing code. We will use Microsoft’s Visual Studio Code, but you’re free to choose yours. PyCharm is a great option, specifically designed for Python development.
In this guide, we will also use two additional Python tools that streamline specific scraping tasks. First, we will add the Requests library. When you scrape the web, you send HTTP requests to fetch data, but coding them from scratch is complex. Requests is valued highly for simplifying HTTP requests and is widely considered an essential scraping tool.
To install it, open the Command Prompt on Windows, then type the following:
pip install requests
macOS users type the following into the Terminal:
pip3 install requests
Notice we are using a specific pip command. It's Python's built-in package manager and is usually included automatically when installing Python, as is the case here.
Another Python library we will use is BeautifulSoup. When you scrape the web, you typically get huge blocks of text and the entire HTML code. Extracting the required information from there is tedious and time-consuming.
BeautifulSoup parses the data, transforming HTML into a structured tree. You can then inform your scraper to extract specific tags, CSS classes, and URLs. Type in the following line to install it:
pip install beautifulsoup4
macOS users type the following into the Terminal:
pip3 install beautifulsoup4
At this point, we highly recommend getting used to virtual environments. In many cases, you will use several Python libraries and frameworks. Some projects will require a newer version of your chosen add-on, while others will need an older one.
To prevent version conflicts, you can create a virtual environment for each project. Then you can install separate tools for each one and avoid global install issues. Type the following to create a virtual environment:
python -m venv venv
In this case, the terminal does not display any message. To verify that everything is set up correctly, use this com:
python -c "import requests; from bs4 import BeautifulSoup"
If everything is set up successfully, you will not get any messages. Otherwise, the Command Prompt will display a ModuleNotFoundError message or a different one outlining syntax errors, if there are any.
You're all set up to code your first simple text scraper.
Understanding the Structure of a Web Page
Another crucial bit of knowledge is understanding the structure of websites, the HTML code. It stands for Hypertext Markup Language, and it is a universal language for browsers. HTML instructs browsers where headings are, where to place images, where paragraphs go, and so on.
Along with HTML, all modern websites include CSS (Cascading Style Sheets) and JavaScript. The former applies style, like fonts and colors, while the latter adds interactivity, like clickable buttons, fillable forms, and dropdown menus. The more you learn about data scraping, the more you will use CSS and JavaScript elements to extract information. For this guide, we’ll focus on HTML.
It's easy to think of HTML as a set of boxes defined by tags. Here are seven tags often used for extracting data:
-
<a>tag is an anchor, and it stores URLs within it -
<h1>to<h6>tags are headings, h1 being the main title -
<p>is a paragraph tag -
<tr>is a row tag,<td>is a cell, and<table>is the whole table -
<div>is a container and specifies areas on the website.
So when you are extracting data, you can inform your scraper to fetch the main headings. Another example would be pricing data that is nested in a cell, so you will use the
<tr> row in the <table> box.
Let’s see how it looks in a real example. Let’s inspect the code of the Quotes to Scrape , a great mock-up website to learn the basics of scraping HTML documents.
Browsers allow inspecting code very easily. It is similar across all widely used browsers, like Chrome, Firefox, Edge, Brave, and others. Simply right-click on the element you want to analyze, and select the ‘Inspect’ option at the bottom. It will open the developers tools on the right side of the screen.
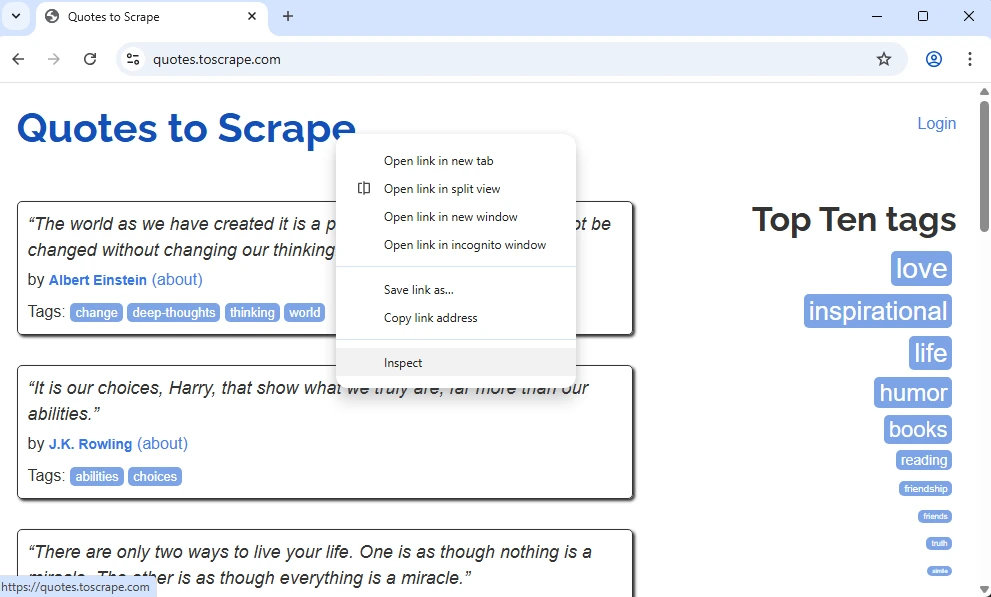
We have selected an element at the very top, likely to be an <h1> heading. Let’s see what’s on the display and break it down.
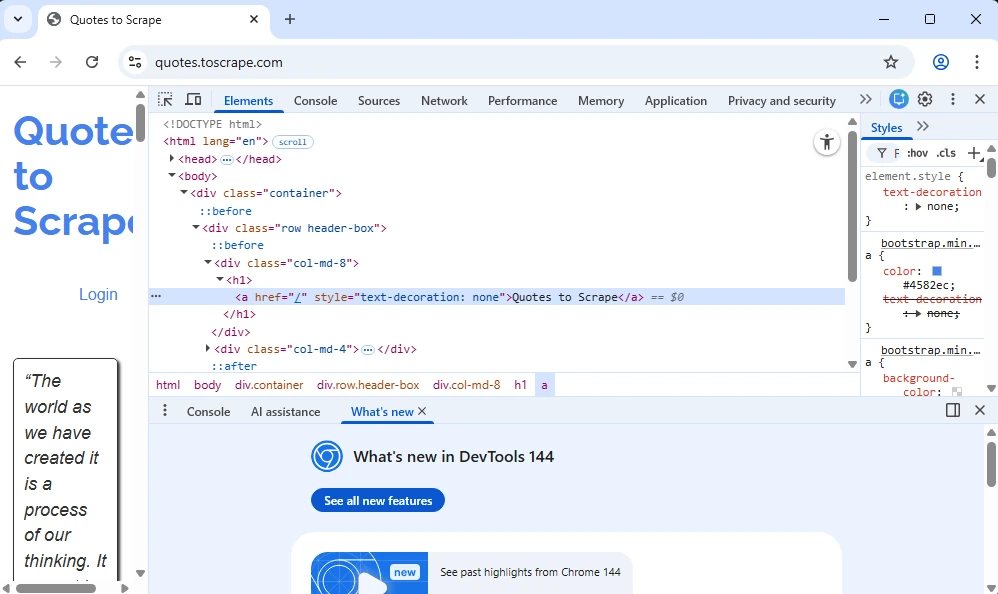
It is indeed an <h1> heading, but it also contains an <a> tag, because a URL is nested within it. Notice that it is also nested in a <div> tag that has a class attribute named ‘col-md-8’.
So there are at least three ways of fetching the information you need. You can instruct the scraper to fetch all <h1> tags. But you can also narrow it down by instructing to fetch <h1> tags only within <div> tags that have the ‘col-md-8’ class. Or you can instruct it to fetch only URLs within <a> tags.
As you can see, extracting data is largely about locating it and guiding your scraper to it. And that’s why understanding HTML structure is paramount. It lets you find the exact information you need. When large-scale scraping is used, it significantly increases data extraction speed and saves device resources and bandwidth.
Writing a Basic Text Scraper
In this chapter, we will show you how to code a simple text scraper. Once again, we will use the Quotes to Scrape as an example.
Firstly, right-click a quote and inspect it in the developers tools.
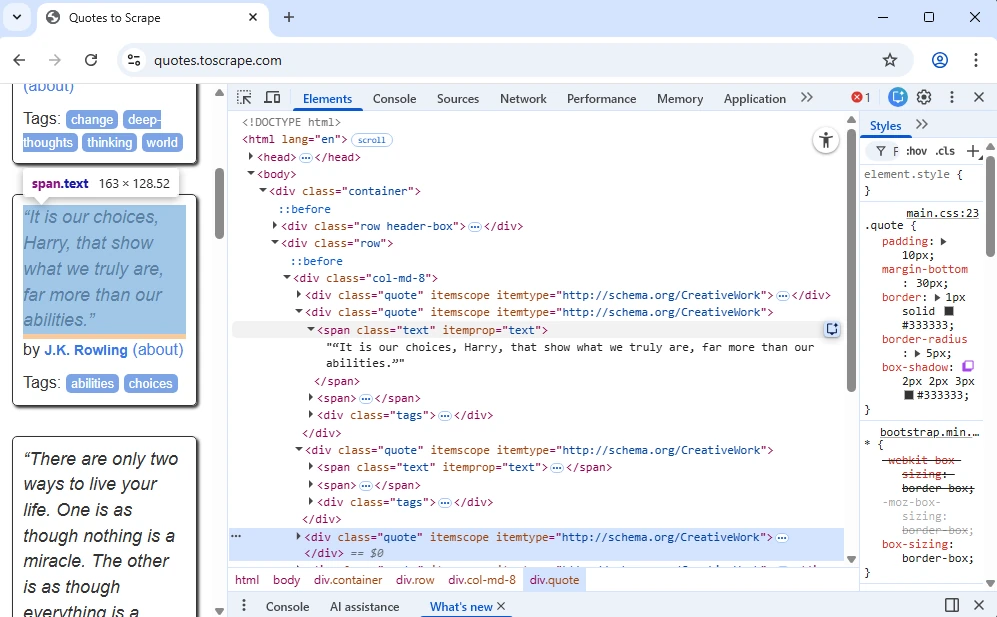
As you can see, quotes have a ‘span class=”text”’, which we will use in the code to fetch them. A <span> tag is similar to a
We will use the Requests library to send an HTTP GET request. BeautifulSoup library will parse the raw HTML file. We will instruct the scraper to find all tags that nest the quotes. And, lastly, get rid of the HTML code only to leave quotes in the results. This is the code we used:
import requests
from bs4 import BeautifulSoup

# 1. Send an HTTP GET request
url = "http://quotes.toscrape.com"
response = requests.get(url)

# 2. Parse the HTML content
soup = BeautifulSoup(response.text, "html.parser")

# 3. Locate target elements
quotes = soup.find_all("span", class_="text")
authors = soup.find_all("small", class_="author")

# 4. Extract and clean the text
for i in range(len(quotes)):
    print(f"QUOTE: {quotes[i].text}")
    print(f"AUTHOR: {authors[i].text}")
    print("-" * 20)
Let's break it down line by line.
First, we import the Requests library, then BeautifulSoup. This lets us send the HTTP GET request and then parse scraped data into an organized tree structure.
At #1, we define the target website and instruct the scraper to download it.
At #2, we instruct BeautifulSoup to parse the scraped data.
At #3, we instruct Python to go over the whole website and locate every element with the 'text' class.
At #4, we use a loop function to go over each element one by one and only extract the text.
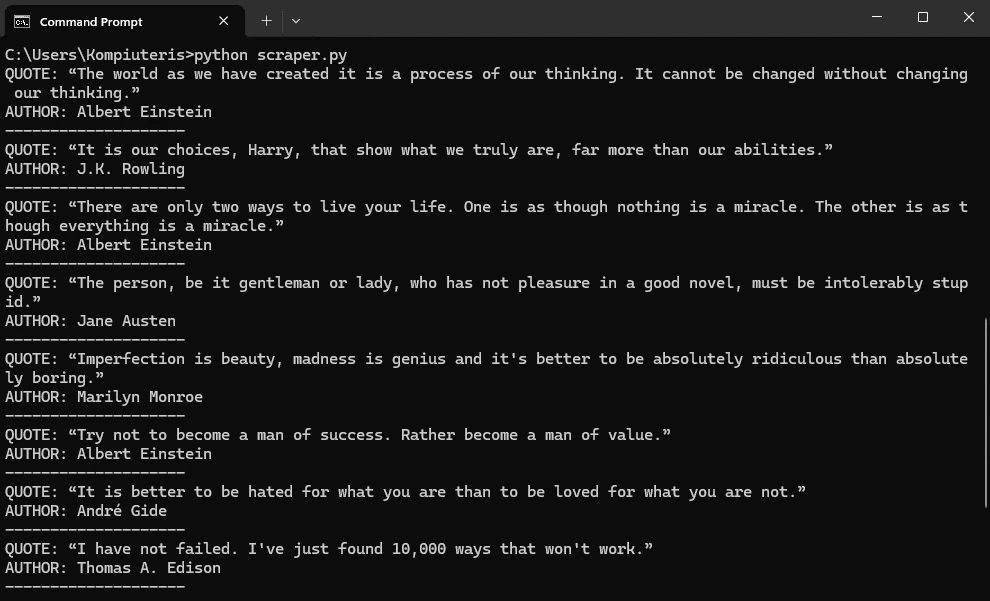
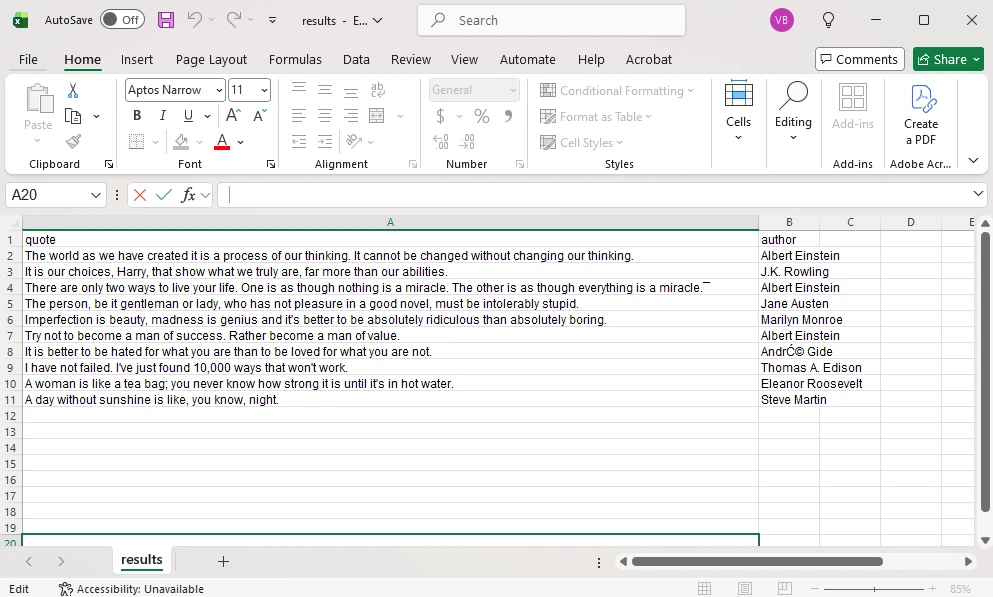
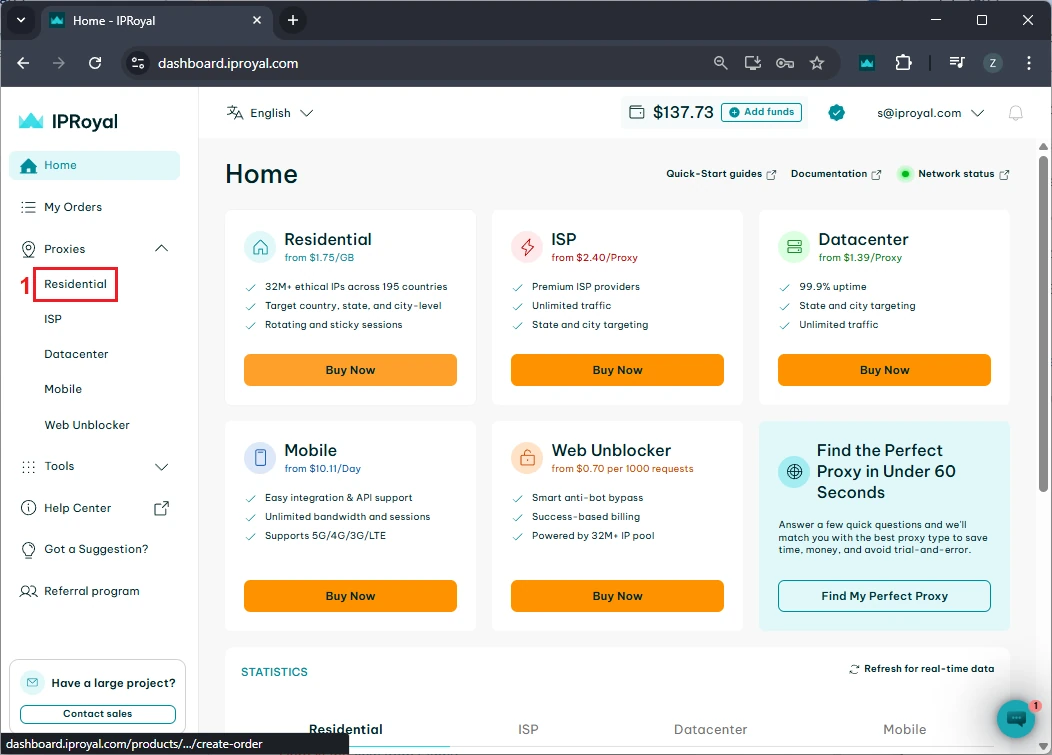
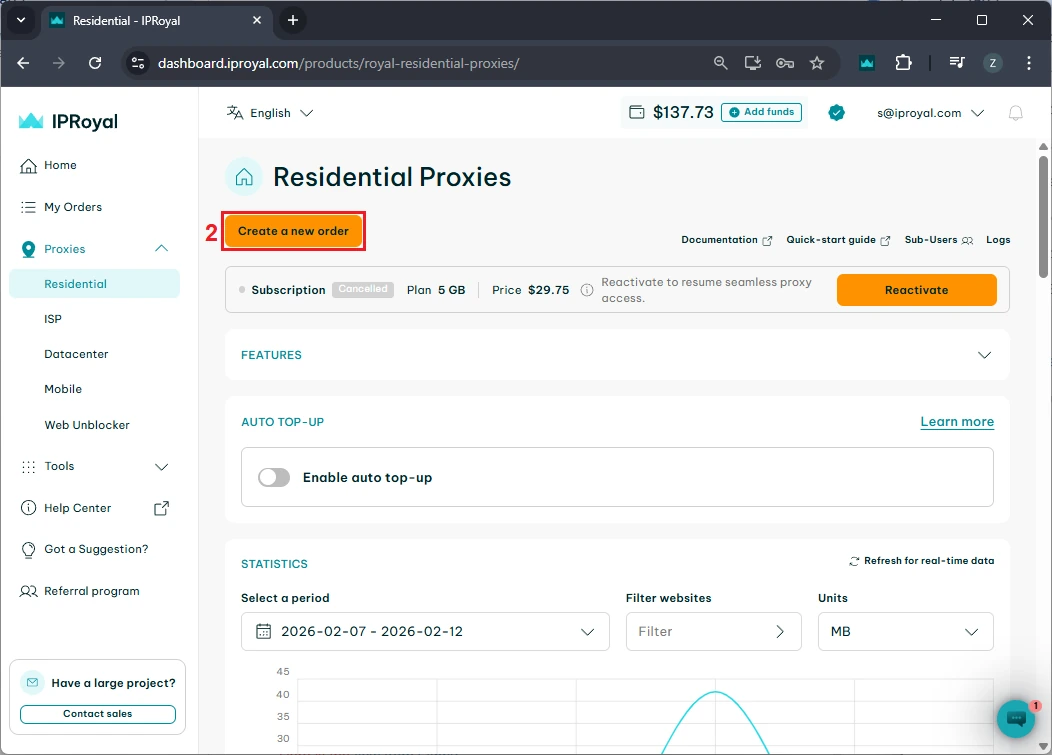
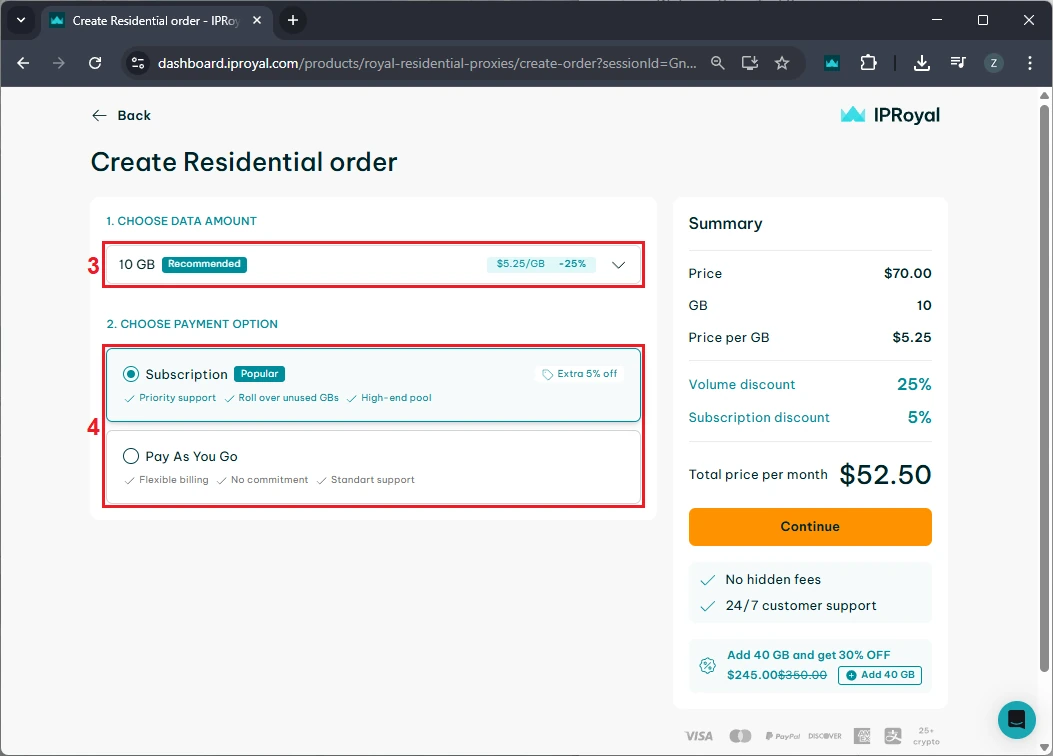
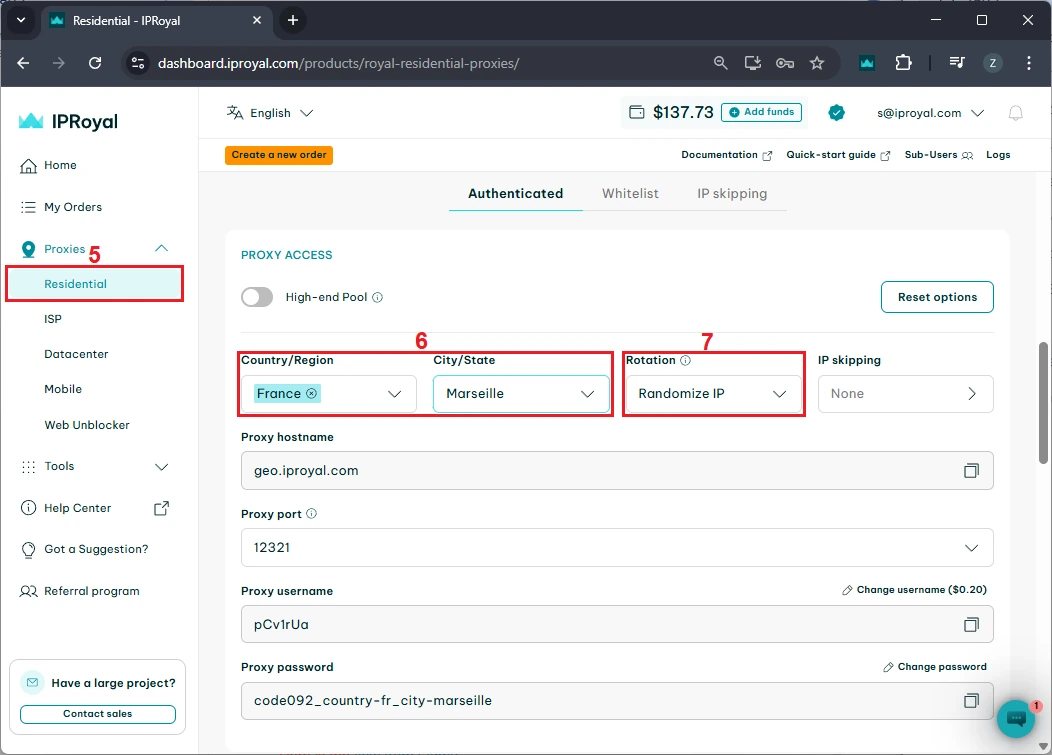
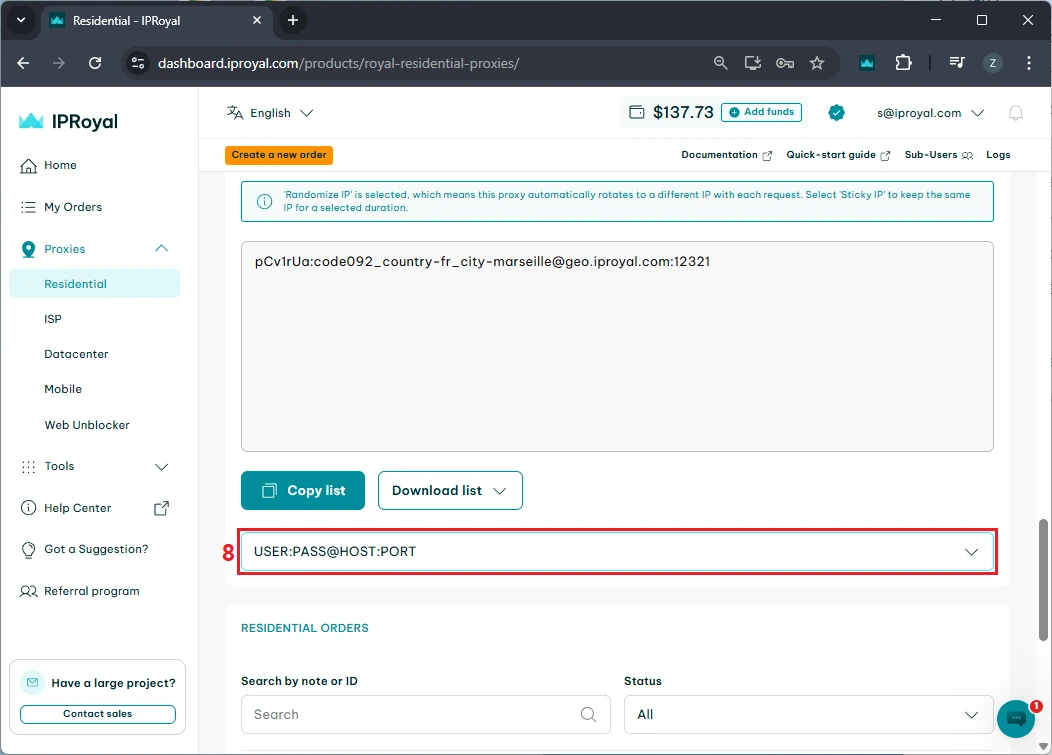
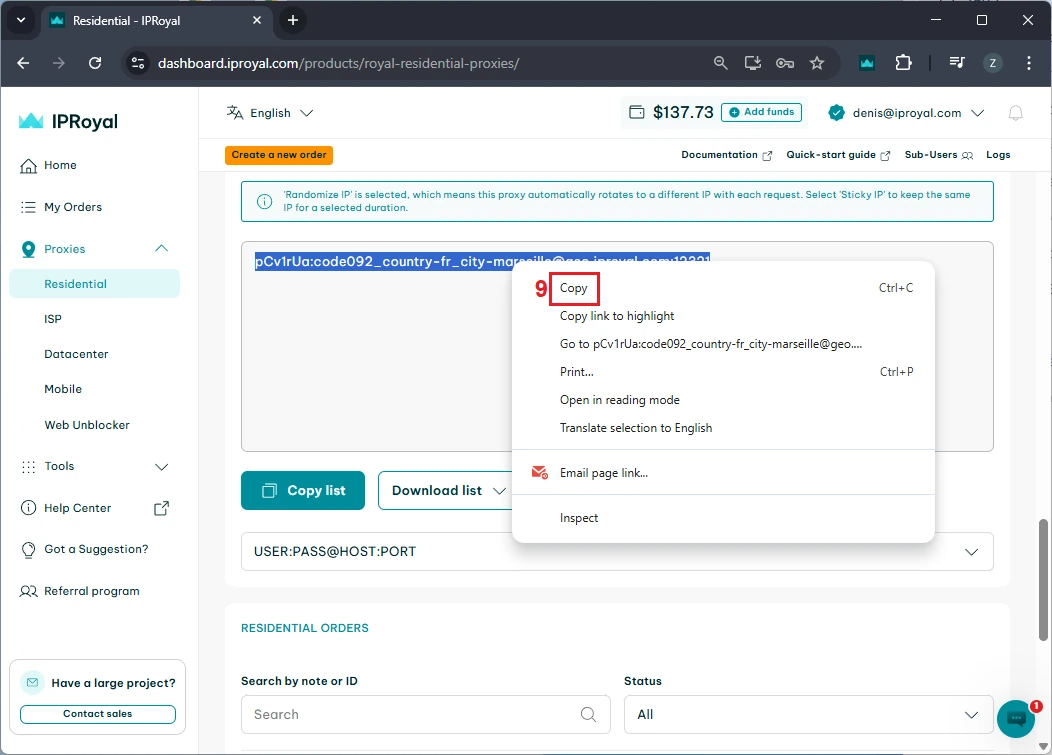
If you want to verify this works, make sure you have set up the scraping environment as explained above. Then, in your chosen IDE, create a file named 'mytextscraper.py', copy the code, and save it in the default directory (or your virtual environment, if you are already using it). Now, open the Command Prompt or Terminal and type: These are the results we get. Our simple scraper not only extracted the required quotes but also cleaned up the scraped data. The result is clear and human-readable text. Gathering online data is the first part, but you also need to save it. Scraped data is usually stored in CSV, JSON, and SQLite formats to make it ready for further use. We have updated the code to save the extracted data and commented on the new parts. Let's see how to store what we got in a CSV file, which can be imported into Microsoft Excel. First, we instruct Python to import the CSV module. Now, jump to comment #4. Above it, we added the 'scraped_data = []' line, which creates an empty list to store the quotes. Below, the 'scraped_data.append' is nested within a loop. It takes an author and a quote, combines them, and adds them to our empty list. The last segment of code that starts with 'with open' instructs Python to create a new CSV file and store author and quote data within it. This is how it looks imported into Microsoft Excel. At this point, you have made data available for further use. A data analyst working with Excel can now take your CSV file, import it, and use Excel tools to complete further tasks. Scraping, just like coding in general, is just as much about fixing code as writing it. Here are three common issues that many scraping specialists may encounter. To scrape data, the website must be online, and you must be allowed to access it. Otherwise, you may encounter errors 403 (blocked access), 404 (website not found), or 429 (too many requests). Here's how to check if your scraper connects successfully. This piece of code checks for a status code of 200, indicating that the client's request was successfully processed. Otherwise, it prints the error code, which you can inspect to determine the issue. Keep in mind that if you receive error 429, your scraper should be modified to comply with the website's rules. Our best web scraping practices guide covers this and other common issues. Sometimes you may lose connection, or the website may experience a brief downtime. In this case, you can use the try and except functions. Python now runs the code, and if there is an internet disconnect, it would stop the program and display errors without the except block. However, it now includes a fallback scenario under the 'except' statement, which allows the program to run and simply outlines where the error occurred. After you instruct the scraper where to fetch data, it will always look in the same location. But websites often change element placement, resulting in an error. Here's how to spot it: This is a simple 'if-else' statement, which you will use a lot in coding. Here, it checks if the element exists, and if not, it jumps to the 'else' statement to inform you that something has changed. In the vast majority of cases, you will have to use proxies to scrape the web. That's because websites defend against bots and may consider scrapers intrusive. Some websites also limit data access to maintain competitiveness. If you scrape without proxies, your IP may be blocked, resulting in error 403. We recommend using residential proxies to rotate IP addresses. This way, your scraper uses a different one for each HTTP request or according to your code. Our rotating residential proxies also assign a new IP address to each request, maximizing scraping success rates. Now, we will show you how to get our residential proxy and add it to your scraper. After that, we will provide code to add headers and rotate user agents, which mask your device details for an additional layer of undetectability. 1. Create an IProyal account and log in with your credentials. 2. Click the 'Residential' (1) tab on the left side. 3. Click the 'Create a new order' (2) button to purchase traffic. 4. Choose the desired amount of traffic (3), subscription plan (4), and finalize your order. 5. Click the 'Residential' (5) tab again and scroll down to the 'Proxy Access' section. Configure your proxy’s location (6) and rotation (7). We’ll use proxies from Marseille, France, which send each request from a new IP address. 6. Scroll down to the 'Formatted Proxy List' section. Change your proxy format (8) to USER:PASS@HOST:PORT. 7. Finally, copy (9) the proxy string to your clipboard. Now we will show you how to add a proxy to the text scraper. Here’s the complete code: First, we import random, which allows Python to choose a random user agent from the list below. A user-agent is a string with your device's specifics. If you want to mask your scraper to avoid detection and blocks, you must modify your user-agents alongside switching IP addresses. At #1, we specify three user-agent strings and instruct Python to randomly select one at #2. In comment #3, we used our proxy credentials from IPRoyal, and this is where you will enter yours. Keep in mind Python requires 'protocol://user:pass@host:port' format. Here's what it means: Lastly, at #4, we add proxy and header details to our HTTP requests, and the rest of the code remains unchanged. You now have a simple text scraper that packs some advanced features. It randomly selects one of three user-agents, and you can easily add more. It uses a rotating residential proxy server, so each of your scraping requests has a different IP address. Your scraper also parses the results and saves them in a CSV file. Even though large-scale scrapers are much more complex, you have built very solid foundations. To improve further, we recommend checking out the Selenium and Playwright libraries widely used for browser automation. It allows scraping highly complex websites, and that's what you're aiming for. python mytextscraper.py
Saving Scraped Text to a File
import requests
from bs4 import BeautifulSoup
import csv  # NEW IMPORT

url = "http://quotes.toscrape.com"
response = requests.get(url)

soup = BeautifulSoup(response.text, "html.parser")

quotes = soup.find_all("span", class_="text")
authors = soup.find_all("small", class_="author")

# NEW: Store data in CSV
scraped_data = []

# 4. Extract and clean the text
for i in range(len(quotes)):
    quote_text = quotes[i].text
    author_name = authors[i].text

    # Show the results in the terminal
    print(f"QUOTE: {quote_text}")
    print(f"AUTHOR: {author_name}")
    print("-" * 20)

    # Save each pair into our list as a dictionary
    scraped_data.append({"quote": quote_text, "author": author_name})

# NEW: Save data to a CSV file
# This creates a file called 'results.csv'
with open("results.csv", "w", newline="", encoding="utf-8") as f:
    writer = csv.DictWriter(f, fieldnames=["quote", "author"])
    writer.writeheader()
    writer.writerows(scraped_data)

print("Data saved to results.csv")
Handling Common Scraping Issues
Status Code Errors
response = requests.get(url)

if response.status_code == 200:
    print("Success! The website is open.")
else:
    print(f"Error! Could not open site. Code: {response.status_code}")
Try and Except Functions
try:
    response = requests.get(url)
    #your code goes there
except:
    print("Something went wrong with the internet connection.")
Handling Website Changes
element = soup.find("span", class_="text")

if element is not None:
    print(element.text)
else:
    print("Element not found, the website has changed.")
Adding Headers and Proxies

import requests
from bs4 import BeautifulSoup
import csv
import random

url = "http://quotes.toscrape.com"

# 1. List of user-agents to rotate
user_agents = [
    "Mozilla/5.0 (Windows NT 10.0; Win64; x64) Chrome/119.0.0.0",
    "Mozilla/5.0 (Macintosh; Intel Mac OS X 10_15_7) Safari/537.36",
    "Mozilla/5.0 (X11; Linux x86_64) Firefox/120.0"
]

# 2. Pick a random user-agent
headers = {"User-Agent": random.choice(user_agents)}

# 3. Proxy configuration
proxies = {
    "http":
"http://pCv1rUa:[email protected]:12321",
    "https":
"http://pCv1rUa:[email protected]:12321"
}

# 4. Send request with headers and proxies
response = requests.get(url, headers=headers, proxies=proxies)

soup = BeautifulSoup(response.text, "html.parser")

quotes = soup.find_all("span", class_="text")
authors = soup.find_all("small", class_="author")

scraped_data = []

for i in range(len(quotes)):
    quote_text = quotes[i].text
    author_name = authors[i].text

    print(f"QUOTE: {quote_text}")
    print(f"AUTHOR: {author_name}")
    print("-" * 20)

    scraped_data.append({"quote": quote_text, "author": author_name})

with open("results.csv", "w", newline="", encoding="utf-8") as f:
    writer = csv.DictWriter(f, fieldnames=["quote", "author"])
    writer.writeheader()
    writer.writerows(scraped_data)

print("Data saved to results.csv")
Section
Value
Protocol
http:// or https://
User
Your IPRoyal proxy username
Pass
Your IPRoyal proxy password
Host
Your IPRoyal proxy hostname
Port
Your IPRoyal proxy port
Conclusion