Web Crawling With Python
Python

Vilius Dumcius
Search engines like Google and Bing enable us to search for information in virtually any page on the internet. But have you ever wondered how they manage to always have the contents of pages at hand?
Turns out, search engines are one of the biggest users of a technique called web crawling. They use special robots called web crawlers to continuously go through available pages on the internet. These robots follow links from page to page, indexing the contents of the pages and analyzing their links.
This article will show you how to start web crawling with Python using Scrapy , a free and open-source web scraping framework. While your web crawler won’t crawl the entire internet, it will be able to crawl a small subset of Wikipedia.
What Is Web Crawling?
Web crawling is the act of systemically going through one or more websites in an automated manner. It’s done with the help of web crawlers (also called spiders) — bots that find links in web pages and follow them.
Web Crawling vs. Web Scraping
While the terms “web crawling” and “web scraping” are frequently used interchangeably, they mean two different (yet connected) activities.
Web crawling is about discovering new links (URLs), while web scraping is about extracting information from a web page. Most of the time, you’ll use both of these techniques in a data extraction project.
Usually, the end result of web crawling is just a list of urls and/or complete pages, while the end result of web scraping is a much more structured dataset.
Where Is Web Crawling Used?
Search engines like Google are the biggest users of web crawlers. To bring the best results to the users, they need to index and store a replica of the internet. Then, they use algorithms and machine learning on this replica to rank the best answers to any given search engine query.
But web crawling can be useful for many other use cases. For example, imagine you’re creating a price comparison website. You might want to crawl a bunch of ecommerce websites, and then periodically scrape these pages for prices and other valuable information to show the best deals.
Web Crawling With Python and Scrapy
In this tutorial, you’ll learn how to crawl a subset of Wikipedia with Python and Scrapy.
You’ll create a script that can find all the articles that can be accessed by 2 clicks from a Wikipedia page of your choosing. In other words, you’ll find the pages that are 2 degrees apart from any given Wiki page.
Requirements
For this tutorial, you’ll need Python installed on your computer. If you don’t have it, you can download it from the official website .
You’ll also need to install Scrapy:
pip install scrapy
It’s suggested to have some experience with web scraping before doing this tutorial.
How to Create a Web Crawler
First, create a new Scrapy project using the following command:
scrapy startproject wiki
The command will create a directory called wiki and scaffold a Scrapy project with the following structure:
.
├── scrapy.cfg
└── wiki
├── __init__.py
├── items.py
├── middlewares.py
├── pipelines.py
├── settings.py
└── spiders
└── __init__.py
You need to create a new file called wiki.py in the spiders folder and open it in a code editor.
Inside the file, you’ll import all the necessary Scrapy modules, as well as the re module for handling regexes.
from scrapy.spiders import CrawlSpider, Rule
from scrapy.linkextractors import LinkExtractor
import re
In Scrapy, spiders (or crawlers) are defined by classes . Their class attributes and methods describe how the crawler operates.
To create a Wikipedia spider, you need to define a new class called WikiSpider that inherits from the CrawlSpider class that Scrapy provides.
class WikiCrawler(CrawlSpider):
For this task, you’ll need to define 4 attributes: name, start_urls, rules, and DEPTH_LIMIT.
You can set the name to “wiki”, and start_urls to a link of a Wikipedia article of your choice.
name = 'wiki'
    start_urls = ['https://en.wikipedia.org/wiki/Lord_of_Light']
The rules attribute is a bit more complicated. It tells the crawler on which links to act and what to do with those links.
This is the rules attribute you need to use for crawling Wikipedia:
rules = (Rule(LinkExtractor(
        allow="https://en.wikipedia.org/wiki/.*",
        deny=["Category:", "Talk:", "Wikipedia talk:", "Wikipedia:", "Help:", "Special:", "Portal:", re.escape("https://en.wikipedia.org/wiki/Main_Page")]),
        callback='parse_item',
        follow=True),)
It consists of one large Rule object. Let’s go through it step by step.
- The first part of the Rule object is a link extractor , an object that is responsible for extracting the links that you want. It has two arguments: allow and deny.
- allow contains a regex pattern that matches the links that the link extractor should act upon.
- deny contains regex patterns that match links that the link extractor should ignore. It has higher precedence than allow, so you can allow all /wiki/ links and then deny the special non-article sites.
- The callback argument contains a function that should be run on the responses from links that crawler extracted.
- The follow argument signifies whether you want the crawler to continue crawling from the links that are extracted.
The ruleset is arguably the most complex part of this web crawler. Writing rulesets for crawlers might take some time to get used to, but it enables you to easily specify how the crawler should act without writing long and convoluted lines of Python code.
The final attribute is the depth limit. It will make sure that the crawler doesn't crawl links that are more than two pages apart from the original page.
custom_settings = {
        "DEPTH_LIMIT": 2
    }
To finish the spider, you need to write a callback function: parse_item. This is the function that is responsible for parsing the pages you crawl and returning some output. In other words, this is the place to put any scraping logic that you want your spider to execute.
parse_item will extract the title and the URL of the page and return a dictionary with both of these values.
def parse_item(self, response):
        title = response.css('title::text').get().split(" - Wikipedia")[0]
        url = response.url
        yield {'title': title, 'url': url}
Notice that we’re using yield instead of return here. Scrapy is asynchronous: your requests are scheduled and executed concurrently.
Here’s the full web crawler code:
from scrapy.spiders import CrawlSpider, Rule
from scrapy.linkextractors import LinkExtractor
import re

class WikiCrawler(CrawlSpider):
    name = 'wiki'
    start_urls = ['https://en.wikipedia.org/wiki/Lord_of_Light']


    rules = (Rule(LinkExtractor(
        allow="https://en.wikipedia.org/wiki/.*",
        deny=["Category:", "Talk:", "Wikipedia talk:", "Wikipedia:", "Help:", "Special:", "Portal:", re.escape("https://en.wikipedia.org/wiki/Main_Page")]),
        callback='parse_item',
        follow=True,),)

    custom_settings = {
        "DEPTH_LIMIT": 2
    }

    def parse_item(self, response):
        title = response.css('title::text').get().split(" - Wikipedia")[0]
        url = response.url
        yield {'title': title, 'url': url}
Technically, the crawler is complete. But it’s not quite ready for the real world since it’s bound to get noticed and banned by the Wikipedia servers due to too frequent bot requests.
There are two solutions for that. The first is to introduce a delay of around a second or so for each page. You can do that by going to the settings.py file of the project and adding a DOWNLOAD_DELAY setting.
DOWNLOAD_DELAY = 1
The second solution is to use a set of proxies. Proxies can mask the fact that all the requests come from one party and enable you to make more requests per second. For example, if you have four proxies, you can request 4 pages per second. This amounts to one page for each proxy per second, which shouldn’t raise an alarm.
In addition, proxies are a great boon even if you do get banned. If a proxy gets banned from a certain site, it doesn’t really impact you much, you can get another one. But you wouldn’t want your own computer to be banned from Wikipedia, wouldn’t you?
Some proxy providers like IPRoyal provide a proxy that changes your IP on every request. In a sense, you can think of it as an infinite source of proxies.
Let’s see how you can add an IPRoyal proxy to your script.
How to Add a Proxy to a Scrapy Spider
In this part, you’ll learn how to add a proxy to a Scrapy crawler.
As an example, we’ll use IProyal residential proxies . These are great for web scraping projects because they take care of rotating your IP on every request. In addition, they are sourced from a diverse set of locations. So it’s hard for website owners to detect your web scraping activities when you’re using them.
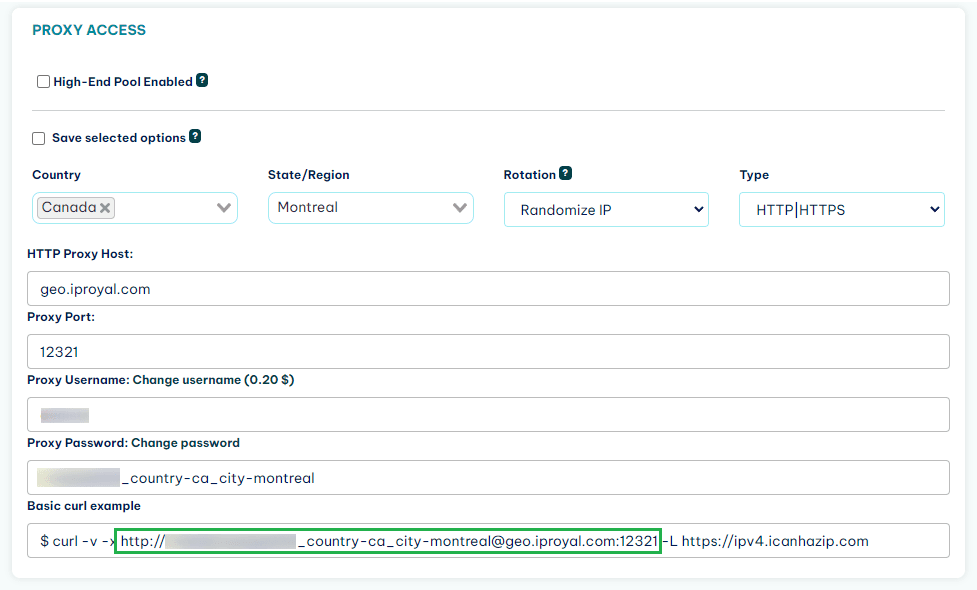
To use your proxy in Scrapy, you’ll need your proxy access link. If you’re using an IPRoyal proxy, you can find it in the web dashboard.
Be careful! A proxy access link contains your username and password, so it should be handled sensitively.
The simplest (and safest) way to use a proxy in Scrapy is to add it as an environment variable in the terminal you’ll use to launch the spider. Scrapy automatically scans for environment variables called “http_proxy” and “https_proxy” and uses them.
Adding a proxy link to an environment variable also means that you won’t leak it if you share your crawler’s code with someone else or upload it on GitHub.
The way to do this differs according to the shell you have. In a Linux shell, you can use the export keyword.
export http_proxy="http://username:[email protected]:12321"
export https_proxy="http://username:[email protected]:12321"
And that’s all you need to do. Now you can run the script. The command below will run the spider and save all the pages crawled in a JSON file called pages.json. (It will take some time to run.)
scrapy crawl wiki -o pages.json
Conclusion
In this article, you learned how to write a web crawler in Python using the Scrapy framework. You also learned how to add proxies to your spider, which are absolutely necessary if you want to do large-scale scraping and web crawling with Python.
Scrapy is a good tool for most web crawling and web scraping cases. The only downside is that it doesn’t work very well with JavaScript-heavy sites. If you plan to scrape or crawl those, other free web scraping tools might be more applicable.
FAQ
Why should you use Scrapy for web crawling instead of Requests/Beautiful Soup?
Most basic web crawling tasks can be done with either Scrapy or Requests + Beautiful Soup.
But Scrapy has multiple advantages over Beautiful Soup. It’s a framework that’s built for web crawling and scraping, while Beautiful Soup is just a library for parsing HTML.
Here are some of its advantages:
- It enables you to execute multiple requests at the same time, decreasing the time spent crawling.
- It removes the need to write a lot of boilerplate for basic scraping actions.
- It has built-in tools for error handling, which are very valuable for larger jobs.
Is Scrapy beginner-friendly?
While not very hard to use, Scrapy does demand some previous Python and scraping knowledge. There are quite a lot of basic tutorials out there, but you need to read documentation to be able to use it for non-basic use cases. And the documentation.. could be better, which means you might also need to dip inside code.
So if you’re just starting out with Python and web scraping, it’s better to try out working with a more basic tool like BeautifulSoup.
Can I put the result of a Scrapy crawl in a XML or CSV file?
Yes, absolutely. You just need to change the file extension of the output file when you run the crawl command.
Here’s the command for XML output:
scrapy crawl wiki -o pages.xml
And here’s the command for CSV output:
scrapy crawl wiki -o pages.csv