'/%3e%3cellipse%20opacity='0.34'%20cx='327.5'%20cy='339'%20rx='264.5'%20ry='264'%20fill='url(%23paint1_linear_12724_35442)'/%3e%3cdefs%3e%3clinearGradient%20id='paint0_linear_12724_35442'%20x1='327'%20y1='-2.524e-06'%20x2='327'%20y2='389.286'%20gradientUnits='userSpaceOnUse'%3e%3cstop%20stop-color='%2327D9E5'/%3e%3cstop%20offset='0.927406'%20stop-color='%23004047'%20stop-opacity='0'/%3e%3c/linearGradient%3e%3clinearGradient%20id='paint1_linear_12724_35442'%20x1='328.02'%20y1='74.7771'%20x2='328.02'%20y2='395.312'%20gradientUnits='userSpaceOnUse'%3e%3cstop%20stop-color='%2327D9E5'/%3e%3cstop%20offset='0.927406'%20stop-color='%23004047'%20stop-opacity='0'/%3e%3c/linearGradient%3e%3c/defs%3e%3c/svg%3e)

It's a common misconception that Ubuntu Linux is just for programmers or tech experts. Even advanced Ubuntu proxy integration isn't more complicated than in Windows or macOS systems. In some regards, it might even be more convenient to use Ubuntu for various networking, development, or automation tasks.
Why Set Up a Proxy on Ubuntu?
As with any other operating system, proxy servers bring privacy, access, and performance benefits to Ubuntu. Once set up system-wide or for a particular application, it will route the traffic and change your IP address, which brings many benefits.
- Privacy and anonymity. It's much more difficult for third parties to track your online activity if you use IP addresses from proxies.
- Access control. A proxy server will allow you to bypass regional and other restrictions that might be imposed on your original IP address.
- Performance. Proxies speed up the loading of services and improve performance in other ways in various scenarios.
Proxy servers are especially beneficial in tasks like web scraping, automation, and testing. Such uses are common with Ubuntu (and Linux in general) users. Proxies allow you to run necessary scripts and bots that would be limited otherwise.
Types of Proxies Compatible with Ubuntu
While there are some differences in configuration and compatibility, all major proxy protocols are compatible with Ubuntu systems.
- HTTP/HTTPS proxy servers work with most web-based apps. The HTTPS proxy version should be preferred as it's more secure. HTTP is recommended only if HTTPS is not supported.
- SOCK5 proxies support TCP and UDP, work with most applications and command line tools. Recommended for most scraping, development, networking, or other tasks.
Both residential and datacenter proxies are suitable for use with Ubuntu systems, although the choice rests on your use case. Residential proxies stand out for the legitimacy of their IP addresses. They should be preferred for tasks like multi-accounting, bypassing geo restrictions, and difficult web scraping targets.
For most networking, automation, development, or similar use cases, datacenter proxies are a better choice. They are generally faster while supplying you with more IP addresses for the same price. In some cases, mobile proxies are needed to access mobile-only content.
Ubuntu Proxy Setup via System Settings (GUI)
We'll use IPRoyal's residential proxies as a setup example. All the required details for configuring proxy settings in Ubuntu can be found in the dashboard, as shown below. Replace the placeholders with them in the following steps.
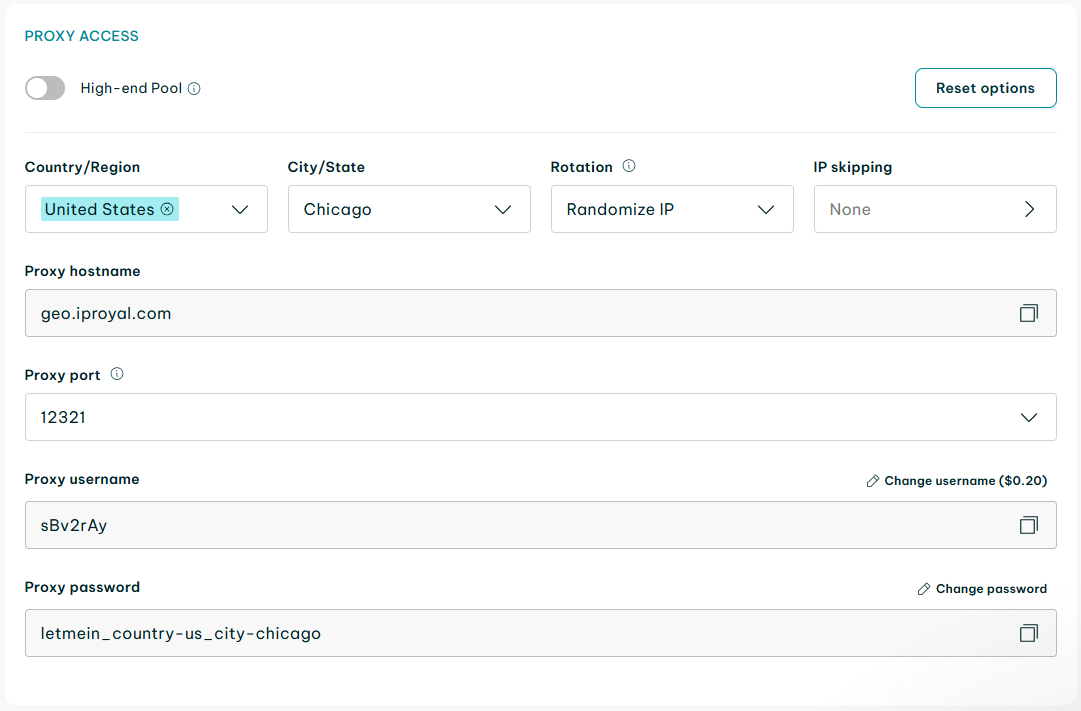
In case you need more detailed information on purchasing and setting up residential proxies, check out our quick start guide. Once you have the proxy credentials, you can set up proxies in Ubuntu's settings following the steps below.
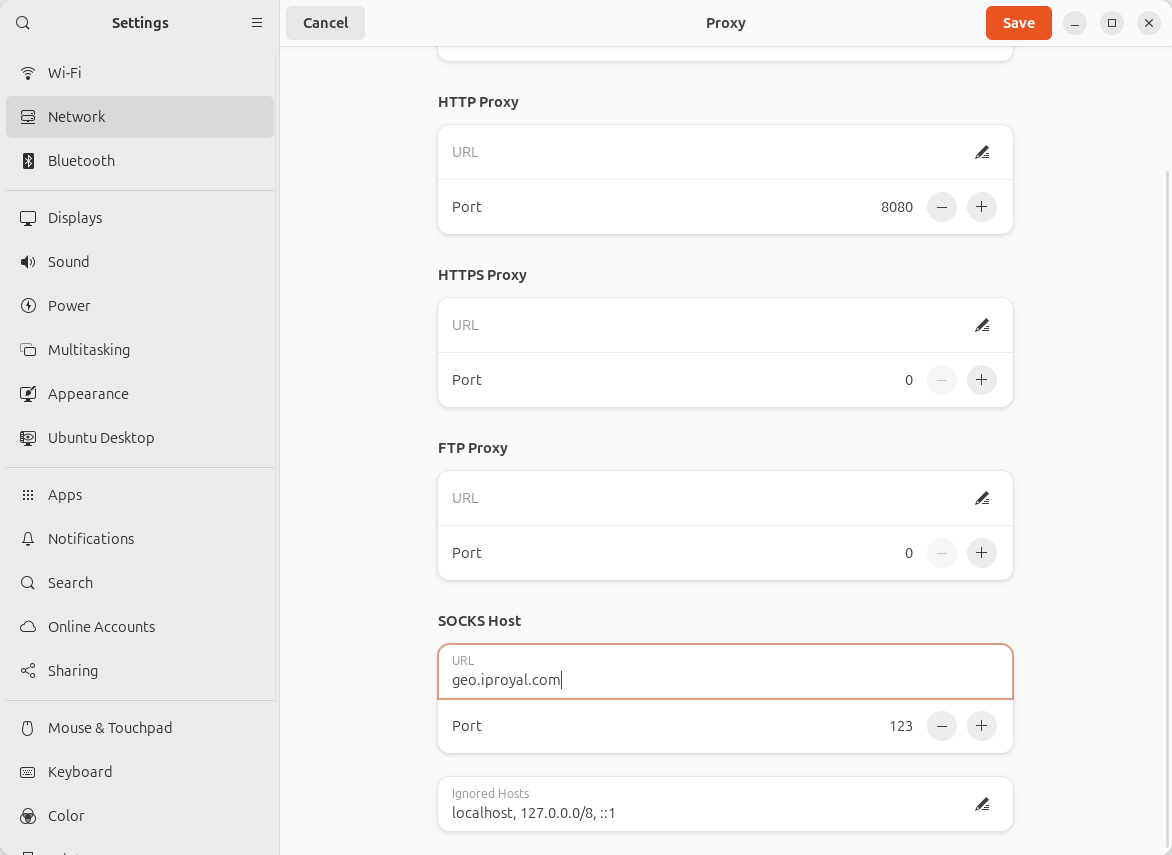
- Click on the system menu in the top-right corner and press on the Settings icon.
- Find Network and click on proxy.
- Toggle the Network proxy option to ON in the network proxy window.
- Set network proxy configuration to Manual.
- Find your proxy type from the list and enter the proxy details there.
- Save.
Proxies might require username and password authentication. You'll be prompted to enter them when an application, such as the Mozilla Firefox browser, sends the first request. Alternatively, you can set up IP whitelisting authentication.
These steps will ensure that all applications, such as your browser or the software center, will use a proxy server connection. The settings will persist until you change them again, but they will not apply to terminal applications like cURL or APT.
Set Up Proxy Using Environment Variables
Temporary proxy in the terminal
Another way to set up proxy servers in Ubuntu is by using the terminal. The commands for both temporary proxy configurations are quite similar to the steps for macOS.
- Press the Activities Overview button in the lower left corner. Select a terminal from the list (or type in Terminal).
- If you're using HTTP/HTTPS proxies, use the following commands.
export http_proxy="http://PROXY_HOST:PROXY_PORT"
export https_proxy="http://PROXY_HOST:PROXY_PORT"
If you use SOCKS5 proxies, enter these commands:
export http_proxy="socks5://PROXY_HOST:PROXY_PORT"
export https_proxy="socks5://PROXY_HOST:PROXY_PORT"
3. Your proxies might require username and password authentication. If that is the case, include it in the export command as such.
export http_proxy="http://USERNAME:PASSWORD@PROXY_HOST:PROXY_PORT"
export https_proxy="http://USERNAME:PASSWORD@PROXY_HOST:PROXY_PORT"
Authentication for SOCKS5 proxies works in a similar way:
export http_proxy="socks5://USERNAME:PASSWORD@PROXY_HOST:PROXY_PORT"
export https_proxy="socks5://USERNAME:PASSWORD@PROXY_HOST:PROXY_PORT"
4. Finally, you can verify whether the proxy variables are set correctly using the following command:
env | grep -i proxy
These steps set a proxy for Ubuntu only in the current terminal session. Once it's closed, the proxy settings will need to be reinstated. Follow the steps below if you need to set proxies in Ubuntu permanently.
Permanent proxy in terminal
To set up a permanent proxy for your Ubuntu system, you will need to edit the .bashrc file by setting environmental variables there.
- Press the Activities Overview button in the lower left corner. Select a terminal from the list (or type in Terminal).
- Start with the following command, which opens the .bashrc file:
sudo nano ~/.bashrc
3. Then, edit the file by running the relevant export commands as in the steps for the temporary proxy. Here are the commands for an HTTP/HTTPS proxy:
export http_proxy="http://PROXY_HOST:PROXY_PORT"
export https_proxy="http://PROXY_HOST:PROXY_PORT"
The SOCKS5 commands are also the same:
export http_proxy="socks5://PROXY_HOST:PROXY_PORT"
export https_proxy="socks5://PROXY_HOST:PROXY_PORT"
4. In case your proxies require authentication, username and password can be added to the commands as well. Examples for HTTP/HTTPS and SOCKS5 proxies:
export http_proxy="http://USERNAME:PASSWORD@PROXY_HOST:PROXY_PORT"
export https_proxy="http://USERNAME:PASSWORD@PROXY_HOST:PROXY_PORT"
export http_proxy="socks5://USERNAME:PASSWORD@PROXY_HOST:PROXY_PORT"
export https_proxy="socks5://USERNAME:PASSWORD@PROXY_HOST:PROXY_PORT"
5. Lastly, you need to save the .bashrc file and exit the settings.
source ~/.bashrc
These steps will configure proxies permanently for the user who runs them. It includes both the apps and settings of Ubuntu as well as various command-line tools.

Configure APT to Use a Proxy
The Advanced Package Tool (APT) is a convenient package manager for Debian-based Linux systems like Ubuntu. Mainly used for software management, it might require specific proxy servers for installing various updates or connecting to apps. To do it, you'll need to edit the proxy configuration file of APT:
- Press the Activities Overview button in the lower left corner. Select a terminal from the list (or type in Terminal).
- Open the apt.conf file.
sudo nano /etc/apt/apt.conf
3. Add the relevant lines:
Acquire::http::Proxy "http://USERNAME:PASSWORD@PROXY_HOST:PROXY_PORT";
Acquire::https::Proxy "https://USERNAME:PASSWORD@PROXY_HOST:PROXY_PORT";
Unfortunately, APT does not support SOCKS5 proxies natively, so you'll need to use third-party tools like ProxyChains.
4. Save (Ctrl+O) and exit the terminal.
Set Proxy for Command-Line Tools
If setting permanent and temporary proxies in Ubuntu is too much of a hassle, you can use single-command proxies in most command-line tools separately.
cURL
With cURL, you can specify the proxy to use with the -x or --proxy options.
curl -x http://PROXY_HOST:PROXY_PORT https://iproyal.com/
Authentication can be added if the proxy requires it.
curl -x http://USERNAME:PASSWORD@PROXY_HOST:PROXY_PORT https://iproyal.com/
Wget
The most straightforward way to use proxies with Wget in Ubuntu is to use them for a single line:
wget -e use_proxy=yes -e http_proxy=http://PROXY_HOST:PROXY_PORT https://iproyal.com/
If your network proxy requires authentication:
wget -e use_proxy=yes -e http_proxy=http://USERNAME:PASSWORD@PROXY_HOST:PROXY_PORT https://iproyal.com/
Git
For Git, it's easiest to set a proxy globally for all repositories.
git config --global http.proxy http_proxy=http://PROXY_HOST:PROXY_PORT
If your proxy server needs authentication:
git config --global https.proxy http://username:password@proxy_address:proxy_port
Test and Verify Proxy Connection
At least one of the methods to set proxies on Ubuntu should have been suitable for your use case. To test whether proxies work, you can visit a web page that shows your IP address, such as our IP lookup tool, or use a cURL command.
curl https://ifconfig.me
If the IP address you see is of your proxy, then the setup is working.