Developed from Google’s Chromium project, Chrome is one of the best browsers available today. The ability to work across multiple platforms, including Mac OS, Windows, Android, Linux, and Google’s own Chrome OS, makes Google Chrome the most popular web browser.
When it comes to proxy servers, by default, the Google Chrome browser copies and uses your operating systems proxy server settings. In other words, Chrome doesn’t have or need any particular configuration or additional settings to work. You can, however, use Google Chrome to set the proxy configuration of your computer.
How to Configure Chrome Proxy Settings in Windows 10
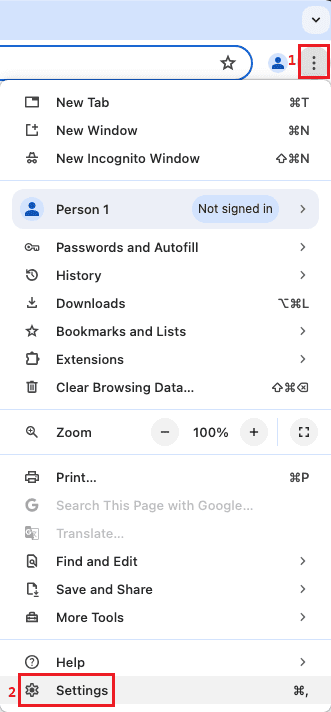
1. Open Chrome. Access the browser settings by clicking on the three dots (1) on the top right-hand corner of your browser window.
2. From the drop-down menu, click on Settings (2).
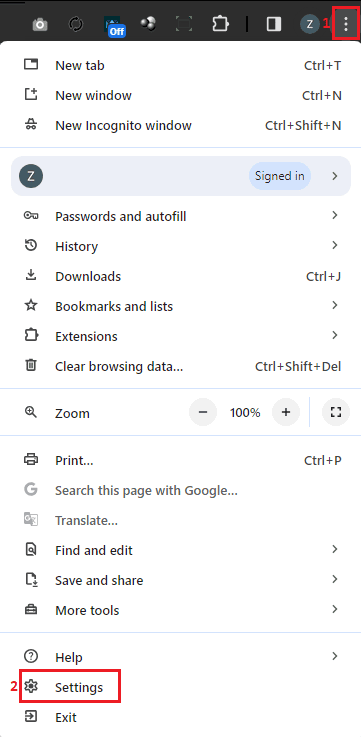
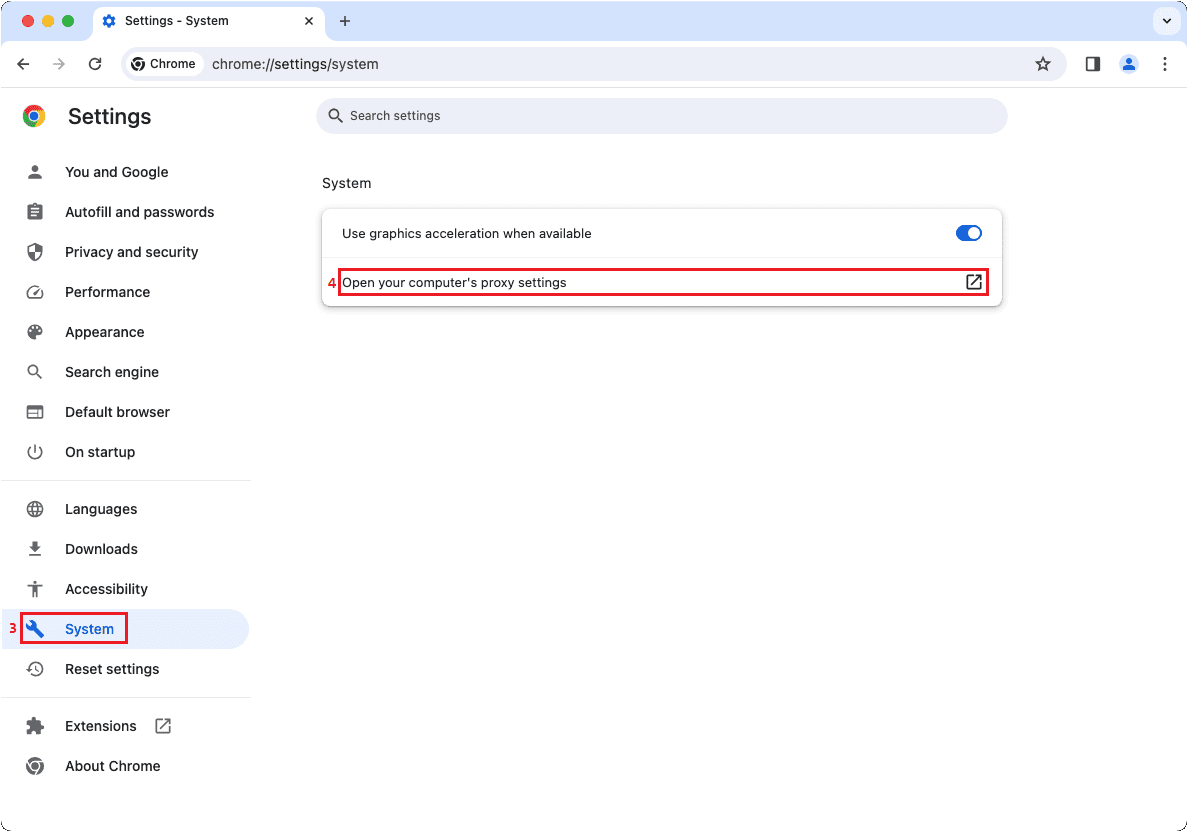
3. On the left of your browser window with the settings shortcuts, click on System (3).
4. In the system settings, select Open your computer’s proxy settings (4).
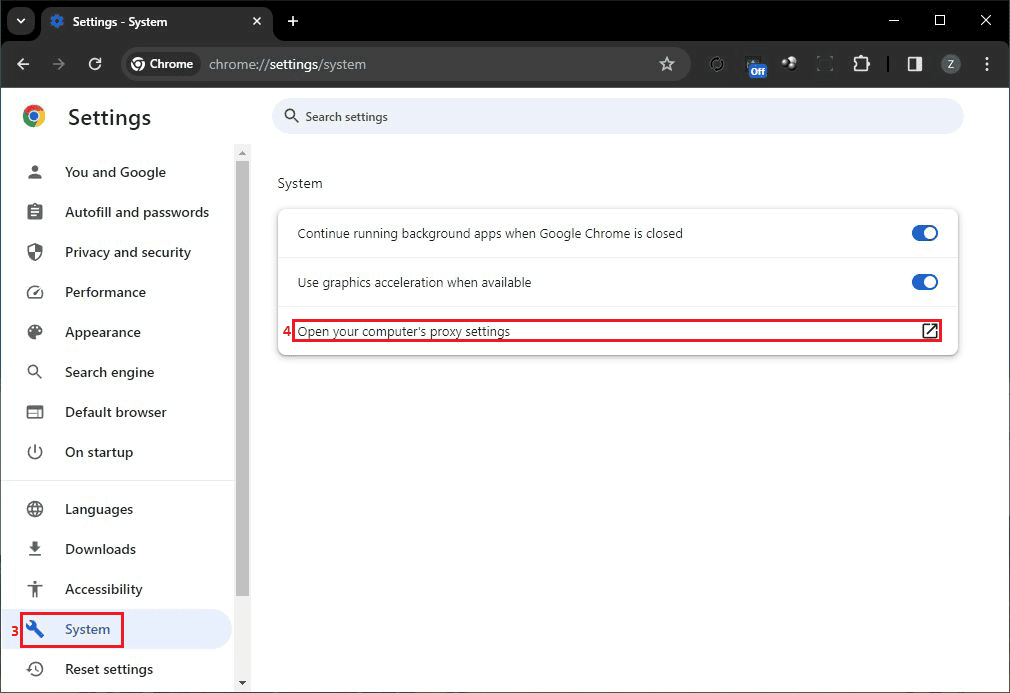
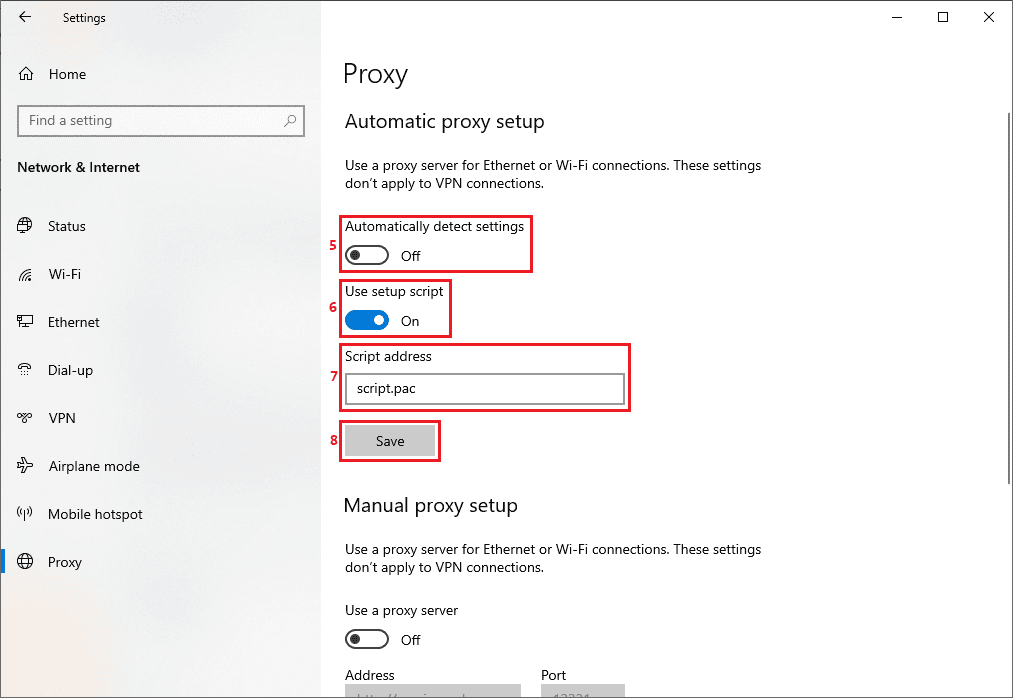
5. This opens the system proxy settings on the Network & Internet settings page of your Windows 10.
6. You can opt for the Automatic proxy setup (5), where the system can detect and change proxy settings automatically.
7. If you wanted to configure your settings using a script automatically, turn on the setup script option (6). Insert the script address in the box (7), press Save (8), and you’re good to go.
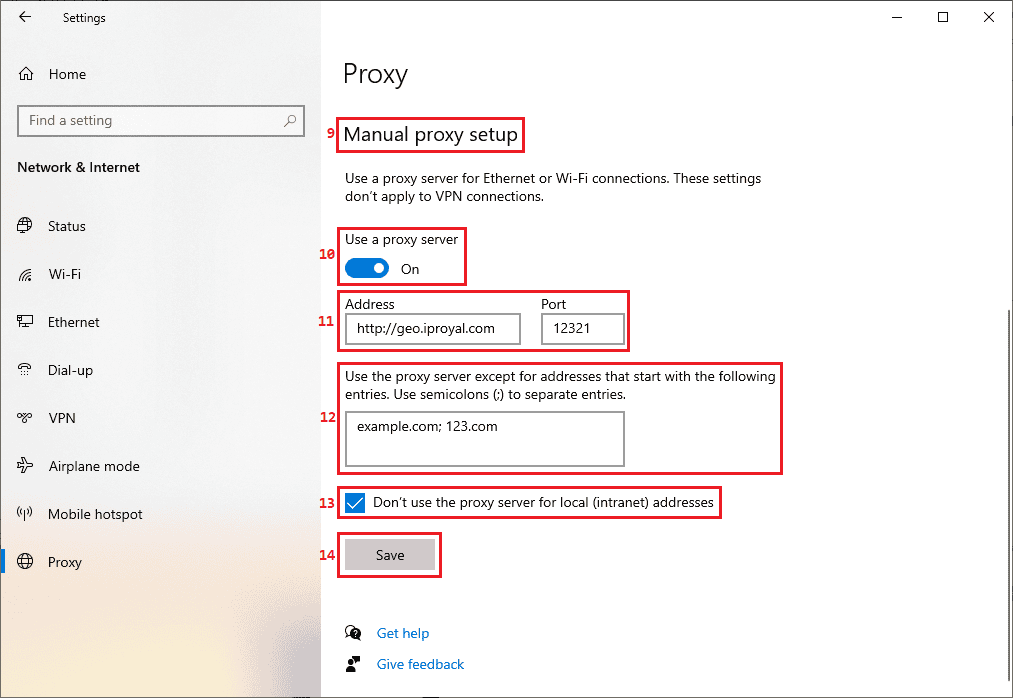
8. If you opt to change proxy settings manually, scroll down to the Manual proxy setup (9) section and turn on the Use a proxy server (10) option.
9. Next, enter the proxy IP address and port number (11) and make sure you’ve enabled IP whitelisting in your IPRoyal dashboard since Windows 10 and 11 don’t allow you to use a username and password for authentication.
10. If you have web addresses that you want to access directly, insert them in the “Use the proxy server except for… (12)” box, and remember to check the “Don’t use the proxy server for local addresses (13)” box if you have a local webserver. This allows you direct access to your local web server without having to go through the proxy.
11. Once you’ve configured everything, click the Save (14) button.
12. The first time you try to open a webpage, a prompt will ask you to input both your proxy username and password, and log into your proxy user account.
Once you finish these steps, your Google Chrome proxy settings will take effect and you can start surfing the web safely.
How to Configure Chrome Proxy Settings in MacOS
1. Open your Google Chrome browser, and on the top right-hand corner, click on the three vertical dots (1) to open the browser settings.
2. In the drop-down menu, choose Settings (2).
3. Click on System (3) in the quick menu and select Open your computer’s proxy settings (4).
4. MacOS will open the proxy settings for your currently active internet connection (Wi-Fi or ethernet).
5. Select the proxy IP protocol (5) you want to use. All IPRoyal proxies support HTTP/HTTPS and SOCKS5 protocols, depending on your needs. We’ll use HTTPS.
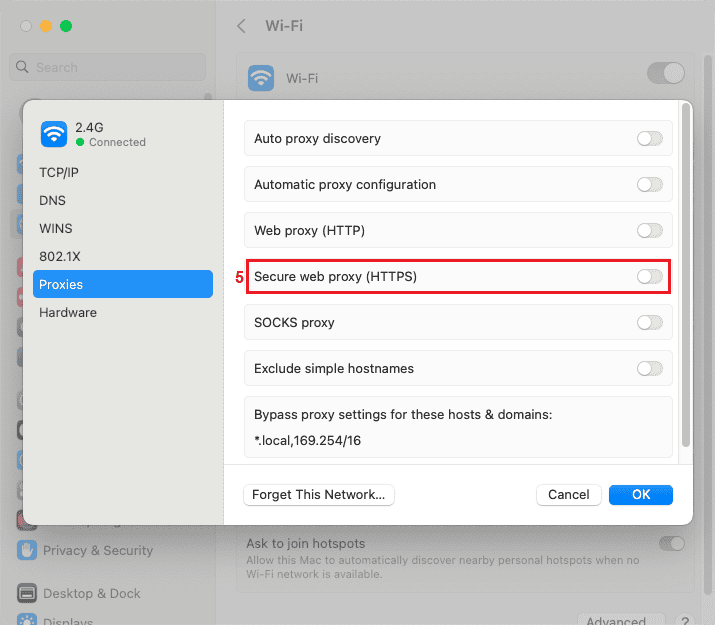
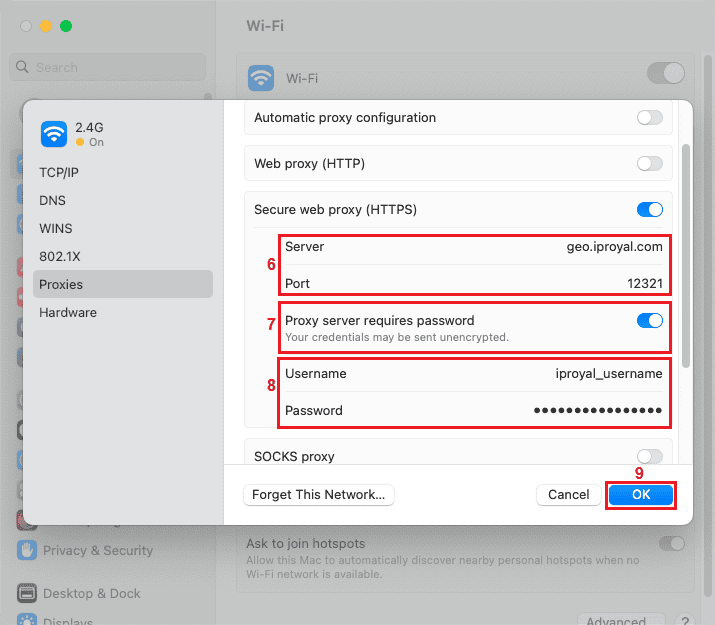
6. Enter the proxy server and port (6).
7. Tick the Proxy server requires password (7) box, and enter your username and password (8) from IPRoyal.
8. Once you’re through, click OK (9) to save the configuration settings.
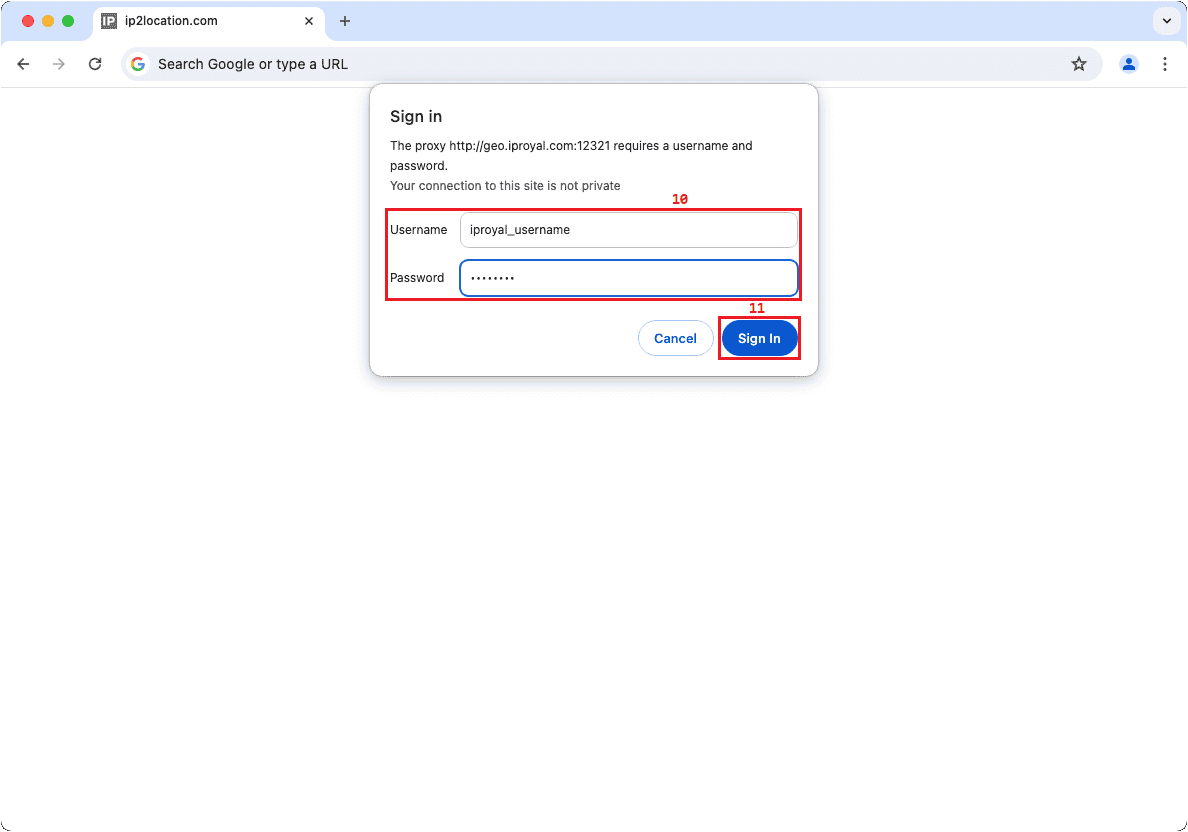
9. The first time you try to open a webpage, a prompt will ask you to input both your proxy username and password (10).
10. Enter your IPRoyal username and password, and click the Sign In (11) button to start browsing using your proxy.
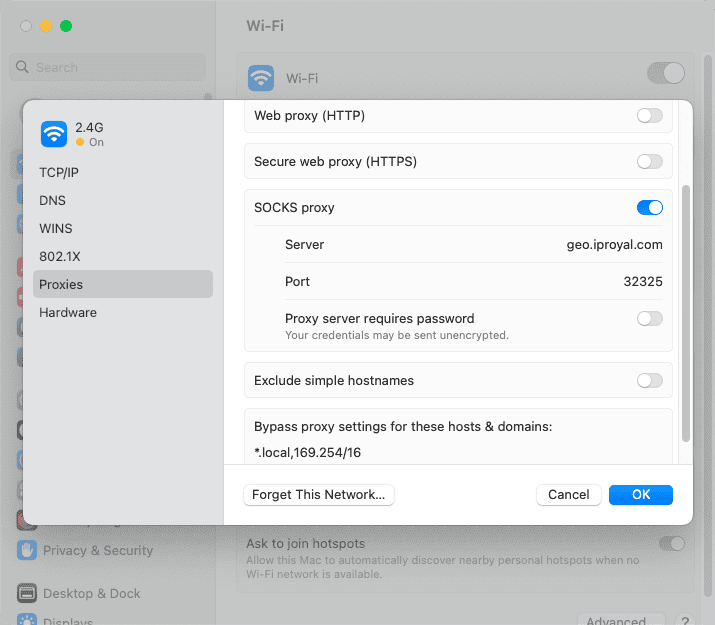
Note: If you want to use the SOCKS5 protocol, you must whitelist your IP address and leave the Proxy server requires password option turned off. Recent MacOS versions only work with SOCKS proxies that don’t require a username and password (tested on Monterey, Ventura, and Sonoma).
Why Choose IPRoyal as Your Proxy Service Provider
It’s important to note that when using Mac OS and Windows 10, while the HTTP/HTTPS proxy authorization prompts come as soon as you attempt to access a webpage, the Google Chrome browser does not support SOCKS authorization.
If you’re looking to hide the IP address provided by your internet service provider and secure your data, never use free proxies, and avoid shared proxies. Start using any of our exceptional IPRoyal proxy services. With proxies all over the world, your location will always remain confidential. Our residential proxy service will ensure you never get detected or blocked by the websites you’re scraping. Also you can switch IPs at your convenience using our instant IP change and auto-rotate function.
Our IPv4 and IPv6 private proxies are personal, not shared, meaning only you will have access to them, giving you an unrivaled level of security and speed. Our 4G mobile proxies and sneaker proxies allow you to shop, web scrape, and undertake competitor research in complete anonymity.
Contact us and give yourself that extra edge by getting the best Google Chrome proxy services today!
