Node Unblocker for Web Scraping: Tutorial for 2026
Tutorials

Marijus Narbutas
Key Takeaways
-
Node Unblocker is a web proxy library for Node.js that lets you build your own HTTP(S) proxy server.
-
Node Unblocker works as a middleman, routing and rewriting your requests, but it struggles with JS-heavy websites.
-
It's recommended to set up and launch a local Node Unblocker instance before deploying it to a cloud server.
If you’re already using Node.js for building projects of web scraping or automation, don’t pass up Node Unblocker. It’s a Node.js library for self-hosting a web proxy server that intercepts, forwards, and rewrites HTTP(S) traffic. Creating a server instance on your machine or a remote server helps circumvent geographical or other access restrictions.
While many websites require more advanced anti-bot systems and proxy services, Unblocker remains a simple, open-source, and free way to experiment with web unblocking. First steps with the Node Unblocker server are easy to master, but making it production-ready might take some practice.
What Is Node Unblocker?
Node Unblocker is a Node.js-based library built upon the Express framework that lets you build your own HTTP(S) proxy server. Like all proxies, self-hosted Unblocker instances act as a middleman for your requests, but can also rewrite URLs, headers, cookies, and other data to subsequent requests.
Once an instance is set up, images, scripts, AJAX calls, and all other resource requests will go through the same Node Unblocker server. Unblocker can be used on nearly any machine with just a few lines of code. However, most use cases require bypassing network restrictions, so a remote server is needed.
Node Unblocker is a common choice for those who can access third-party machines when web scraping, automating tasks, testing software, or performing other tasks. You can set up Unblocker in cloud services, creating a proxy that can be used for your web scraping needs.
How Does Node Unblocker Work?
Node Unblocker creates a web proxy server within a selected machine, which is used to read, rewrite, and send HTTP(S) requests. Requests from your code will go to this server before reaching the destination server.
If the server is a remote one or in the cloud, Node Unblocker will function as a basic web proxy with some advanced features. If you don’t intend to customize Node Unblocker, then using a quality proxy pool might be a better idea.
Most of the advanced customizations are available through various Node Unblocker’s middleware, such as rotating user agents or setting realistic Referrer headers. Which ones you need depend on your web scraping project and targets, but some are almost universally valuable.
- Removing Content Security Policy (CSP) headers prevents them from leaking to other sites and breaking the proxy. Additionally, removing CSP allows you to execute inline scripts, which can be useful if content is loaded dynamically through JavaScript.
- Custom cookies can help maintain sessions, navigate through multi-step workflows, and reduce block rates or other issues.
- Redirects middleware reduces the likelihood that redirects will fail to go through the proxy.
Unblocker middleware lets you customize how requests and responses are handled, which you might not be able to do with proxy services only. Such capabilities are most useful for web scraping and other projects that require frequent header modification.
Additionally, configuration lets you further tweak the behavior of Node Unblocker’s web proxy. For example, the client forces JavaScript to use the proxy by default, but this can be turned off if required.
Node Unblocker Limitations
For simple and moderately dynamic websites, Node Unblocker’s functionality is enough, but it has some known limitations. It’s designed as an HTTP(S) rewriting proxy that does not fully emulate a browser. So, projects that rely solely on Unblocker server instances will struggle with modern, highly interactive websites and apps.
- OAuth and federated logins. Such flows heavily rely on strict origin checks and redirects between multiple domains, which the Unblocker proxy does not fully support.
- postMessage communication. Node Unblocker documentation itself claims that anything that uses postMessage is unlikely to work. It’s a browser API that lets different browsing contexts send messages directly, heavily used by Facebook, Google, and other major websites.
- JS‑heavy behavior. Sites like Roblox, Discord, YouTube, Instagram, and others use lots of client-side JavaScript loading and robust anti-bot measures, which makes Node Unblocker work unreliably.
Most of the shortcomings of Node Unblocker can be bypassed by adding a headless browser, such as Selenium or Playwright, to your web scraping workflow.
Node Unblocker Prerequisites
What you’ll need to get started with Unblocker varies based on your current setup and coding experience. Three prerequisites are the most important for a beginner project.
1. Node.js
Before you can start creating Node Unblocker servers, you’ll need the Node.js runtime environment installed .
2. An Integrated Development Environment (IDE)
There are numerous IDEs suitable for Node.js, such as Visual Studio Code , Atom or Webstorm . We’ll be using Webstorm moving forward, but the principles remain the same, regardless of the IDE you use.
3. A cloud service provider
While you can run Node Unblocker on your local machine, you’d still be using your own IP address. To make the web proxy more effective for scraping, you’ll have to use a cloud service.
You’ll start using the cloud service at the very end of the tutorial once the application is working as intended.
Installing and Starting Node.js
Once your IDE is set up and running, you’ll have to initialize a Node.js project. In the Terminal (or any equivalent), type in:
npm init -y
Running the -y argument automatically provides default answers to Node.js project setup questions. You can remove it and answer the questions manually, but most of them are the application's metadata and names, so it's not as important for our purposes.
Then you'll need to install the Node Unblocker and Express package:
npm install unblocker express
Unblocker is the Node Unblocker package, and Express is a library that lets you create a server through Node.js.
Running these commands will create a new file, package.json, which will contain details about your application. Create a new file called app.js in the project directory (where you ran npm init -y) and open it with your IDE.
To import the Unblocker and Express libraries, paste the following commands:
const express = require('express')
const Unblocker = require('unblocker');
Since we won't be reusing the variables, we can use “const” to import Express and Node Unblocker, which means the reference can't be reassigned later on. Var is also acceptable, although it can lead to issues in larger codebases.
Our require function serves as an import for the libraries themselves. “Require” functions similarly to import in other languages, since whenever it's called, Node.js will look for the named library in either core modules or third-party ones and load it.
Creating the Web Proxy
We start by initializing the Express application, which will allow us to set up a server and configure it later on. The next line initializes an Unblocker instance, which will use the prefix /proxy/ to fetch requests.
const app = express();

const unblocker = new Unblocker({prefix: '/proxy/'});
app.use(unblocker);
If you try to access a website without the /proxy/ prefix, the Unblocker instance will not attempt to take over the request, and your regular IP address will be used. As such, all proxied URLs begin with the prefix, and any URLs you want to access regularly shouldn't have it.
Finally, app.use tells the Express application to use the Unblocker instance as middleware. All incoming requests to the Express application will be passed through the Unblocker, which will then function as your web proxy.
You may also set a custom port for your application if necessary:
const port = 3000;
Starting the Server
While we have set up the Unblocker server, we still need to let the server to launch and listen to the selected port:
app.listen(process.env.PORT || port || 8080).on('upgrade', unblocker.onUpgrade);
console.log("Node Unblocker Server Running On Port:", process.env.PORT || port || 8080)
We're starting the server with app.listen and set to a default port or a defined port (if you previously used the const port function), or, if neither is found, uses 8080.
Our function continues with .on and specifies upgrade, which is used for various networking protocols that require an upgrade (WebSocket, for example). Both of these arguments are required for the Node Unblocker server to pick up requests that may be using protocols other than HTTP.
Finally, console.log is simply a message that states that the Unblocker server is running and on which port.
Testing the Server Locally
Before launching Node Unblocker on a cloud server, you should always run it locally to ensure it's functioning as expected.
Depending on your IDE and OS, starting the server may have a few different steps. We'll use Windows as an example here. Open up the Terminal and head over to your project location:
cd X:\YOUR\PROJECT\FOLDER
Then, launch the server:
node app.js
If you named your file anything other than app.js, you will have to use that name.
You can now either use cURL or your regular browser to access a website. To use the latter, simply type the URL below into your browser:
http://localhost:3000/proxy/https://iproyal.com/
Take note of the port that has been used for Unblocker, as an incorrect one may fail to load the page. If the port is correct, however, you shouldn't notice any unnecessary buffering or slowdowns, and the page should load.
Launching Node Unblocker on a Remote Server
Running a Node Unblocker server on your local machine may be helpful if you need access to websites restricted by a local network administrator. However, such a setup won't help you access geo-restricted content as the IP address will be the same.
Launching Node Unblocker on a cloud server will let you use it as a web proxy for evading internet censorship, accessing geo-restricted content, and bypassing most other blocks.
There are numerous providers you can use, such as Heroku, Render, and many others. We'll be using Google Cloud Compute Engine as it lets us deploy low-cost virtual machines.
Start by editing the package.json file as such:
{
 "name": "node-unblocker",
 "version": "1.0.0",
 "description": "",
 "main": "app.js",
 "private" : true,
 "keywords": [],
 "author": "",
 "license": "ISC",
 "engines": {
   "node": "21.x"
 },
 "dependencies": {
   "express": "^4.18.2",
   "unblocker": "^2.3.0"

 },
 "scripts": {
   "start": "node app.js"
 }
}
We're adding a few new things, but the most important part is to add the "scripts" key-value pair, as it provides the VM with the command to run the Node Unblocker proxy server. Additionally, the "engines" tells the VM which version of Node.js to use for the proxy server.
Then, register for Google Cloud and enable Compute Engine on your account. You'll be brought to a new menu where you should click Create Instance.

Select the cheapest (E2 at the time of writing) VM instance and click Create. Google will create a random server running the specifications, which you'll be able to use freely.
You'll have to wait a bit for the instance to start. If you have some experience with cloud servers, you can use SSH to connect to them. Otherwise, you can always connect through your browser by clicking the downwards pointing arrow next to SSH.
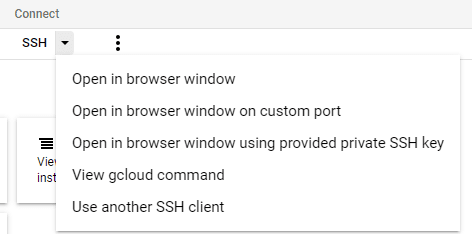
You'll be brought into the server, which should be running Ubuntu. You may need to relog into your Google Account a few times before full authorization is granted.
If you chose Ubuntu or Debian, you'll need to adjust the listen function slightly:
app.listen(process.env.PORT || port || 8080, '0.0.0.0').on('upgrade', unblocker.onUpgrade);
console.log("Node Unblocker Server Running On Port:", process.env.PORT || port || 8080)
Then, you'll need to upload your project files to the VM. If you've connected through a browser, you can click the Upload Files button and simply select them. Otherwise, use the SSH command:
scp /path/to/file username@a:/path/to/destination
Once the files are sent, install Node.js on the machine. First, you'll need to add the NodeSource repository, guidelines for which can be found on the Node.js GitHub repository . Running the command should automatically install Node.js and npm.
Then, run the application by typing in:
node app.js
If everything is working correctly, use your local machine's browser and type in:
VM_EXTERNAL_IP_ADDRESS:PORT/proxy/https://iproyal.com
If you're getting errors, you may need to enable HTTP traffic in your VM instance or create a firewall rule that allows traffic through your selected port.
As long as it's allowed by the terms of your cloud service provider, you can use the Node Unblocker server for web scraping purposes. However, a single proxy server won't be enough for long, as an IP address can get banned.
Moving Forward
Node Unblocker proxies are great if you have a small project or if you have access to many cloud VMs. You can create many Node Unblocker proxies, which will mitigate the threat of blocks, internet censorship, and other restrictions.
Acquiring a larger proxy pool is recommended for larger projects. It would also likely be less costly per IP address (or traffic) than running Node Unblocker and provide even better features.
FAQ
What is Node Unblocker used for?
Node Unblocker is a Node.js-based web proxy library used to access websites through a proxy service, mainly to bypass network filters, censorship, or access limitations. Acting as a middleware that intercepts HTTP requests, rewrites URLs, and cookies, it's most commonly used for tasks like web scraping, testing, and automation.
Is Node Unblocker a proxy?
Node Unblocker is a Node.js library for web proxy logic, such as request interception, forwarding, and rewriting. It isn't a proxy service, but a tool to build your own HTTP/HTTPS proxy server, which helps bypass network filters, censorship, or access limits. In most cases, you will still need regular datacenter or residential proxies.
Is Node Unblocker still working in 2026?
Yes, Node Unblocker still works for bypassing web restrictions in 2026, but it's best for simpler, static sites. It's commonly recommended for small learning projects as it works with basic login flows and standard AJAX sites. For advanced targets, it's recommended to use headless browsers, such as Playwright or Selenium, and high-quality proxies.
Can Node Unblocker be used for web scraping?
Yes, it's one of the primary uses of Node Unblocker, but it's not a standalone anti-bot solution. Rather, the Node.js library can work as a proxy layer inside your scraping stack, forwarding and rewriting requests. As such, it helps to bypass IP blocks, access geo-restricted content, and handle cookies, protocols, or even WebSockets.
Does Node Unblocker work with JavaScript-heavy websites?
Node Unblocker does not work reliably with JavaScript-heavy websites, as stated even in the official documentation. It can bypass some basic restrictions and works well for simple sites and test projects. For more advanced scraping targets, browser automation tools, like Playwright or Selenium, and quality proxies are needed.
What are the alternatives to Node Unblocker for web scraping?
Best alternatives for Node Unblocker when scraping are premium proxy service providers, such as IPRoyal. Implementing proxies instead of a Node Unblocker server is a simple solution to make requests without restrictions. More advanced targets might also require using a headless browser, such as Playwright or Selenium.