Ruby Web Scraping Without Getting Blocked


Marijus Narbutas
Ruby web scraping allows you to get and process data at scale.
Web scraping is a technique you can use to gather data from websites automatically. With it, you can monitor price changes, set up job alerts, aggregate news, and even load customer reviews.
It provides many upsides, no matter how you decide to implement it - be it a Ruby web scraper, using a different language, or even using no-code.
But there’s a big issue. You can get blocked.
Most websites try to block web scraping. Although it is perfectly legal, they want to serve content only for real human visitors.
Therefore, our goal for today is to learn how you can web scrape pages with Ruby without getting blocked. You’ll learn from the very basics of installing Ruby and an IDE to taking screenshots, collecting data, and interacting with pages.
Let’s get started!
What Is Ruby Web Scraping?
Web scraping in Ruby is loading content from web pages with its gems/libraries and your own code.
In general, web scraping in Ruby is not that different from web scraping with other languages. You need to fetch pages, download their contents, process data, and save the outputs.
There are quite a few different paths to do it, though. Let’s see each of them in the following sections.
Is Ruby Good for Web Scraping?
Ruby is great for web scraping. If you are looking to get started, it is easy to learn, and it has a good community around it. In addition, there are many great libraries (gems) that you can use, such as Nokogiri, Kimurai, and Selenium.
In terms of deployment, Ruby is very easy to test and push to live environments. You can run it on your own computer, use online hostings, or use cloud services.
How Do I Use Ruby to Scrape a Website?
There are four basic methods to Scrape websites using Ruby:
- Fetch the web pages and use regular expressions to extract data
- Fetch the web pages and use a parser to extract data
- Load XHR requests directly
- Use a headless browser
Using a headless browser such as Selenium is the most reliable and robust option. They can do everything the other libraries can do and much more.
Let’s quickly explore each of your options and explain why we picked Selenium web scraping as our go-to option.
How Do You Scrape in Nokogiri?
You can scrape pages with Nokogiri using a gem like net-http to connect to pages and use Nokogiri to parse them, extracting their contents.
The Nokogiri gem allows you to extract data from HTML content, even if it’s malformed. This is a great step forward compared to using regular expressions, but it’s still not good enough nowadays.
Most modern pages rely on dynamic content, using Javascript to load or modify data. Nokogiri can only handle simple HTML contents. For this reason, it’s better to jump straight to a headless browser and get a complete web scraping tool from the start.
Is Selenium Good for Web Scraping?
Selenium is one of the best web scraping libraries available. It allows you to programmatically interact with web browsers, loading pages just like a real visitor would.
Therefore, you can load content from pages, no matter how complex they are. If a real user can see a page, Selenium can see it too.
Selenium isn’t the only headless browser option in Ruby, though. Here are a few other options:
- Kimurai - A web scraping framework with headless browsers support
- Watir - It stands for Web Application Testing in Ruby, and it allows you to automate web browsers
- Apparition - It’s a Chrome driver for Capybara
- Poltergeist - A PhantomJS driver for Capybara
In general, headless browsers are used as code testing and automation tools. Therefore, their uses go beyond just web scraping, and they are quite useful for application development as well.
Can You Get Blocked for Web Scraping?
Yes, you can get blocked for web scraping. Most website developers try to block automated requests. Therefore, you must use headless browsers and residential proxies to avoid getting blocked.
They try to block visitors based on two main metrics. The request details and the browsing patterns.
Regarding the request details, website owners look at the request headers and how the browser renders pages. Bot requests might forget to set up some headers that real visitors won’t ever forget because real browsers add them automatically.
You can use a headless browser such as Selenium, and you don’t need to worry about this issue. Since it is a real browser, there’s no difference between a Selenium request and a real human request.
The other main point that website owners look at is browsing patterns. If a user visits too many pages, or if they visit every day at the same time, they could be a bot.
You can use IPRoyal’s Residential Proxies service to fix this.
With it, site owners can’t track down your requests since you can change your IP address in each of them. In addition, you can use real residential IP addresses, so your requests come from real devices with home internet connections, and not from other servers or data centers.
Now that you know how you can avoid getting blocked, let’s start web scraping with Ruby.
Ruby Web Scraping - Step by Step
Feel free to follow the entire guide along or jump to the sections that are relevant to you.
Here is what we’ll cover:
- Install Ruby and an IDE
- Install Selenium
- Take screenshots
- Open Selenium with a Proxy
- Extract data
- Click on links
- Fill in forms
How to Install Ruby
The installation instructions depend on your operating system. The very first step is to check if you don’t have Ruby installed already. Open your terminal and run this command:
ruby -v
If you see a message that this command doesn’t exist, you need to install it. If you see a message with a version, you can skip to the next steps.
You can follow the official install instructions for a detailed guide. If you’re using Windows, you can download and run the Windows installer . Another option is to use a package manager such as Chocolatey.
choco install ruby
In MacOS, Ruby is pre-installed. If you want to install a newer version, you can use Homebrew:
brew install ruby
In Linux, you can use the package manager for your distro to install Ruby. Here are some examples:
sudo apt-get install ruby-full
sudo yum install ruby
sudo snap install ruby --classic
sudo emerge dev-lang/ruby
sudo pacman -S ruby
Then, you need a code editor to create your files. You can use any editor you want, such as VS Code, Sublime text, Ruby Mine, Aptana, Net Beans, and others.
How to Install Selenium in Ruby
Open your terminal and run this command:
gem install selenium-webdriver
This should install the Selenium webdriver. Then, you can use it in your code by adding this line:
require ’selenium-webdriver’
In addition, you’ll need to install the devtools gem. Run this command in your terminal:
gem install selenium-devtools
How to Take Screenshots With Selenium
Use your favorite IDE to create a new file called scraper.rb. Add this code to it:
require ’selenium-webdriver’

cap = Selenium::WebDriver::Remote::Capabilities.chrome()

options = Selenium::WebDriver::Chrome::Options.new(
    args: [
        ’--no-sandbox’,
        ’--headless’,
        ’--disable-dev-shm-usage’,
        ’--single-process’,
        ’--ignore-certificate-errors’
    ]
)

scraper = Selenium::WebDriver.for(:chrome, capabilities: [options,cap])

scraper.get ’https://ipv4.icanhazip.com/’

scraper.save_screenshot( ’screenshot.png’ )

puts scraper.page_source
Let’s understand what this code does, piece by piece:
- require ’selenium-webdriver’ - This is where you load Selenium. Make sure that you have installed it first.
- cap = Selenium::WebDriver::Remote::Capabilities.chrome() - Here, you are creating a new set of capabilities. We will use them later.
- options = Selenium::WebDriver::Chrome::Options.new( … ) - This sets the browser options. Feel free to comment the no-sandbox and headless lines, and you’ll see when the browser opens.
- scraper = Selenium::WebDriver.for(:chrome, capabilities: [options,cap]) - In this line, you create a new Selenium instance, using the capabilities and options from the other variables.
- scraper.get https://ipv4.icanhazip.com/ - Here, you navigate to the address defined. It is similar to typing down an address in your URL bar.
- scraper.save_screenshot( ’screenshot.png’ ) - This code saves a screenshot in the same folder where your scraper.rb file is.
- puts scraper.page_source - Here, you output the page source, this is useful in case you don’t want to take screenshots.
When you run this code, you should see a new screenshot.png file in your scraper folder. You should also see the code output in your terminal.

This means that my IP address starts with 177.104.
If you see an error when you run this code, check the FAQ for common issues and solutions.
How to Open Selenium With Authenticated Proxies
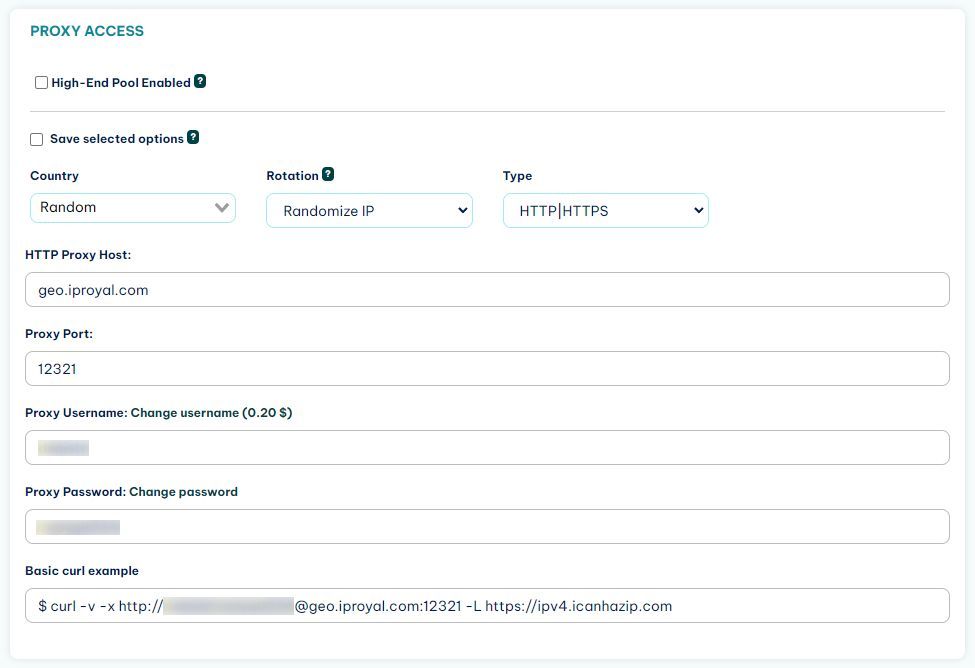
To avoid getting blocked, you need to use a residential proxy. After you sign up for IPRoyal’s Residential Proxies service, you get access to the client area. In it, you can see your connection details and credentials:

In addition, you can whitelist an IP address if you want. For example, if I don’t want to enter username/password when I connect from my computer, I can whitelist the IP address we saw in the previous section.
But let’s assume you want to use authenticated proxies, sending your credentials. How can you do it?
Selenium’s got you covered.
You can define a proxy in the credentials and options, and then set up authentication using the register() method.
Here is a modified version of the previous code snippet to allow authenticated proxies in your Ruby web scraper :
proxy = Selenium::WebDriver::Proxy.new(
    http: ’geo.iproyal.com:12321’,
    ssl: ’geo.iproyal.com:12321’
)

cap = Selenium::WebDriver::Remote::Capabilities.chrome( proxy: proxy )

options = Selenium::WebDriver::Chrome::Options.new(
    args: [
        ’--no-sandbox’,
        ’--headless’,
        ’--disable-dev-shm-usage’,
        ’--single-process’,
        ’--ignore-certificate-errors’
    ]
)

scraper = Selenium::WebDriver.for(:chrome, capabilities: [options,cap])

scraper.devtools.new
scraper.register(username: ’USE YOUR IPROYAL USERNAME HERE’, password: ’PASSWORD GOES HERE’)

scraper.get ’https://ipv4.icanhazip.com/’

scraper.save_screenshot( ’screenshot.png’ )

puts scraper.page_source
Make sure to replace the username and password with your real credentials.
In this code, you are loading the proxy call and authenticating with the scraper.register() method. Notice that this only works if you have the devtools gem installed.
When you run this code, you should see a completely different IP address, like this:

Notice how the IP address changes from 177.104 to 124.105.
In all future examples, feel free to use the authenticated proxy request and change your code just from the page URL selection onwards.
Now you are ready to web scrape without getting blocked. Let’s improve your web scraper by interacting with your target pages.
How to Extract Data From Your Target Pages
You can extract data from elements by selecting them. You can use the find_element method to load a specific element using CSS selectors, xPath, text, id, name, and others.
Here is a simple example:
scraper.get ’https://en.wikipedia.org/wiki/Nintendo_64’

title = scraper.find_element(css: ’.mw-page-title-main’)

puts title.text.strip
This code gets the Wikipedia page for Nintendo 64. Then it loads a title element using a CSS selector. Next, it outputs the text contents of that element.
How to Click on Links With Your Ruby Web Scraper
You can click on links by using the click method. Just like in the previous example, you need to select an element using one of the selectors. Then you can click on it.
Here is an example:
scraper.get ’https://en.wikipedia.org/wiki/Nintendo_64’

scraper.find_element(link_text: ’Nintendo IRD’).click

puts scraper.current_url
This is the output:
https://en.wikipedia.org/wiki/Nintendo_Integrated_Research_%26_Development
This code loads that same page again. Then it finds a link with the text “Nintendo IRD” and clicks on it. The last line outputs the current browser URL.
Then, you should see in your terminal the IRD link, not the original Nintendo 64 link.
How to Fill In Forms With Selenium and Ruby
Lastly, you can fill in forms in your ruby web scraper. You can do it with the “send keys” method, which works like typing on a keyboard.
Therefore, you’ll click on an element and select it. Then you’ll type. Then you’ll perform other actions, such as clicking a search button.
Here is an example:
scraper.get ’https://en.wikipedia.org/wiki/Nintendo_64’

search = scraper.find_element(id: ’searchInput’)

search.send_keys(’Playstation’)

search.submit

scraper.save_screenshot( ’screenshot.png’ )

puts scraper.current_url
This code loads the Nintendo 64 Wikipedia page, then it selects the search box, searches for Playstation, and loads it. It takes a screenshot and outputs the URL. This is the result:

Conclusion
Today, you learned how you can use Ruby for web scraping. We went step by step, from installing Ruby itself to running your scraper without getting blocked. You saw some examples of how you can interact with pages, extract data, and fill in forms.
We hope you’ve enjoyed it, and see you again next time!
FAQ
Error: “chromedriver” cannot be opened because the developer cannot be verified.
MacOS might block you from loading the chromedriver for security reasons. You can unblock it under the system settings > privacy and security > general > click on “open anyway”.
Another option is to open Finder, navigate to the chromedriver folder, right-click the chromedriver file, and select open. This forces it to open, bypassing the security check.
ERROR: Error installing selenium-webdriver:
Sometimes this error happens along with this message:
"The last version of selenium-webdriver (>= 0) to support your Ruby & RubyGems was X. Try installing it with gem install selenium-webdriver -v X.”
This is another sign that there is an error with the gems and versions available. Make sure everything is up to date.
`require’: cannot load such file – selenium-webdriver
If you are getting loaderrors with Selenium or with the devtools, make sure you have installed all libraries (Selenium and the devtools gem). If you have them installed, make sure it is available to your current ruby version.


