'%20fill-rule='evenodd'%20clip-rule='evenodd'%3e%3cpath%20d='M21.9952%2012.2202c-.0019-.6851-.108-1.3688-.2269-2.0439h-9.6238v3.8768h5.4928c-.1125.6103-.3507%201.1919-.6999%201.7094-.3492.5175-.8022.9601-1.3315%201.3009v2.5105h3.3479c1.005-.9487%201.7951-2.0936%202.3191-3.3605.524-1.2668.7701-2.6273.7223-3.9932Z'%20fill='%234285F4'/%3e%3cpath%20d='M12.1415%2021.9954c2.5027.0755%204.9397-.7912%206.8092-2.4216l-3.3025-2.5105c-1.031.6482-2.2362.9808-3.4613.9553-1.266-.0247-2.49275-.4349-3.50967-1.1735-1.01691-.7385-1.81874-1.8128-2.20993-2.9916l-3.4048.0439v2.5438c.84005%201.6575%202.13352%203.0542%203.73642%204.0348%201.60291.9806%203.45238%201.5066%205.34258%201.5194Z'%20fill='%2334A853'/%3e%3cpath%20d='M6.46884%2013.8531c-.42382-1.2324-.42382-2.4897%200-3.7221V7.55469H3.06422C2.36423%208.93568%202%2010.4564%202%2011.998c0%201.5416.36423%203.0624%201.06422%204.4434l3.40462-2.5883Z'%20fill='%23FBBC05'/%3e%3cpath%20d='M12.1415%206.02167c1.4529-.02643%202.8572.46854%203.9039%201.45519l2.9053-2.87706c-1.8433-1.69203-4.2823-2.62308-6.8092-2.59936-1.8902.01282-3.73967.5388-5.34258%201.5194-1.6029.9806-2.89637%202.37735-3.73642%204.03478l3.40462%202.58828c.39118-1.17886%201.1478-2.20915%202.16472-2.94772%201.01691-.73857%202.24366-1.14874%203.50966-1.17351Z'%20fill='%23EA4335'/%3e%3c/g%3e%3c/svg%3e)
In 2025, more and more Internet users are turning to Microsoft Edge. The successor of Internet Explorer has been praised for its improved speeds, useful built-in features, and increased focus on privacy. However, for business workflows involving sensitive data, market intelligence, or geo-specific research, relying on the browser alone isn’t enough.
That’s when Microsoft Edge proxies come in. With the right proxy setup, you can streamline your operations and boost your efficiency while keeping your valuable data private.
In this Microsoft Edge proxy integration guide, we’ll cover the benefits of proxies, the types that work best with this browser, and how to configure them step by step.
Why Use a Proxy in Microsoft Edge?
Reliable proxy servers can transform Microsoft Edge from a simple browser to a valuable business tool. By routing your traffic through a proxy in another location, you get an additional layer of privacy, better control over your data, and the flexibility to access content from anywhere.
Enhanced Privacy & Compliance
Proxy servers hide your original IP address, ensuring your sensitive operations aren’t tied back to your real infrastructure. They protect your valuable data and allow you to perform your critical operations privately, helping you stay compliant with data-handling regulations and protect your brand.
Access to Geo-specific Content
Market research, competitor monitoring, web testing, or ad verification often requires viewing the web from multiple locations. Proxies allow you to access location-specific content from anywhere, masking your original IP address with another from a target region.
This way, they help you access and use accurate localized data no matter where you are and avoid being misled by region-based restrictions.
Efficient Automation
With high-quality Edge proxies, you can streamline your automation workflows and count on consistent access to accurate data. By using high-quality IP addresses from global locations, residential proxies keep your automation activities uninterrupted.
They reduce the risk of CAPTCHAs, IP bans, and rate limits, ensuring smooth and efficient operations.
With these benefits in mind, Edge proxies can make a huge difference in various business operations. Most common use cases include:
- Web scraping & data collection - gathering accurate, real-time data for pricing, competitor monitoring, and market research without interruptions.
- Multi-account management - running multiple accounts for e-commerce, advertising, or social media without triggering detection or blocks.
- Ad verification - ensuring digital ad placements appear correctly and consistently across different regions, devices, and platforms.
- Brand protection - monitoring and acting against counterfeit products, unauthorized sellers, or fraudulent listings while keeping your research anonymous.
- Geo-specific testing - testing websites, apps, and localized user experiences from multiple countries to ensure consistent performance across regions.
Types of Proxies That Work With Edge
Microsoft Edge supports all major proxy protocols. It works with HTTP/HTTPS and SOCKS5 proxies, so you can choose the option that works best for your specific application or workflow.
Here’s where using each proxy type makes the most sense.
- HTTP proxies
Proxy servers supporting the HTTP protocol are ideal for basic web browsing and traffic filtering. You can use them for lightweight monitoring and content access. Avoid HTTP proxies for handling sensitive data as they lack built-in encryption.
- HTTPS proxies
These proxies are a more secure version of HTTP, thanks to the SSL encryption, which safeguards transmitted data. HTTPS proxies are best for operations involving sensitive or valuable information where compliance and security can’t be compromised.
- SOCKS5 proxies
Proxy servers supporting the SOCKS5 protocol are protocol-agnostic, so they work with almost any application or program. They are fast and highly flexible, making them ideal for scraping complex, multi-protocol datasets, multi-accounting, ad verification, etc.
Step-by-Step Guide: Proxy Setup Inside Microsoft Edge
Follow these steps to set up Edge proxy servers within minutes.
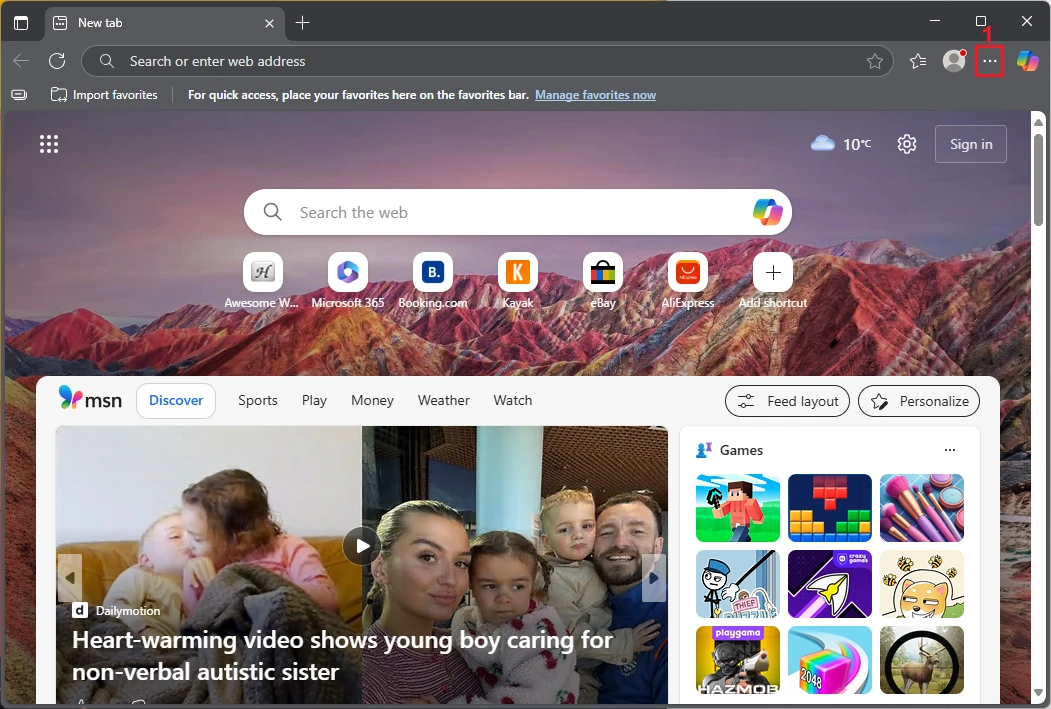
1. Open Microsoft Edge and click the three dots icon (1) in the top right corner.
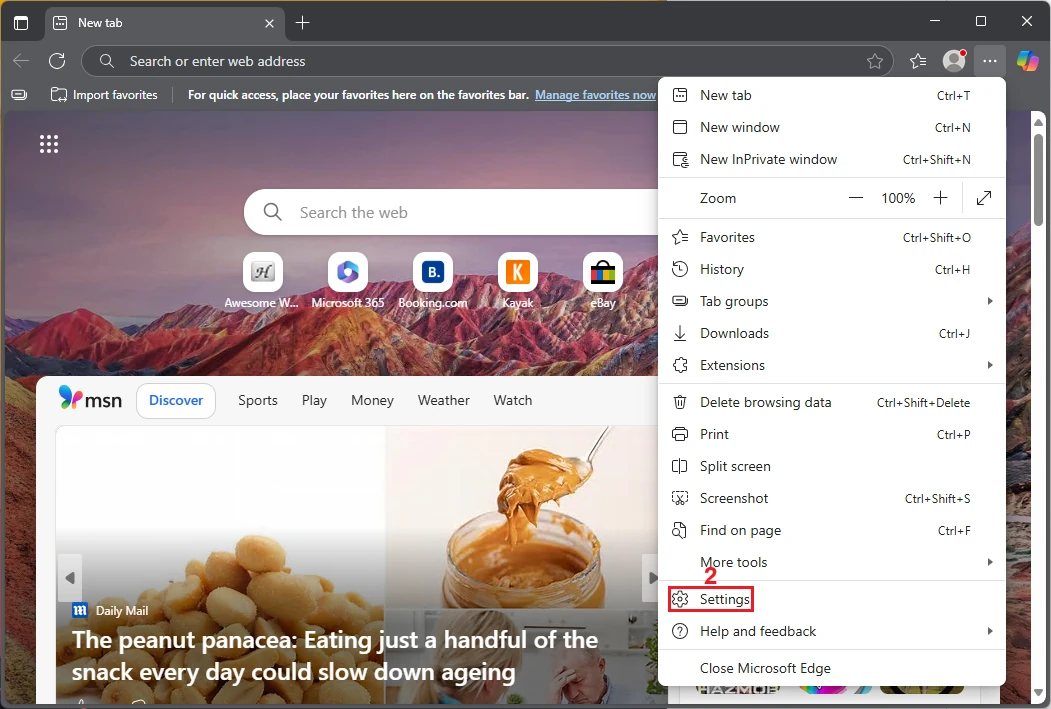
2. From the drop-down menu, select ‘Settings’ (2).
3. Click ‘System and performance’ (3) from the menu on the right, and then select ‘System’ (4).
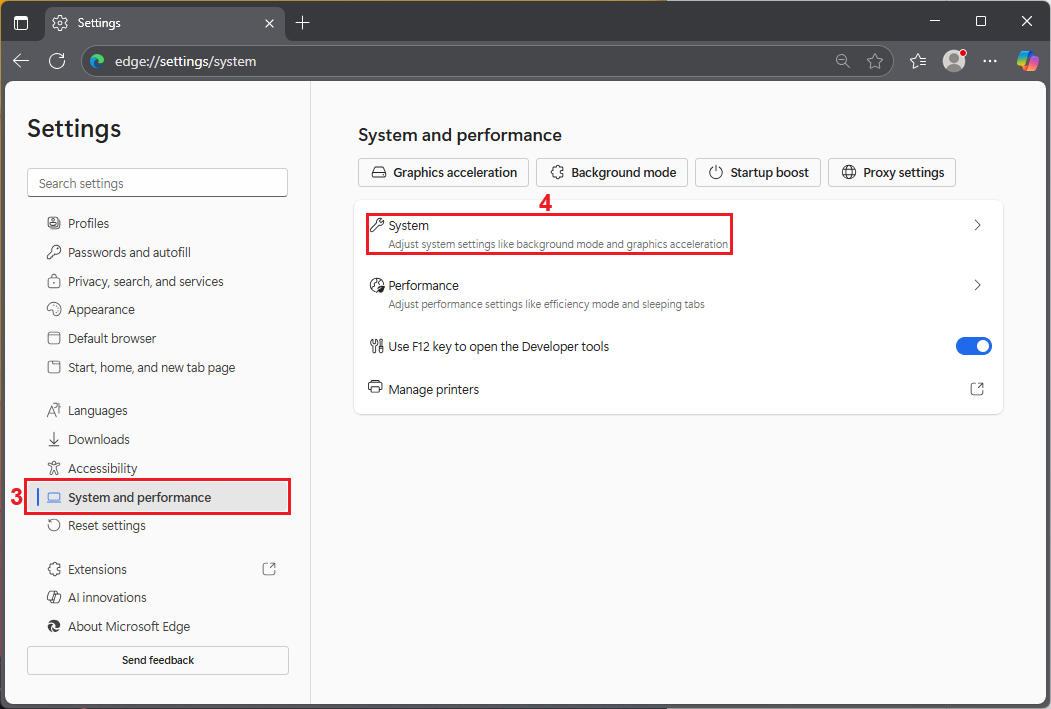
4. In the System settings, choose ‘Open proxy settings’ (5).
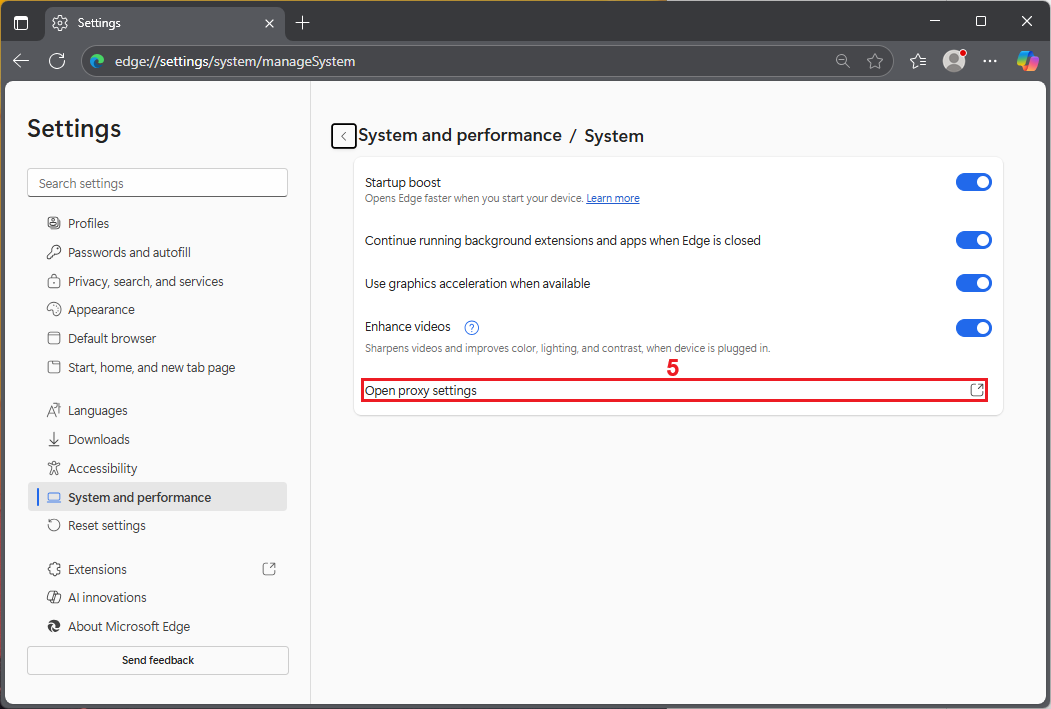
5. This will redirect you to Windows proxy settings. If you opt for the Automatic proxy setup, the system will detect and change proxy settings automatically. To change proxy settings manually, click the ‘Set up’ (6) button under ‘Manual proxy setup.’
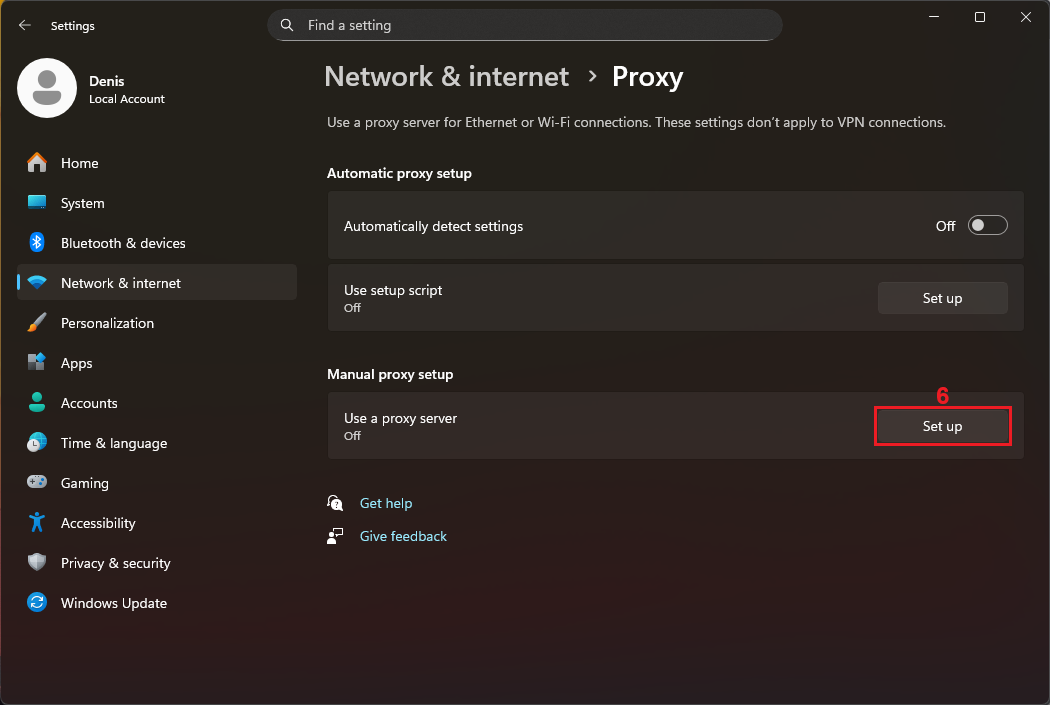
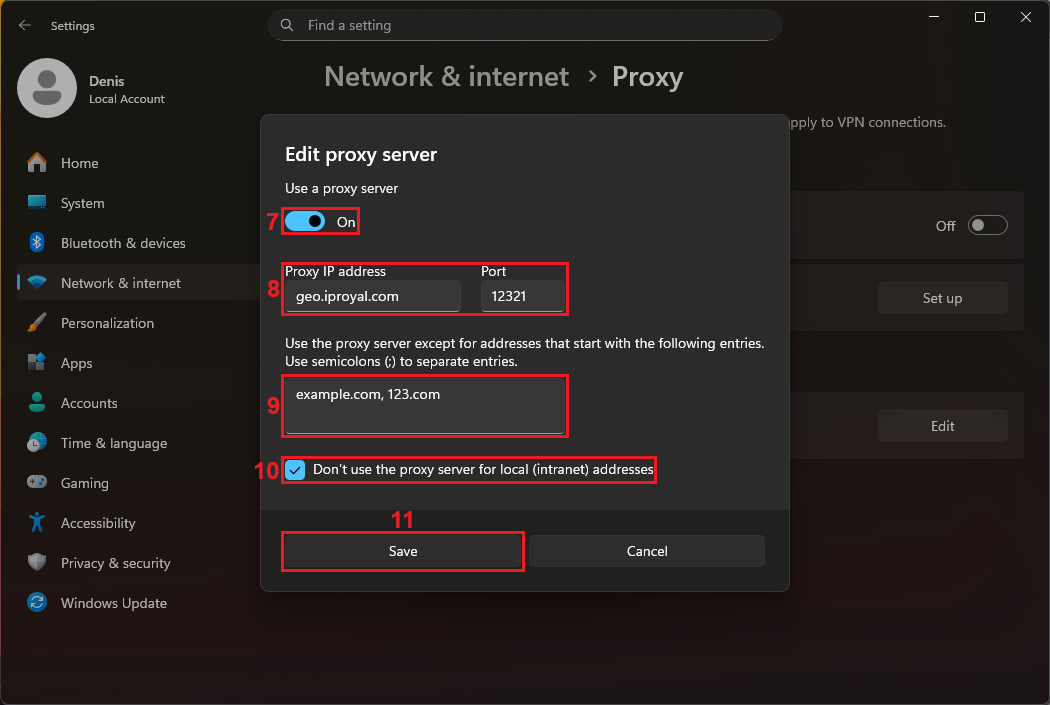
6. Turn on the ‘Use a proxy server’ (7) switch, then enter your proxy credentials in the designated fields (8). If there are specific web addresses you want to access without the proxy, add them in the ‘Use the proxy server except for…’ (9) box.
If you’re running a local web server, check the ‘Don’t use the proxy server for local (intranet) addresses’ (10) box to access it directly without routing through the proxy. Click the ‘Save’ (11) button to save the proxy settings.
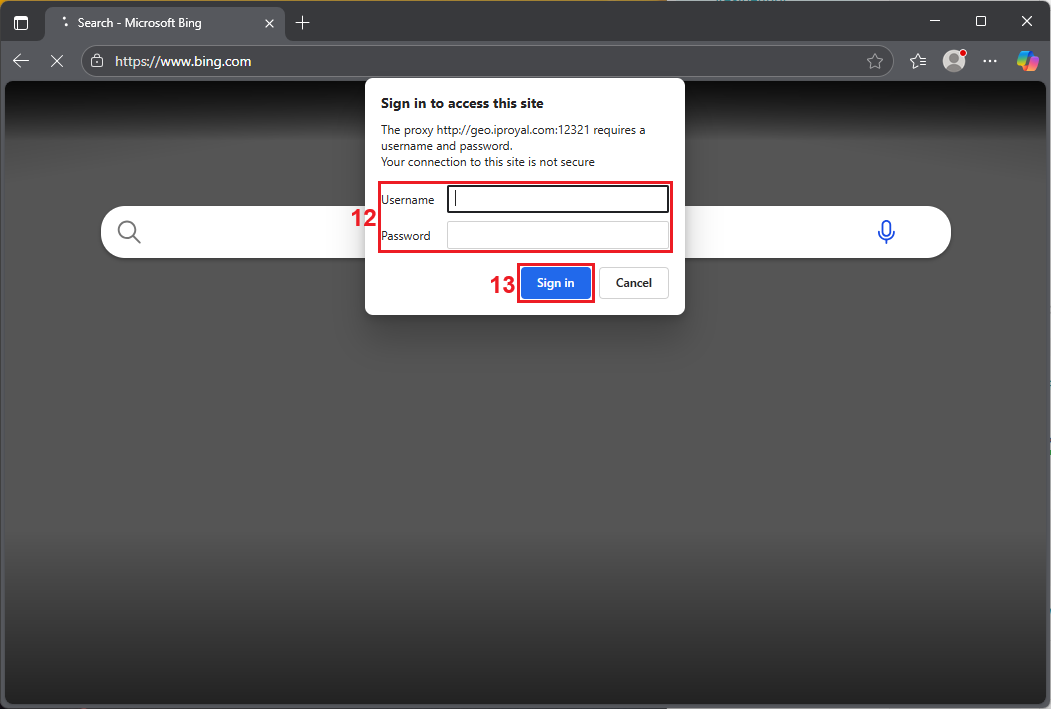
7. The first time you try to open a webpage on Microsoft Edge, a prompt will appear asking you to enter your proxy username and password. Copy them from your proxy dashboard into the appropriate fields (12) and click the ‘Sign in’ (13) button.
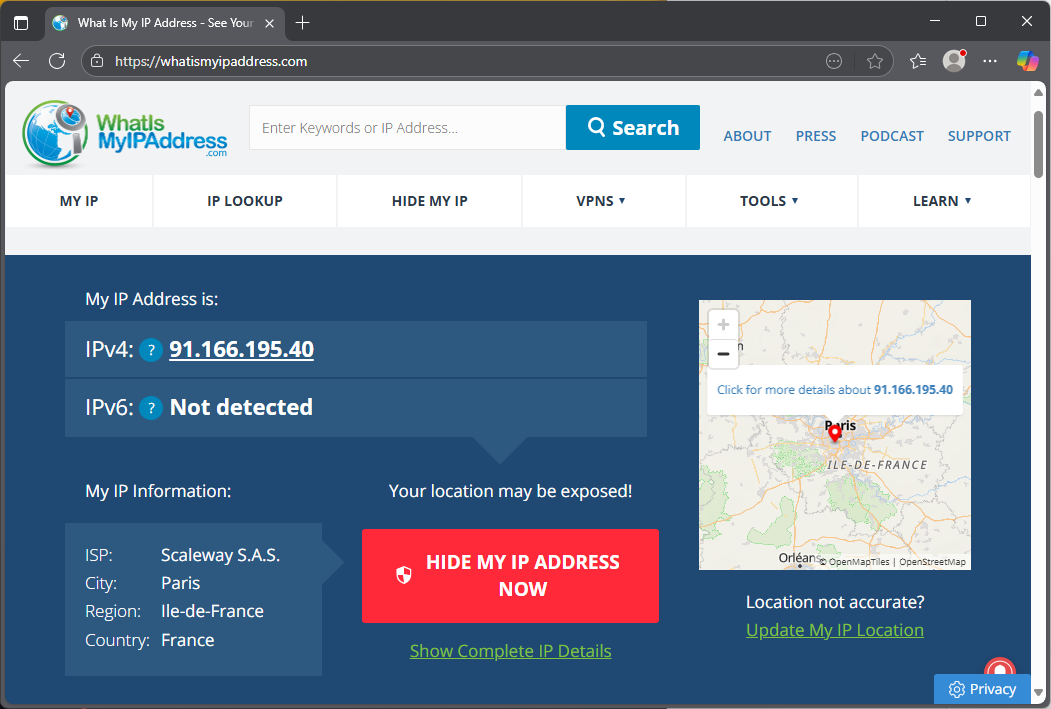
8. To test your connection and ensure you’re routing your traffic through a proxy, visit any IP checking website. If the IP information matches your proxy settings, you’re ready to go.
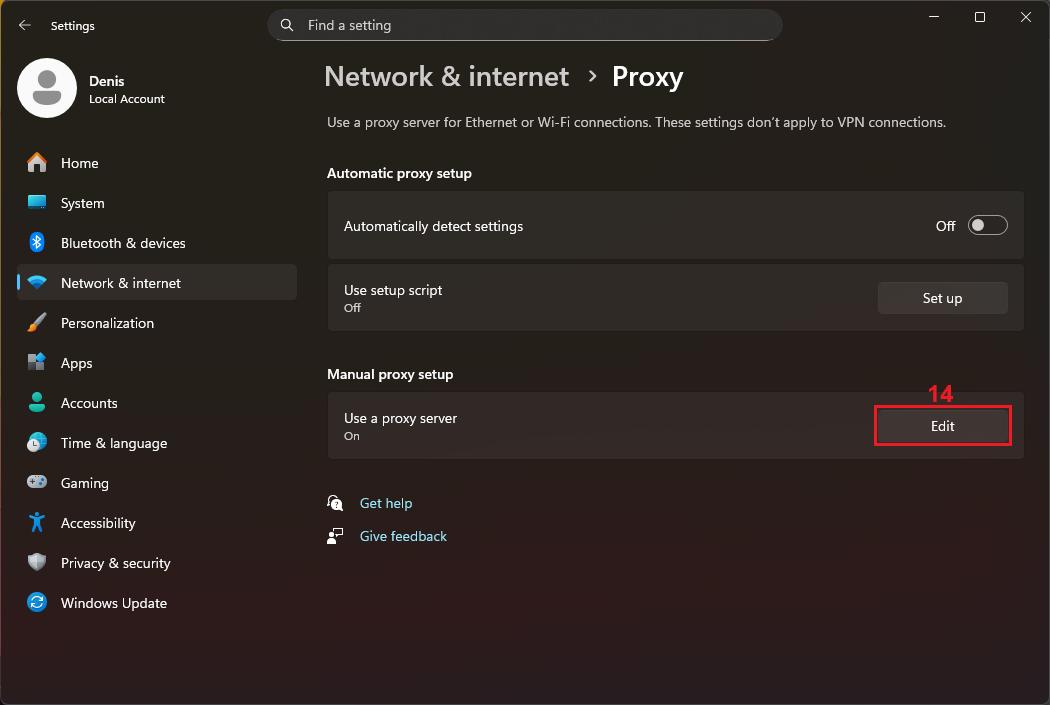
9. When you want to stop using the proxy, click the ‘Edit’ (14) button under Manual proxy setup in your Windows proxy settings.
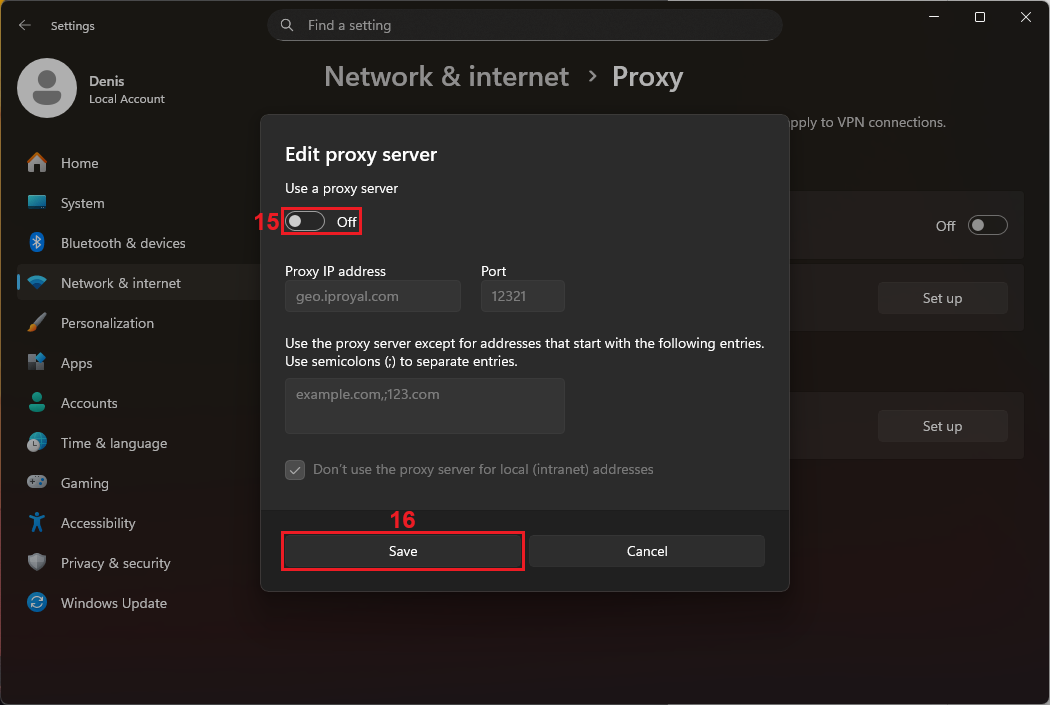
10. Turn off the ‘Use a proxy server’ (15) switch and click the ‘Save’ (16) button to confirm the changes.
Step-by-Step Guide: Using Proxy Extensions in Edge
A proxy extension can help you manage your proxies more easily. Here’s how to install and use one on the Edge browser.
1. Download a proxy extension and install it on your browser. You can use the Edge Add-ons site to look for a proxy extension, but the number of add-ons is limited. Since Edge is based on Chromium, you can get extensions from the Chrome Web Store. Once you find one, open it and click the ‘Get’ (1) button.
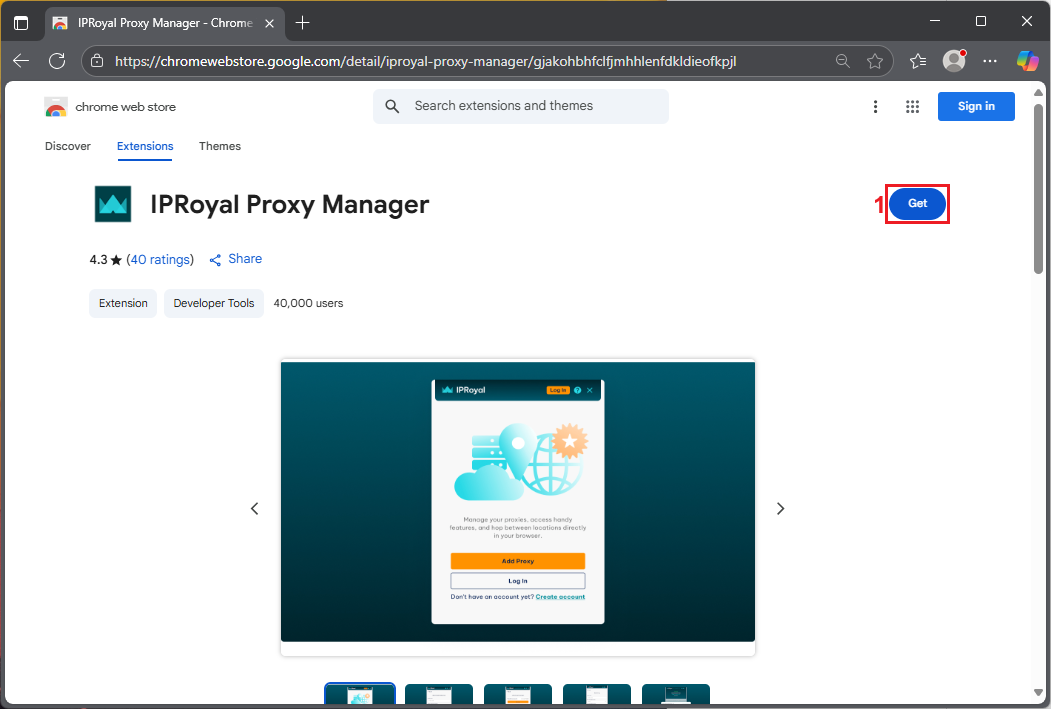
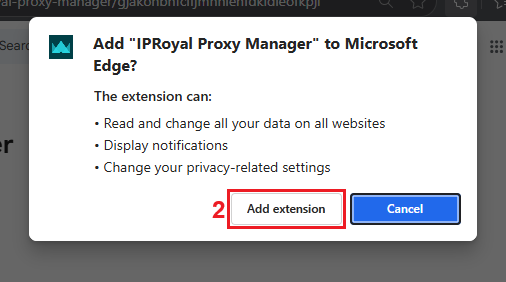
2. Click the ‘Add extension’ (2) button to add it to your browser.
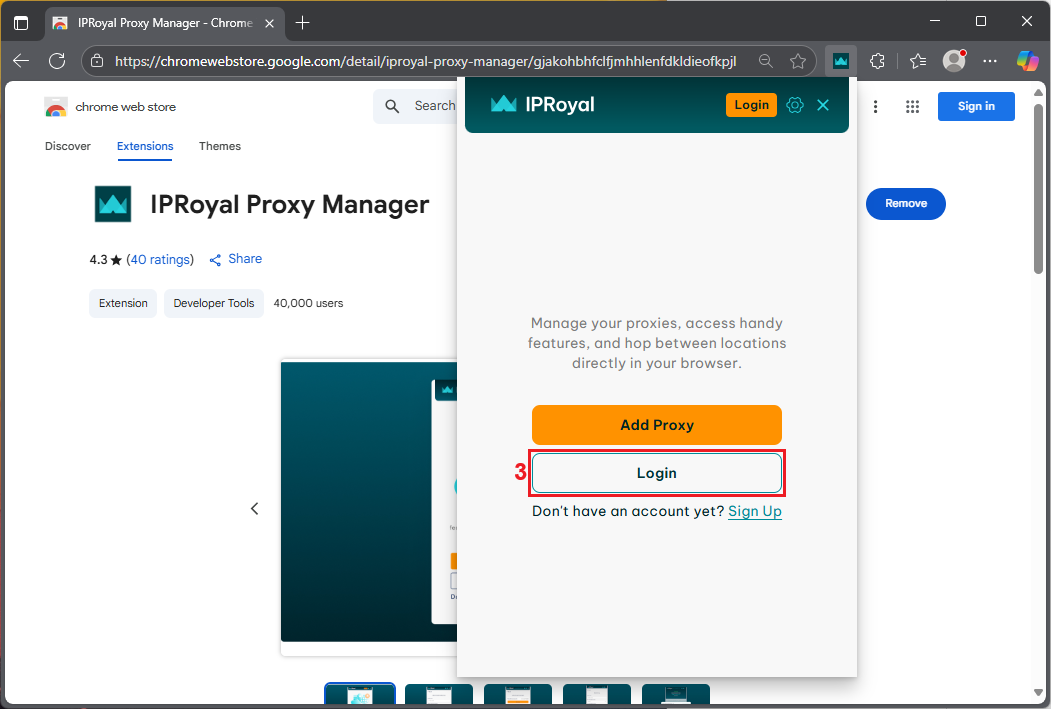
3. After installing the extension, pin it for easier access and click the icon from the extensions panel. Here, the IPRoyal proxy extension gives you two options: add proxies manually or log in to your IPRoyal account, which is easier and more convenient if you already have one.
Click the ‘Login’ (3) button to sign in to your IPRoyal dashboard.
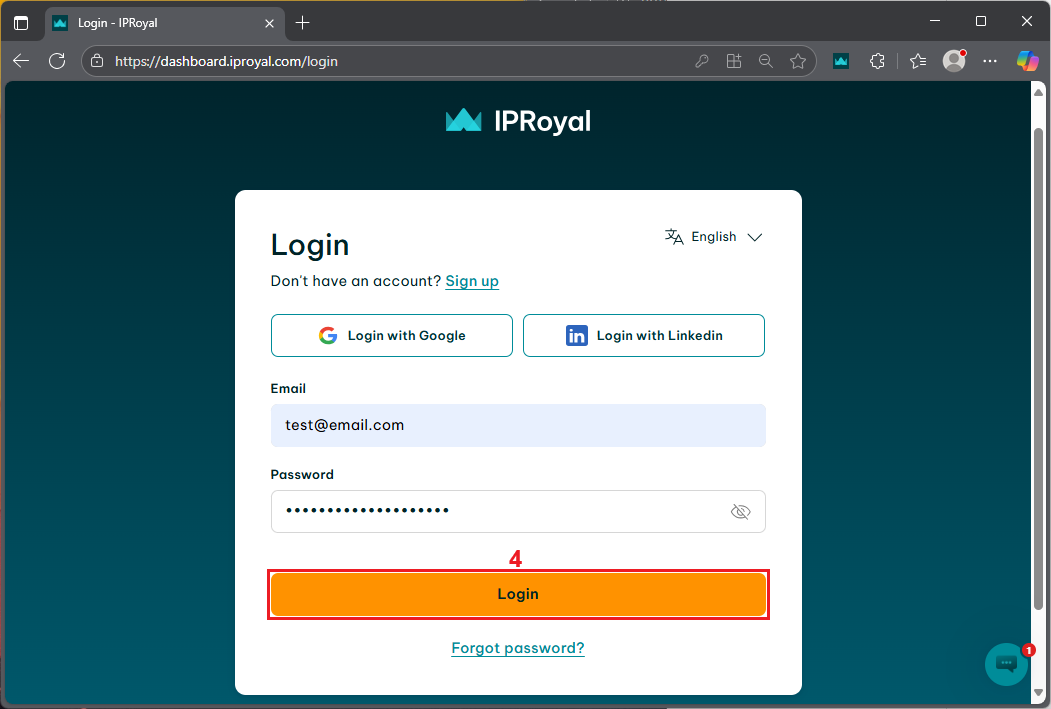
4. Enter your username and password and click the ‘Login’ (4) button.
5. Click the ‘Open Extension’ button (5) and you’re now ready to manage your Edge proxy servers and create proxy profiles.
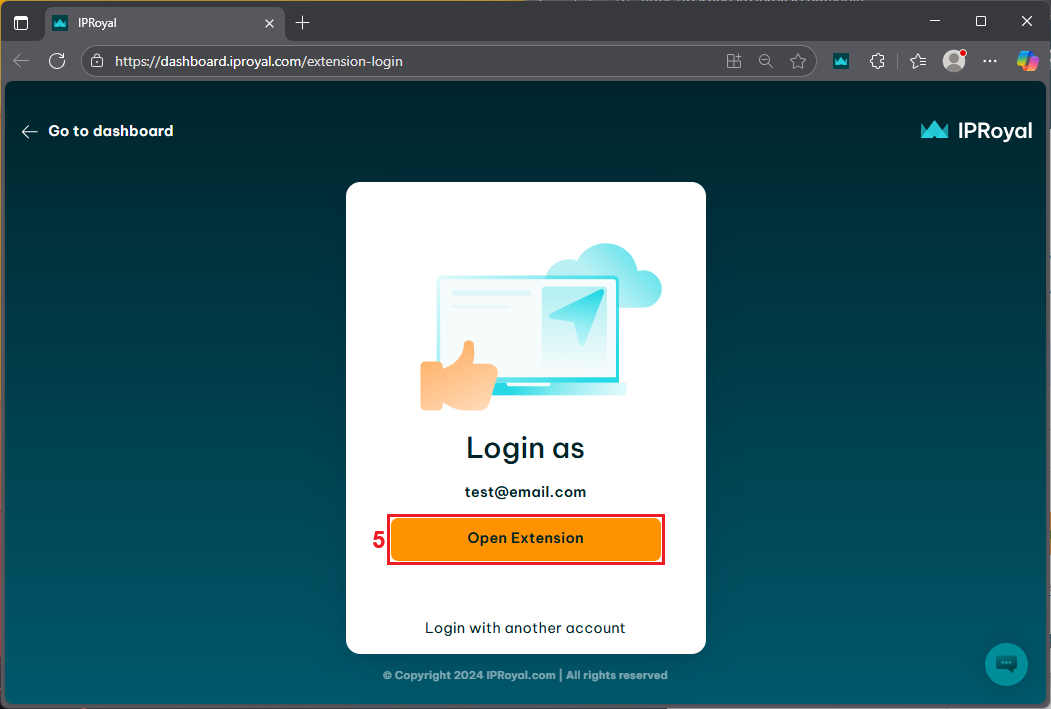
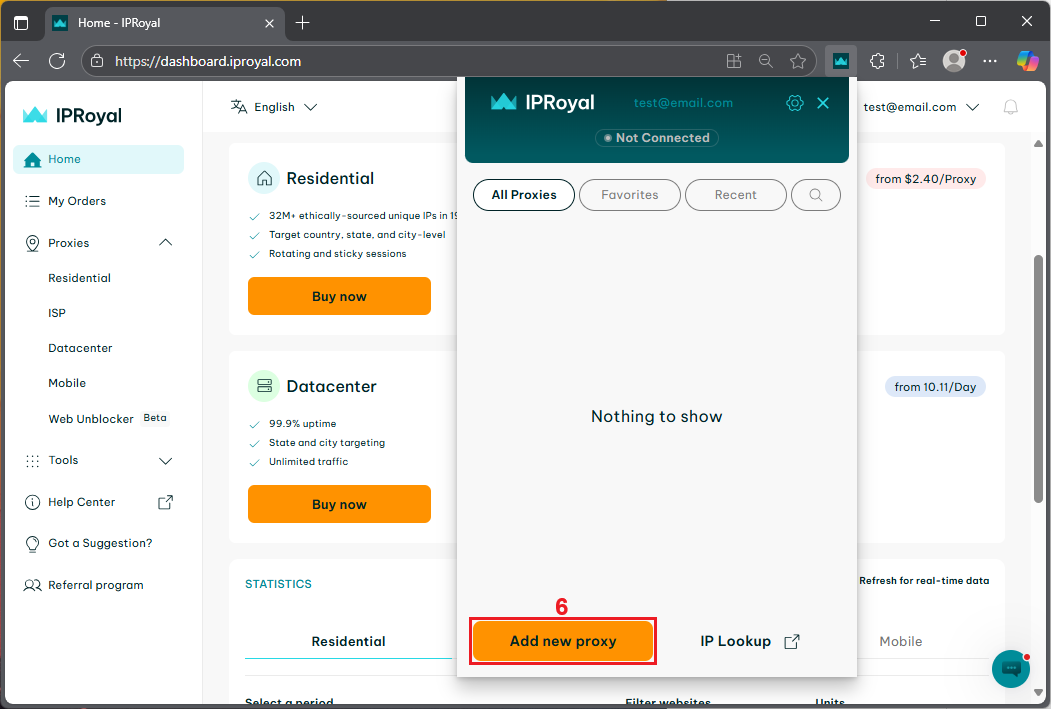
6. Click the ‘Add new proxy’ (6) button.
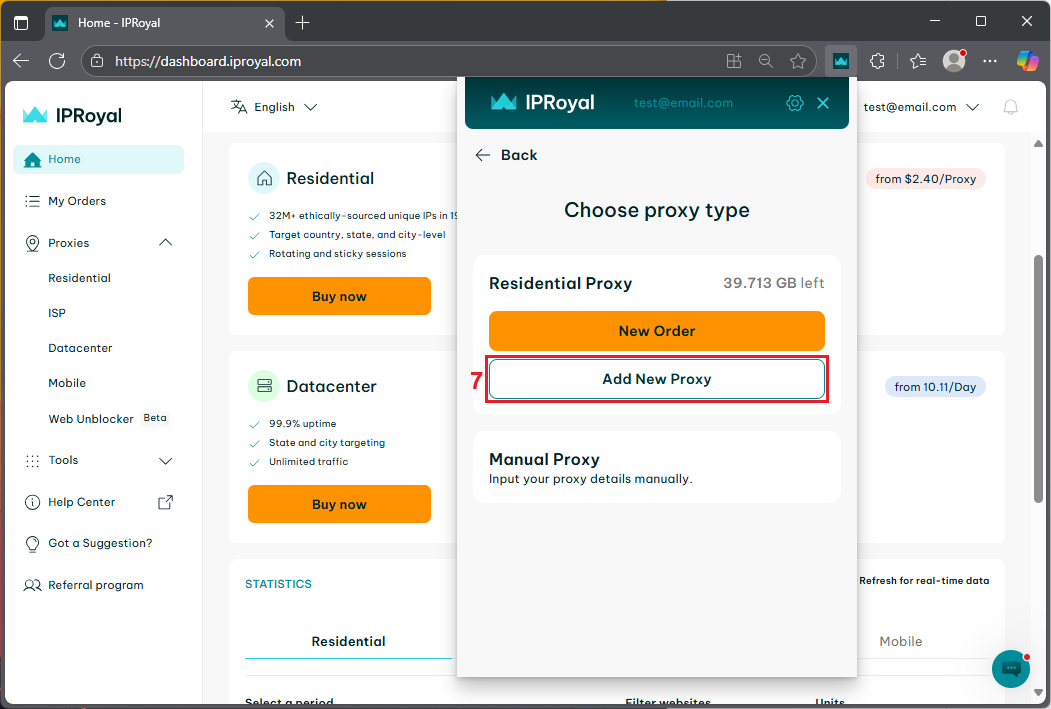
7. Choose the proxy type, Residential or Manual. For Residential Proxies, you can place orders without visiting the IPRoyal dashboard by clicking the ‘New Order’ button. If you already have residential traffic available on your IPRoyal account, click the ‘Add New Proxy’ (7) button as shown below.
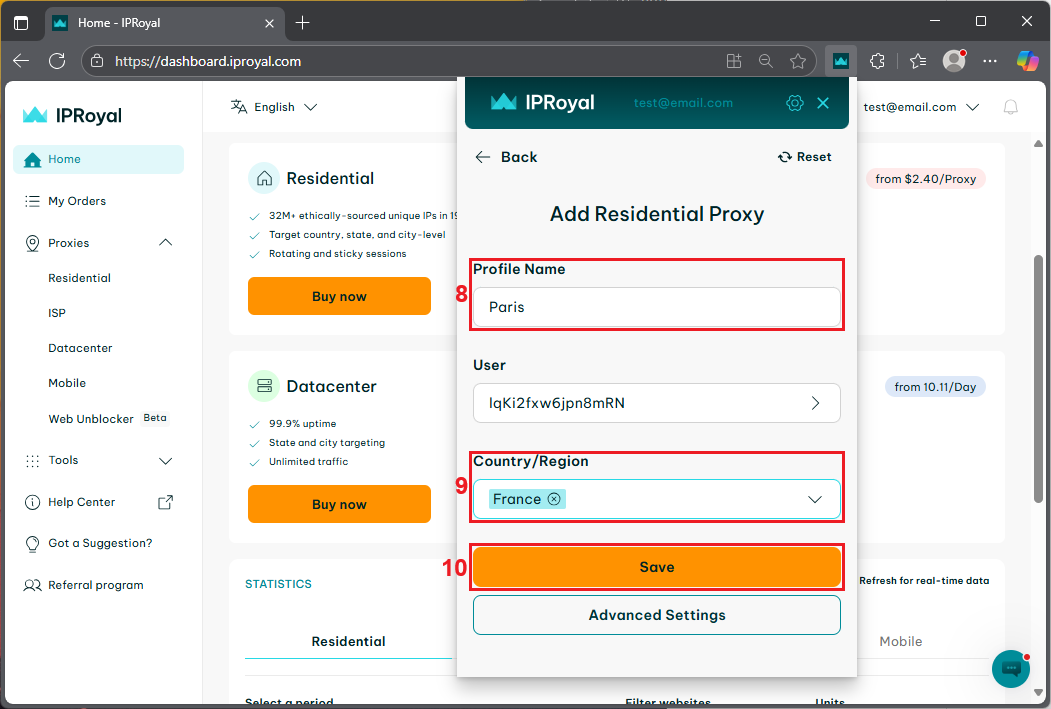
8. Name your proxy server under ‘Profile Name’ (8) choose the IP location (9), and click the ‘Save’ (10) button. The extension will automatically generate your proxy credentials.
9. Your new proxy profile will now be visible in the extension interface. To activate it, click the ‘Connect’ (11) button next to the profile.
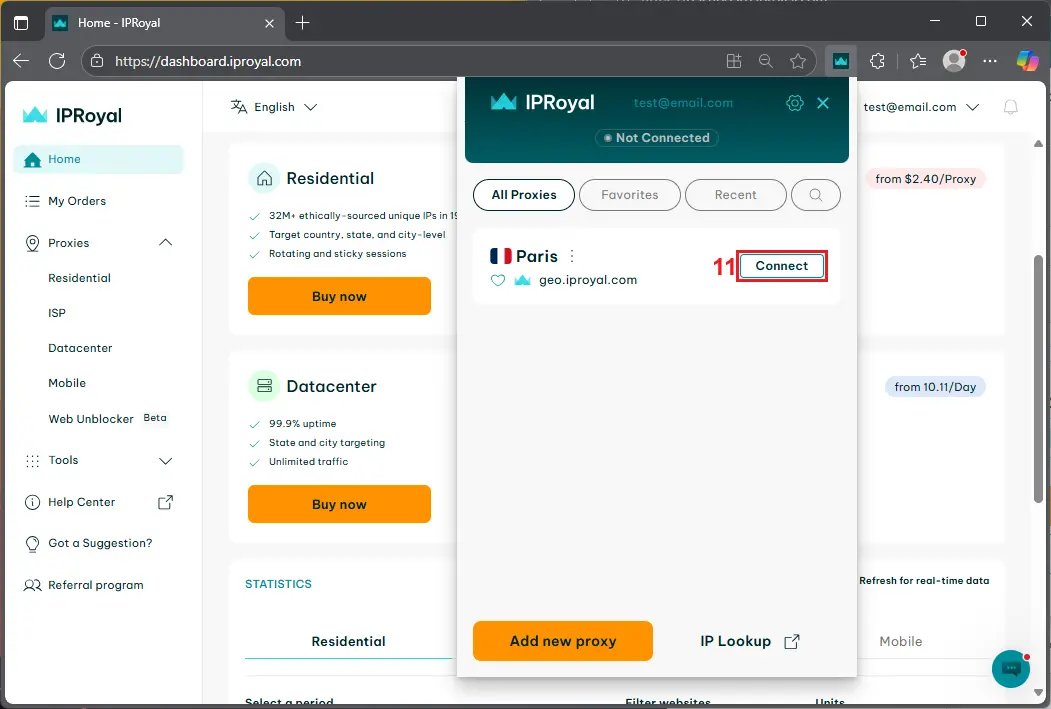
10. Once the connection is successful, the status will change to “Connected.” Click the ‘IP Lookup’ (12) button to check if your proxy is working correctly using our free IP checker tool.
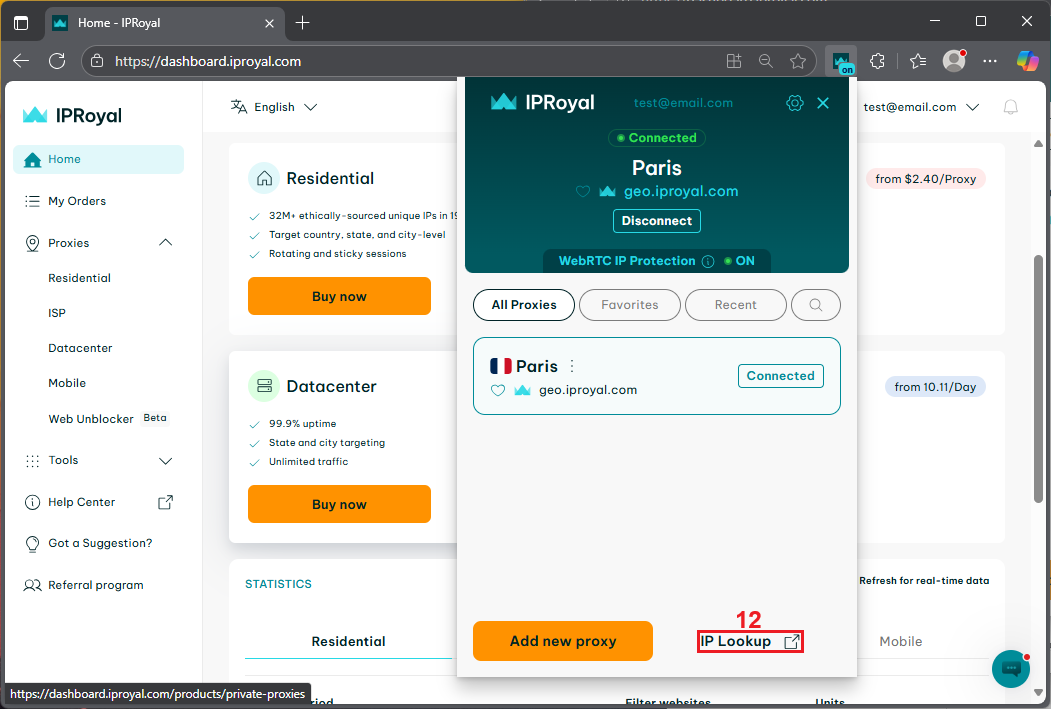
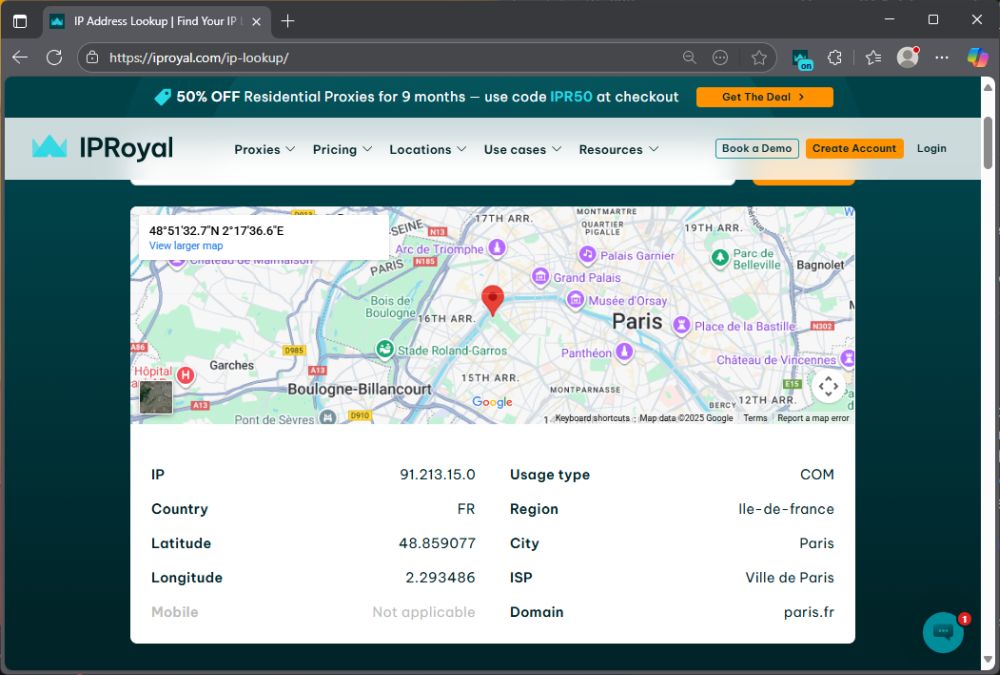
11. The IP Lookup page will show your proxy’s IP address, location, and other useful information.
12. For more customization options, click the three dots next to your proxy in the extension and select ‘Edit Proxy’ (13).
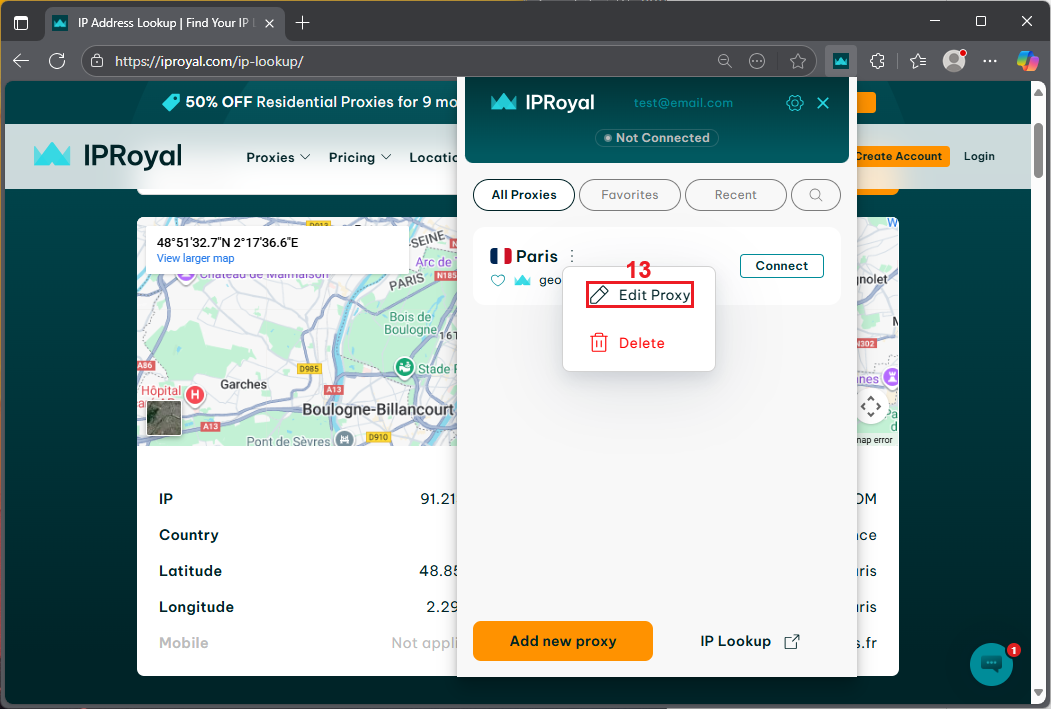
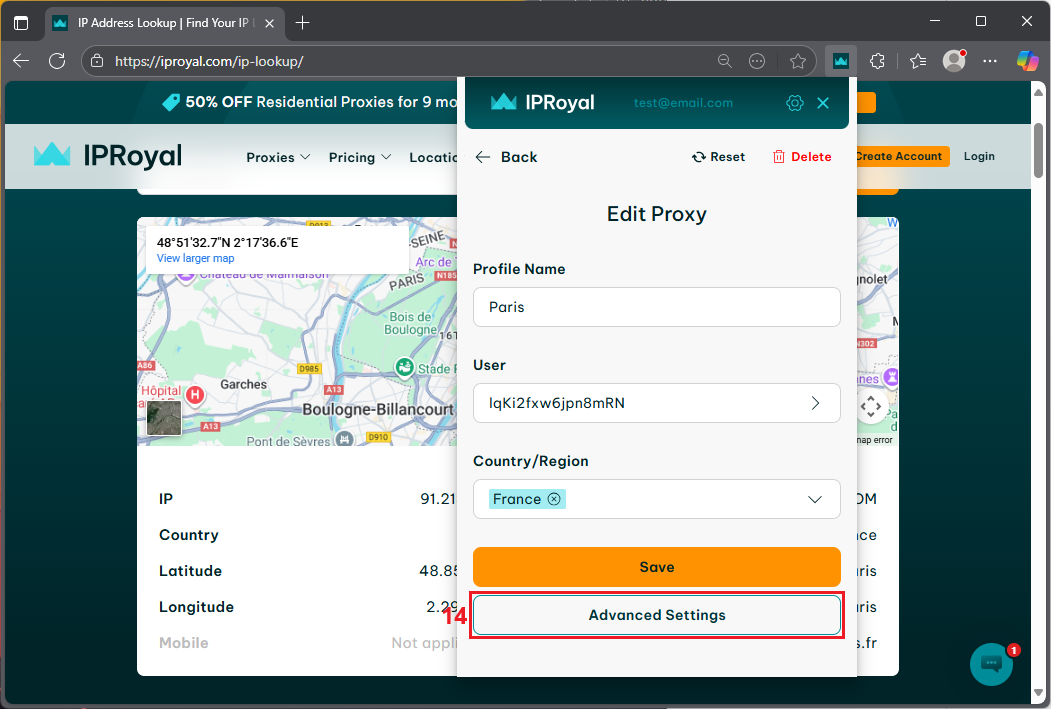
13. Then, click the ‘Advanced Settings’ (14) button to configure advanced proxy settings like high-end pool, city/state-level targeting, IP rotation, and IP skipping.
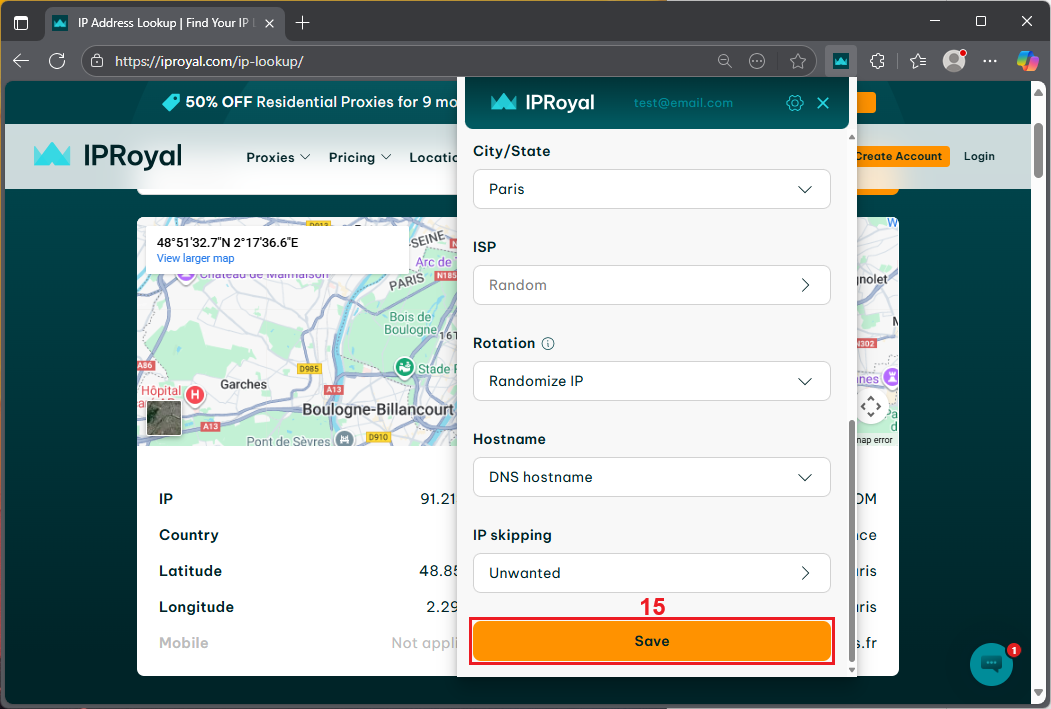
14. Once you configure your proxy, click the ‘Save’ (15) button to confirm the changes.
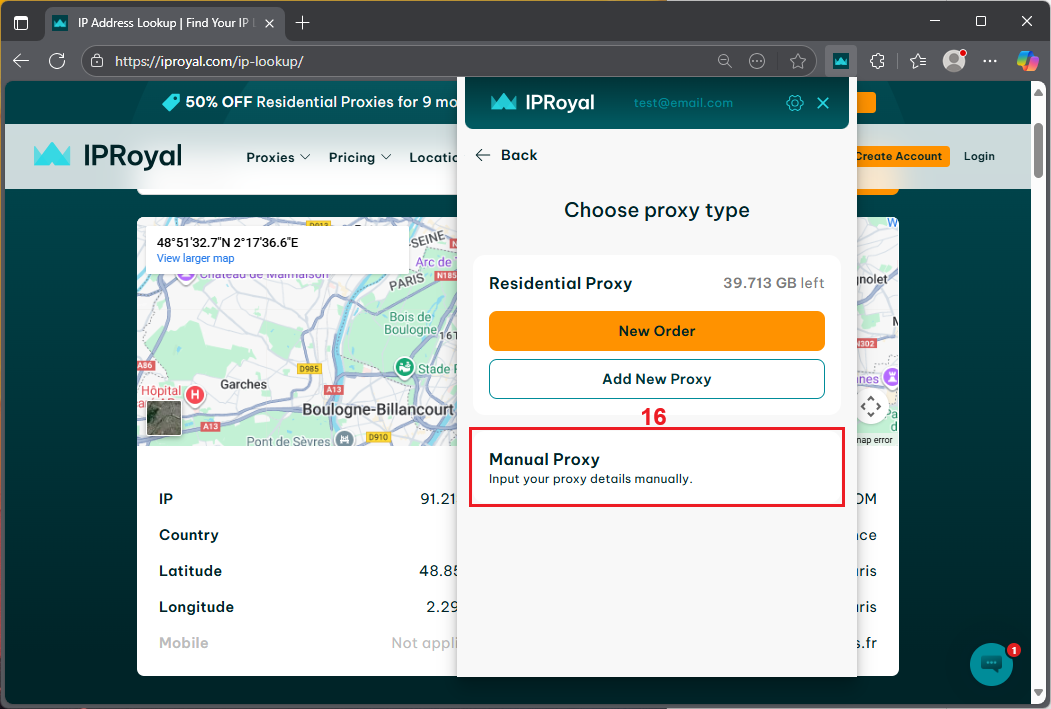
15. To add your proxy credentials manually, click the ‘Manual Proxy’ (16) button.
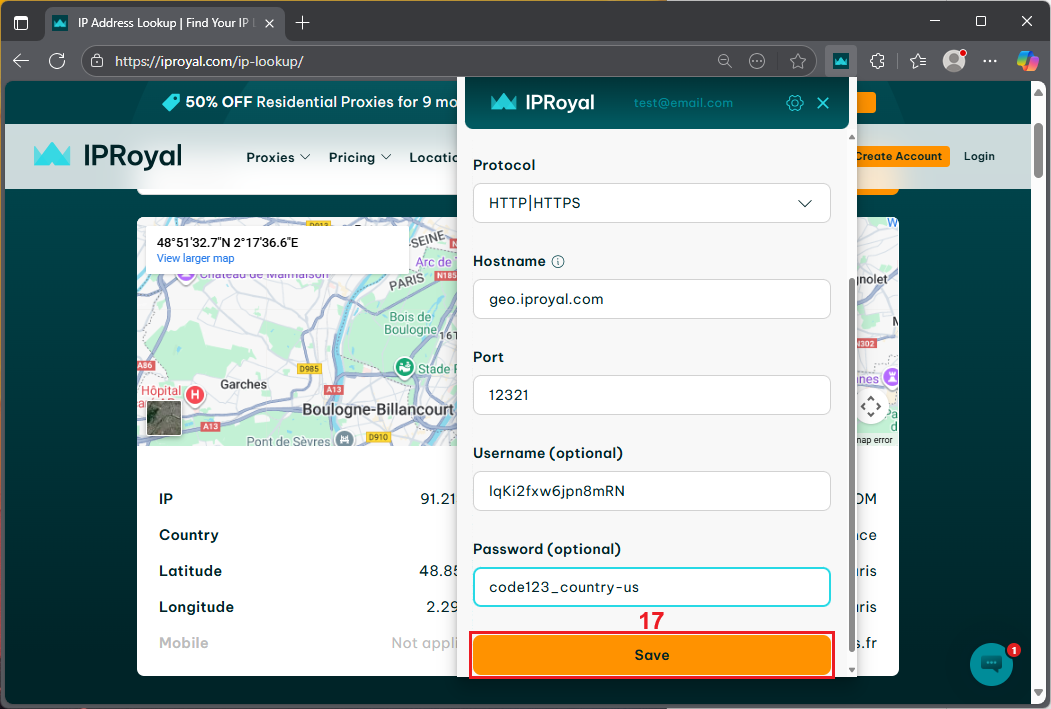
16. Name your proxy, select the protocol, add your proxy credentials, and click the ‘Save’ (17) button.
17. Your newly added proxy will appear on your extension interface. When you want to activate it, click the ‘Connect’ (18) button next to it.
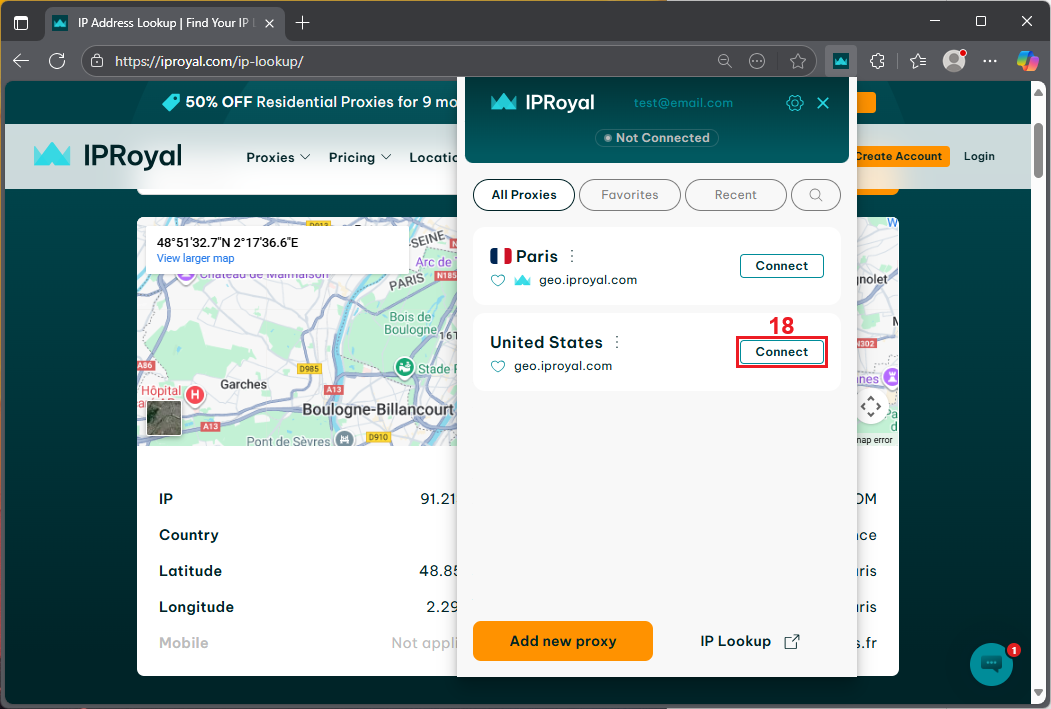
28. To deactivate your residential or manually added proxy, click ‘Disconnect’ (19) and Edge will no longer route your traffic through the proxy.
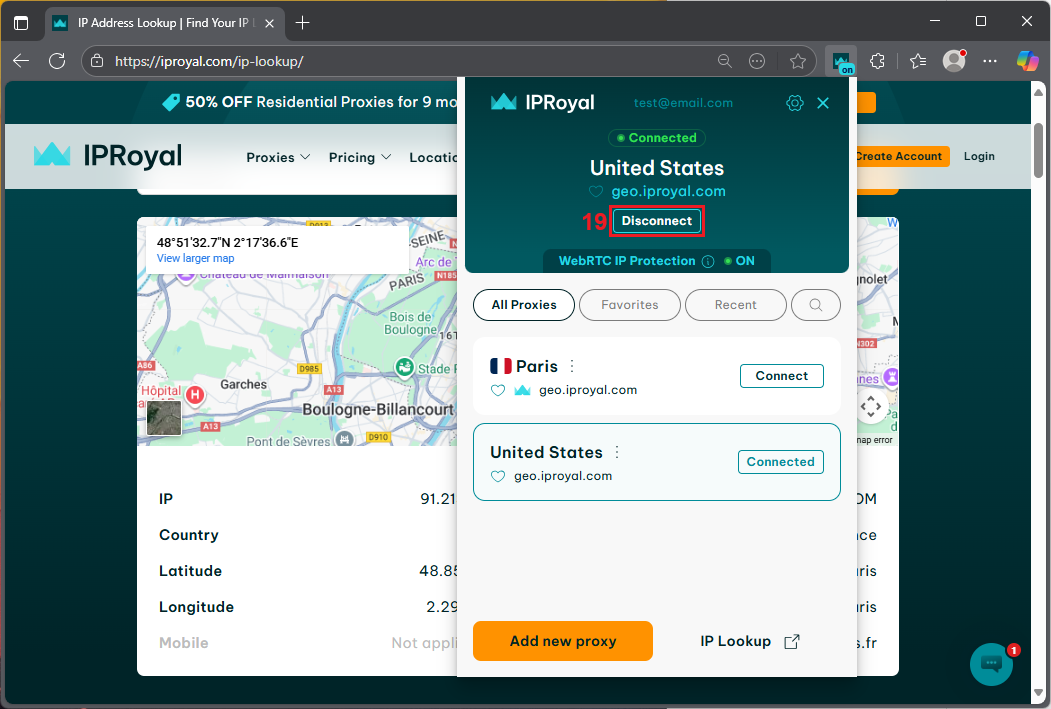
With this proxy extension, you can add as many proxies as you want and switch between them with a single click.
Final Words
Using a proxy in Microsoft Edge can turn the browser into a powerful tool for your workflow. Whether you need increased privacy for sensitive operations, access to geo-restricted content, or lower risk of blocks and rate limits during automation, the right proxy setup makes it possible.
With IPRoyal’s high-quality proxies and the Chrome Proxy Extension that’s compatible with Microsoft Edge and other Chromium-based browsers, you can count on smooth and scalable operations.