'%20fill-rule='evenodd'%20clip-rule='evenodd'%3e%3cpath%20d='M21.9952%2012.2202c-.0019-.6851-.108-1.3688-.2269-2.0439h-9.6238v3.8768h5.4928c-.1125.6103-.3507%201.1919-.6999%201.7094-.3492.5175-.8022.9601-1.3315%201.3009v2.5105h3.3479c1.005-.9487%201.7951-2.0936%202.3191-3.3605.524-1.2668.7701-2.6273.7223-3.9932Z'%20fill='%234285F4'/%3e%3cpath%20d='M12.1415%2021.9954c2.5027.0755%204.9397-.7912%206.8092-2.4216l-3.3025-2.5105c-1.031.6482-2.2362.9808-3.4613.9553-1.266-.0247-2.49275-.4349-3.50967-1.1735-1.01691-.7385-1.81874-1.8128-2.20993-2.9916l-3.4048.0439v2.5438c.84005%201.6575%202.13352%203.0542%203.73642%204.0348%201.60291.9806%203.45238%201.5066%205.34258%201.5194Z'%20fill='%2334A853'/%3e%3cpath%20d='M6.46884%2013.8531c-.42382-1.2324-.42382-2.4897%200-3.7221V7.55469H3.06422C2.36423%208.93568%202%2010.4564%202%2011.998c0%201.5416.36423%203.0624%201.06422%204.4434l3.40462-2.5883Z'%20fill='%23FBBC05'/%3e%3cpath%20d='M12.1415%206.02167c1.4529-.02643%202.8572.46854%203.9039%201.45519l2.9053-2.87706c-1.8433-1.69203-4.2823-2.62308-6.8092-2.59936-1.8902.01282-3.73967.5388-5.34258%201.5194-1.6029.9806-2.89637%202.37735-3.73642%204.03478l3.40462%202.58828c.39118-1.17886%201.1478-2.20915%202.16472-2.94772%201.01691-.73857%202.24366-1.14874%203.50966-1.17351Z'%20fill='%23EA4335'/%3e%3c/g%3e%3c/svg%3e)
Whether you want to avoid ads, bypass geo-restrictions, or ensure a little more privacy, configuring proxies on your iOS device is the answer. While the process requires some manual configuration, it's much easier than it seems once you know some basics about proxy servers.
What Is a Proxy Server? How Can It Help You?
We can think of proxy servers as a middleman. Instead of accessing websites and apps directly, your device sends your requests to the iOS proxy server first, which then reroutes all communications.
The proxy server changes your IP address by using its own to connect to websites. Your real IP remains hidden, and websites only interact with the proxy’s IP. As such, an iOS proxy server ensures various benefits.
- Enhanced privacy and anonymity. IP addresses are the primary method of tracking users online. By routing your data, iPad or iPhone proxies hide your original IP, preventing websites, advertisers, and trackers from identifying you.
- Access to geo-restricted content. A proxy provider can have servers located anywhere in the world. Routing your traffic through a proxy server in a different location makes it appear as though it is coming from a different region where the same geo-restrictions do not apply.
- Bypass network restrictions. Your local network, such as an office or school, may restrict access to certain websites. Routing traffic through to an iPhone proxy server can help you bypass these restrictions.
- Avoid IP blocking and rate limiting. In cases of web scraping or automation, proxy servers are needed to circumvent rate limits or IP blocks. Rotating residential proxies are especially great since they can distribute your requests across a pool of quality IP addresses.
How to Set Proxy on iPhone
Since iOS doesn't support configuring proxies over mobile networks, you'll need to begin the process by creating a Wi-Fi connection. You'll also need a quality proxy server, and its credentials ready.
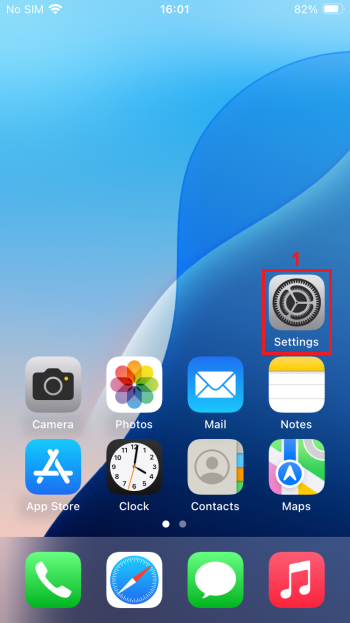
1. Unlock your device and tap on 'Settings' (1).
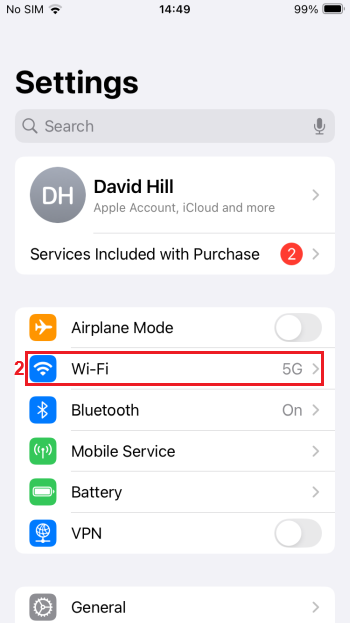
2. Tap on 'Wi-Fi' (2).
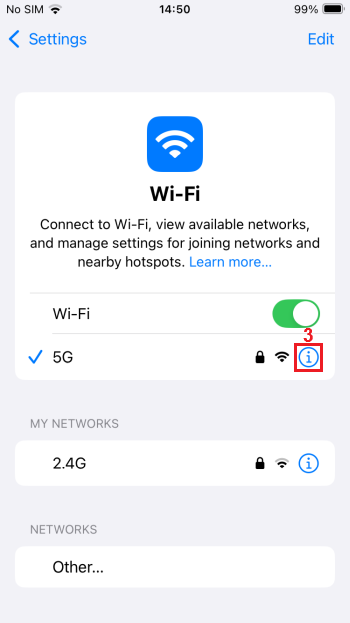
3. Look for the Wi-Fi network you’re currently connected to and tap the blue info icon (3) on the right.
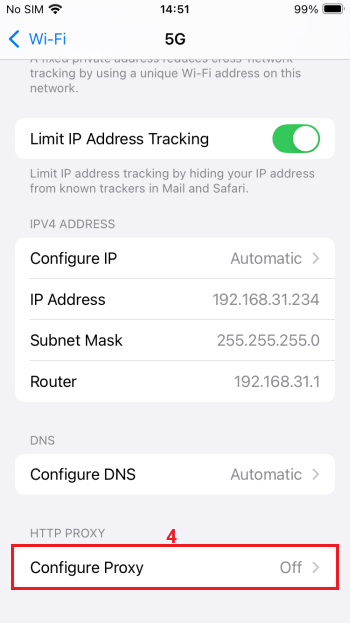
4. In the new widget that appears, scroll down and tap on 'Configure proxy' (4) under 'HTTP Proxy.'
5. You’ll see three new options:
- Off is the default state when proxy settings are not configured;
- Manual configuration lets you configure proxy settings yourself;
- Automatic proxy detection works with network proxies that are preconfigured at the network level.
Choose 'Manual' (5) to enter your proxy details.
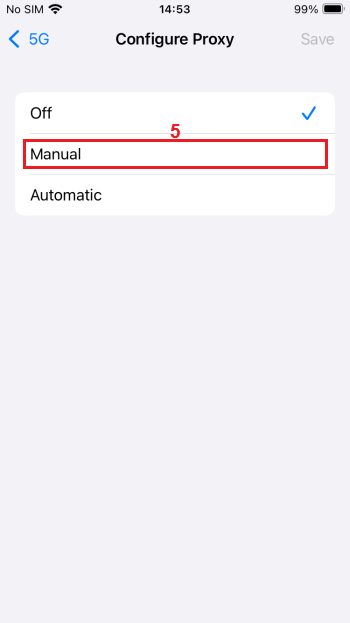
6. Visit the IPRoyal dashboard and configure your proxies. We’ll use high-end (6) IPs from London, UK (7), with the HTTP|HTTPS protocol (8), and IP rotation (9). Once you configure your proxies, your credentials (10) will update automatically.
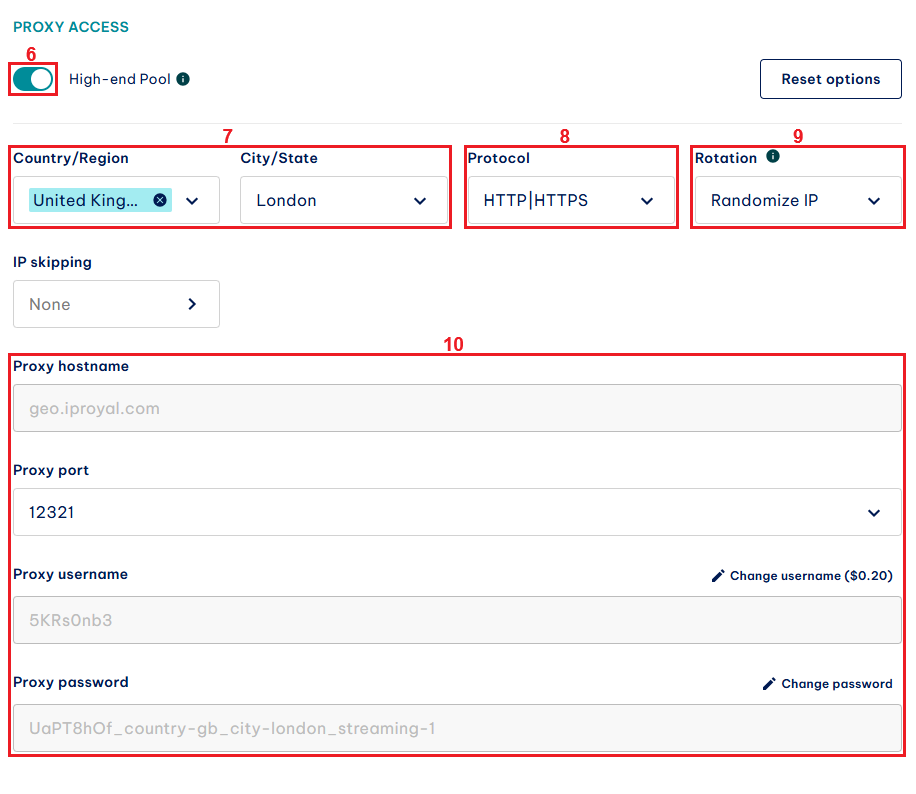
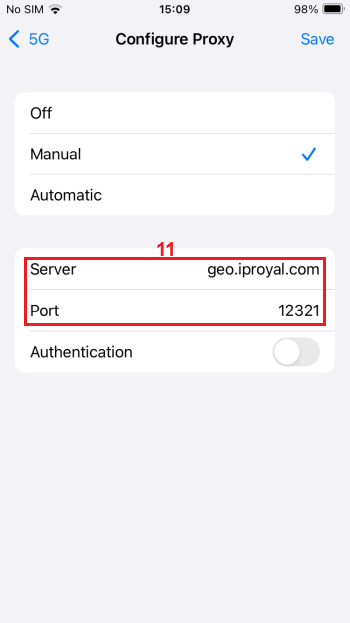
7. Get back to iPhone or iPad proxy settings. Copy the information from the IPRoyal dashboard (Proxy hostname and Proxy port) to the 'Server' and 'Port' (11) fields.
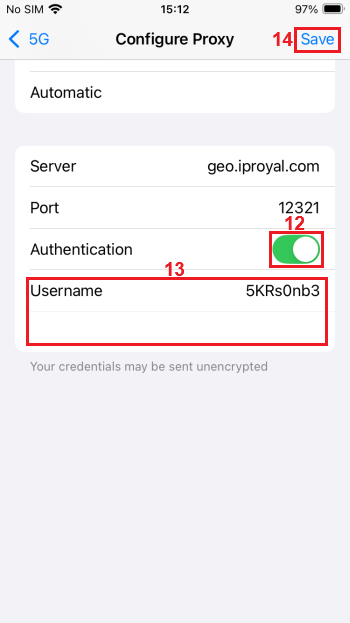
8. IPRoyal proxies require username and password authentication (unless you use IP whitelisting), so toggle the authentication button (12) to On, and copy the information from the IPRoyal dashboard (Proxy username and Proxy password) to the 'Username' and 'Password' (13) fields. Tap 'Save' (14) when you’re done.
To confirm whether your iPad or iPhone proxy server works, open your browser and visit our IP Lookup page. The website displays your current IP address. If it's the one you just set up in the proxy settings, the proxy server is working as intended.
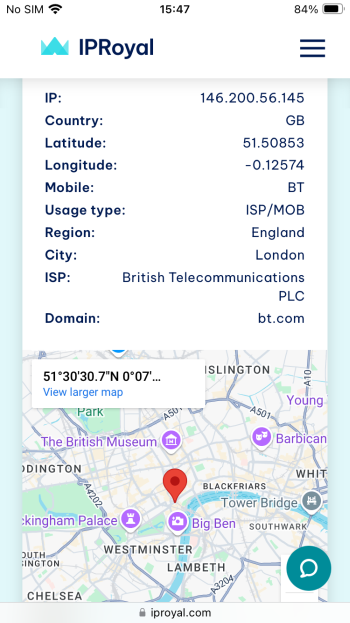
However, if it's your regular IP address from your internet service provider, you may have missed some steps. Go back to your iPad or iPhone proxy settings and start the process again.
Setting Up SOCKS5 Proxies
If you're using proxies with the SOCKS5 protocol, you'll need to follow a different process. There is no native support of SOCKS5 for iPhone or iPad devices, so you'll need to use third-party apps like Shadowrocket or Potatso to configure iOS SOCKS5 proxy servers.
These apps will allow you to bypass your iPhone settings when configuring proxies, adding a variety of functions for proxy pool management and privacy. Proxy apps are also useful when you want to configure proxies without access to a Wi-Fi connection and only with mobile data.
Conclusion
Configuring iPhone proxy settings sounds more complicated than it is. Following the steps here, you should set up your iOS proxy in minutes. Almost any proxy server type will work for common cases as long as you use a reputable proxy provider, such as IPRoyal.
Yet, Mobile proxies are generally considered the best option for iOS devices. Such proxies use real devices with authentic ISP-issued IP addresses on mobile networks, which provides the best compatibility when used as iPad or iPhone proxies.