A proxy server can be useful for many reasons. Whether you want to access geo-restricted content, set up your own VPN, or simply hide your location, proxy servers are the go-to solution. Apple devices are no exception. In this article, we’ll highlight the importance of using proxies on macOS and guide you through the process.
Why Set Up a Proxy on Mac?
There are several benefits of setting up a proxy server on your Mac. Since proxy servers act as intermediaries between your device and the internet, they can significantly increase your online privacy and security by masking your IP address. This approach is particularly beneficial on public Wi-Fi networks or when you’re trying to bypass geo-restrictions.
Additionally, you can use proxies to manage multiple connections, test websites and apps from different locations, or maintain anonymity while browsing sensitive data.
In terms of setting up a proxy on a Mac, you have several options. Modern macOS versions have elaborate network settings, so you can use automatic proxy configuration, auto proxy discovery, set up an HTTP(S) or SOCKS proxy, and more. Even if you don’t have access to your system preferences for whatever reason, you can still take advantage of a web proxy.
What Do You Need to Set Up a Proxy on Mac?
To start using a proxy server on your Mac, you’ll need a few things. A Mac running a currently supported macOS version is essential. Most modern versions will do fine (Monterey, Ventura, Sonoma, or Sequoia), as they all support proxy server settings natively.
In addition to your computer, you’ll also need the proxy server details. These include your proxy IP address or hostname, port, username, and password if you’re using a third-party proxy provider. You can also get a PAC file from your network administrator.
If you prefer to use a web proxy, you don’t need anything else. Make sure you trust the host and avoid performing any sensitive tasks unless you’re using a secure web proxy you can trust.
How to Set Up Proxy on Mac?
For visual learners watch this video:
The procedure for changing proxy settings on macOS doesn’t differ significantly between operating system versions. System Preferences changed its name to System Settings a while ago, and you might run into an extra step here and there, but everything should be where you expect it to be. For this tutorial, we’ll use macOS Sequoia version 15.1.1.
You can change proxy settings in the System Settings (or System Preferences), so we’ll start there.
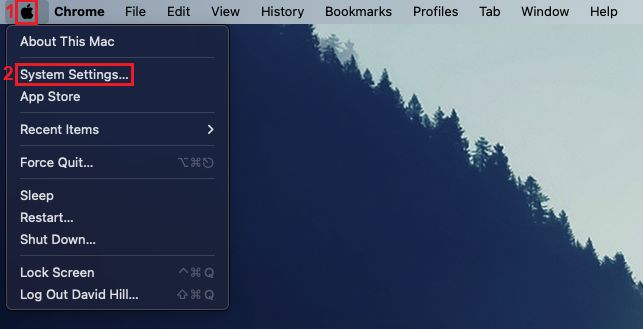
1. Click on the Apple icon (1) and select System Settings (2) from the menu.
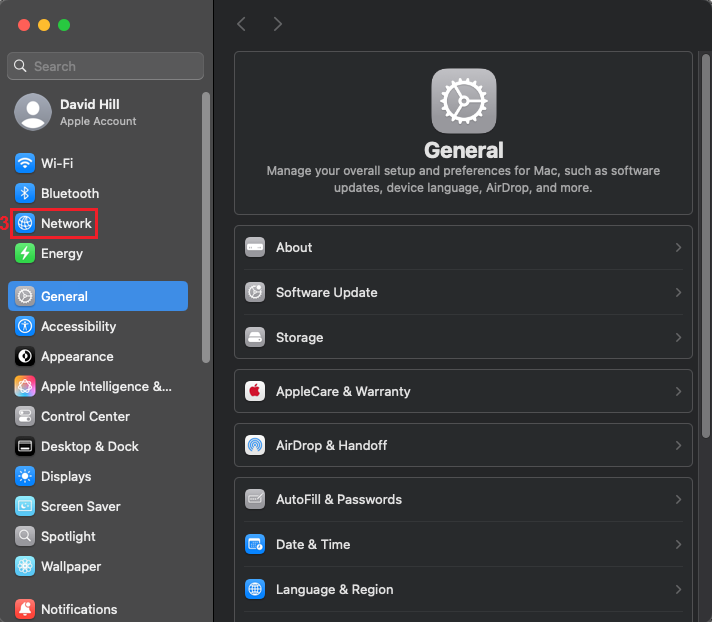
2. In the new window, click on Network (3).
3. Proxy settings are separated for wired and wireless connections. Click on the connection type (4) you want to use with a proxy server (Wi-Fi or Ethernet).
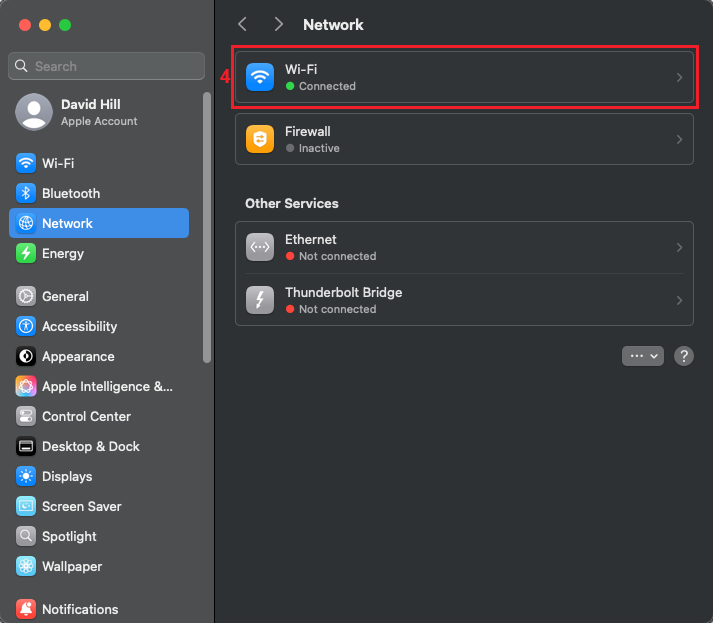
4. Find the connection you want to configure and click the Details button (5) next to it.
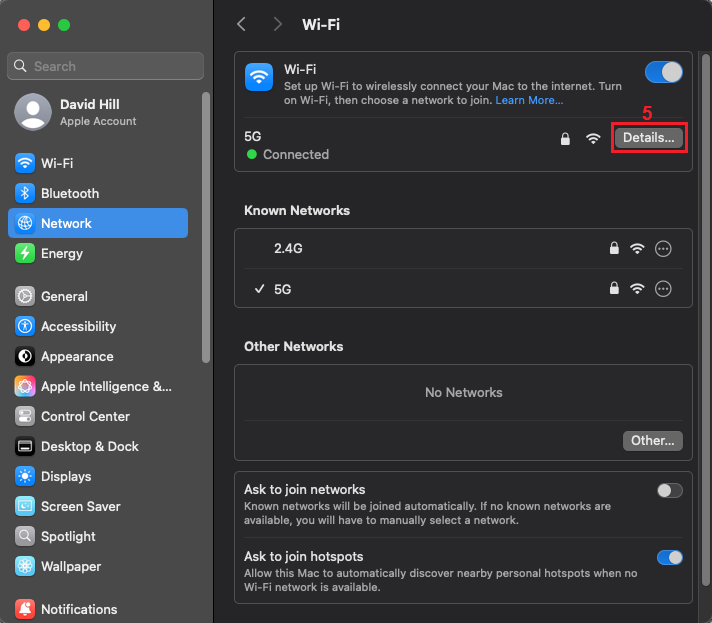
5. Click on Proxies (6) in the left-side menu.
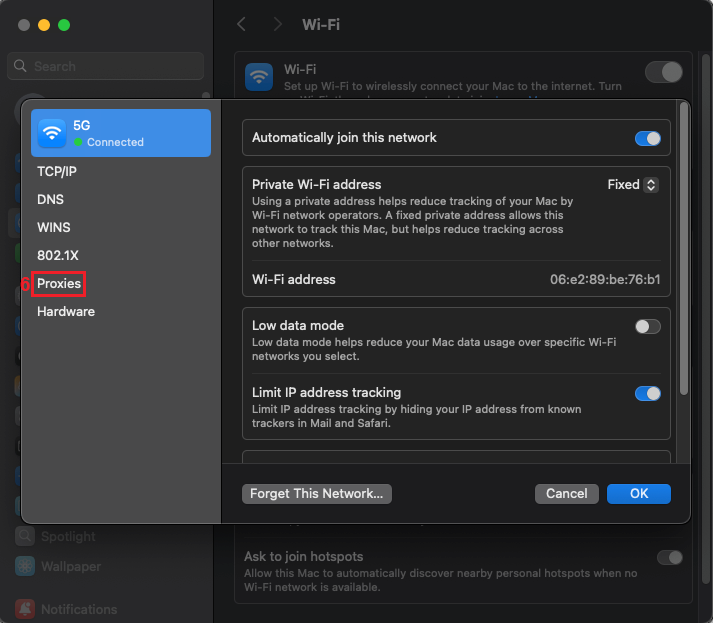
6. You have several options here. Turn on Auto proxy discovery (7) if your network broadcasts proxy settings. If you got your proxy server configuration as a URL or a PAC file, turn on Automatic proxy configuration (8) and provide it.
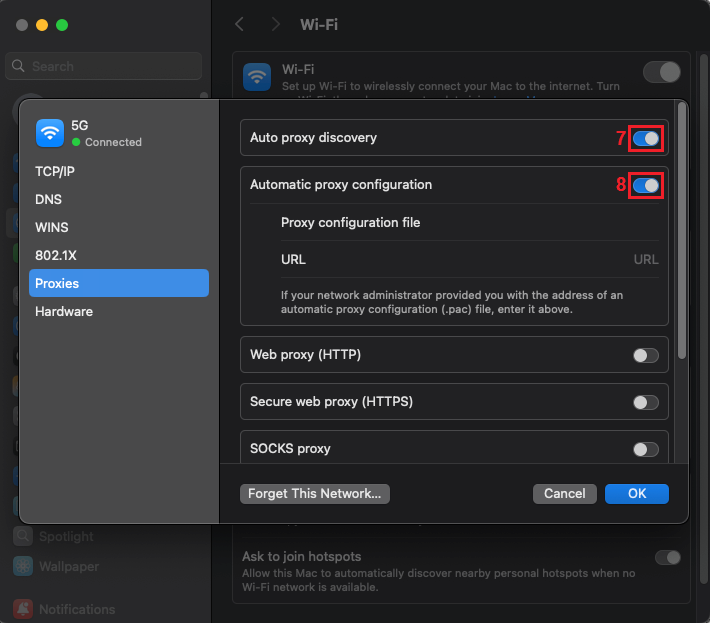
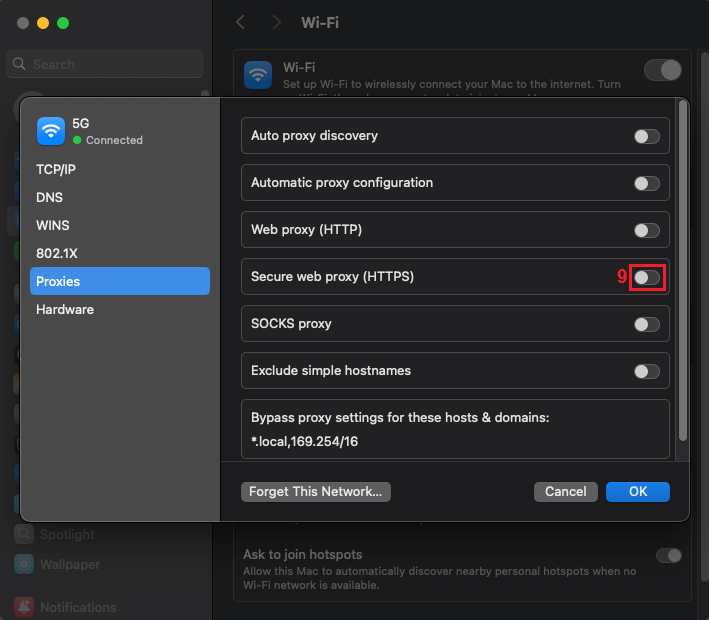
7. If you’re using a third-party proxy provider, turn off the options above. Instead, toggle the switch next to the proxy type you want to use. We’ll go with HTTPS proxies (9).
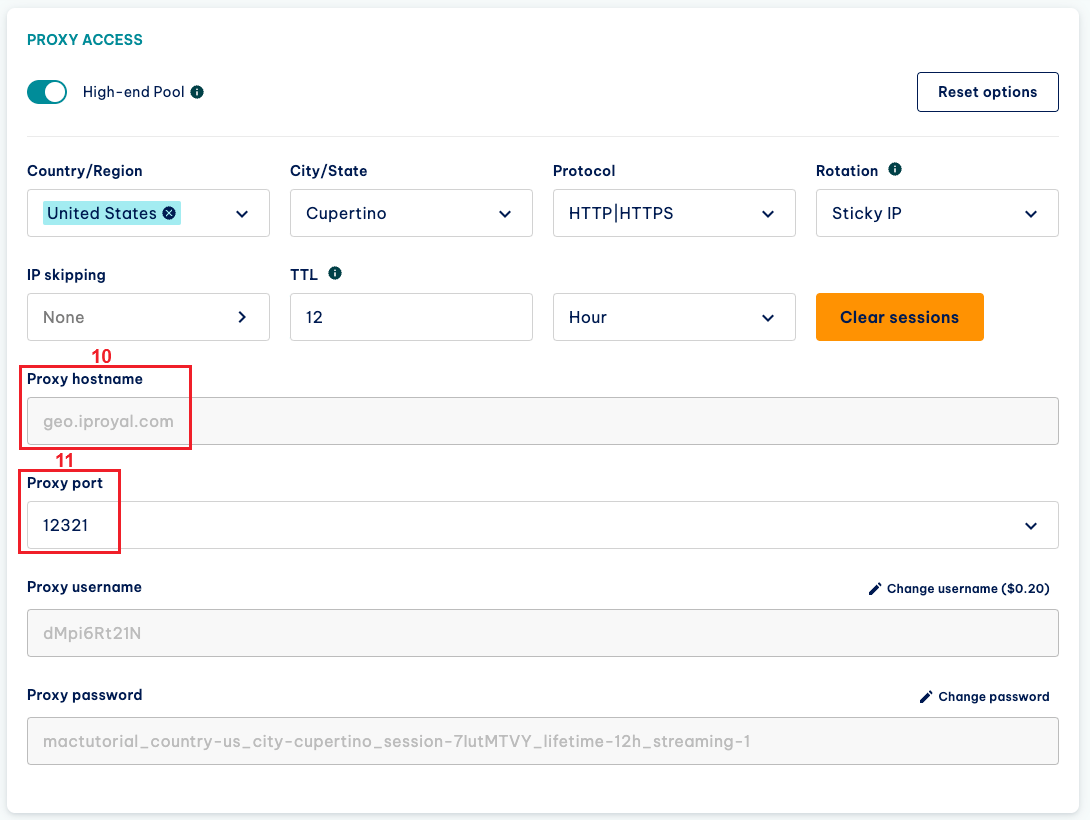
8. We’ll use residential proxies. Visit the IPRoyal dashboard and configure your proxies (location, protocol, rotation, and so on). Once you’re done, you’ll need the Proxy hostname (10) and Proxy port (11).
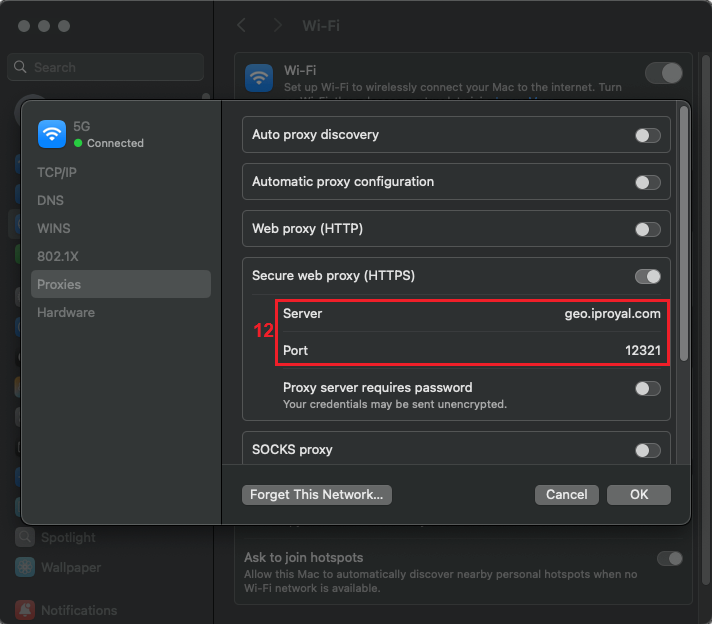
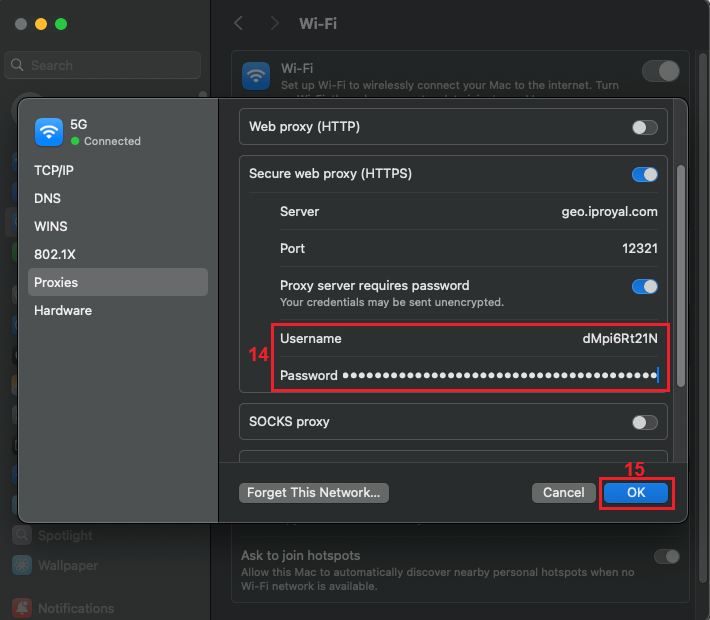
9. Copy this information into the server and port fields (12) in the system settings window.
10. If you’re not using IP whitelisting, turn the Proxy server requires password (13) option on.
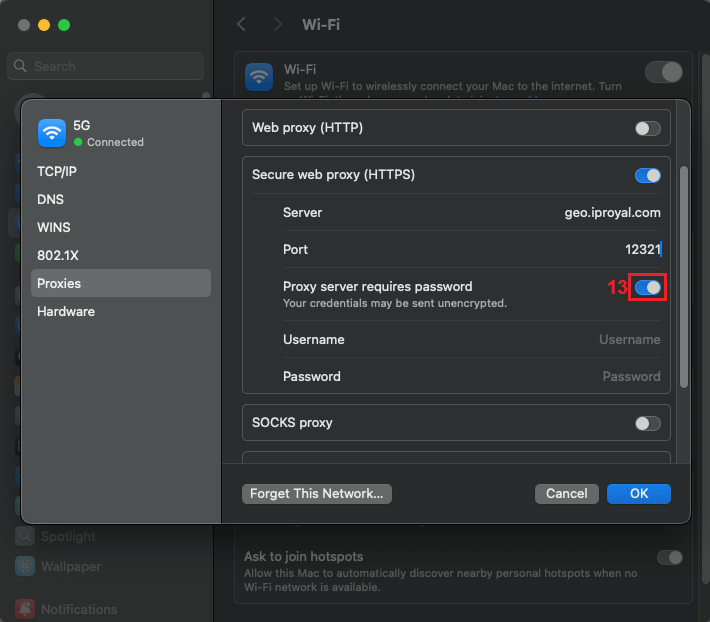
11. Copy your username and password from the IPRoyal dashboard to the appropriate fields (14) and click OK (15).
How to Verify Your Proxy Setup?
Checking if your newly configured proxy works is simple - you don’t need to open system preferences or anything like that. Simply visit a website that can display your current IP address, like our IP Address Lookup page.
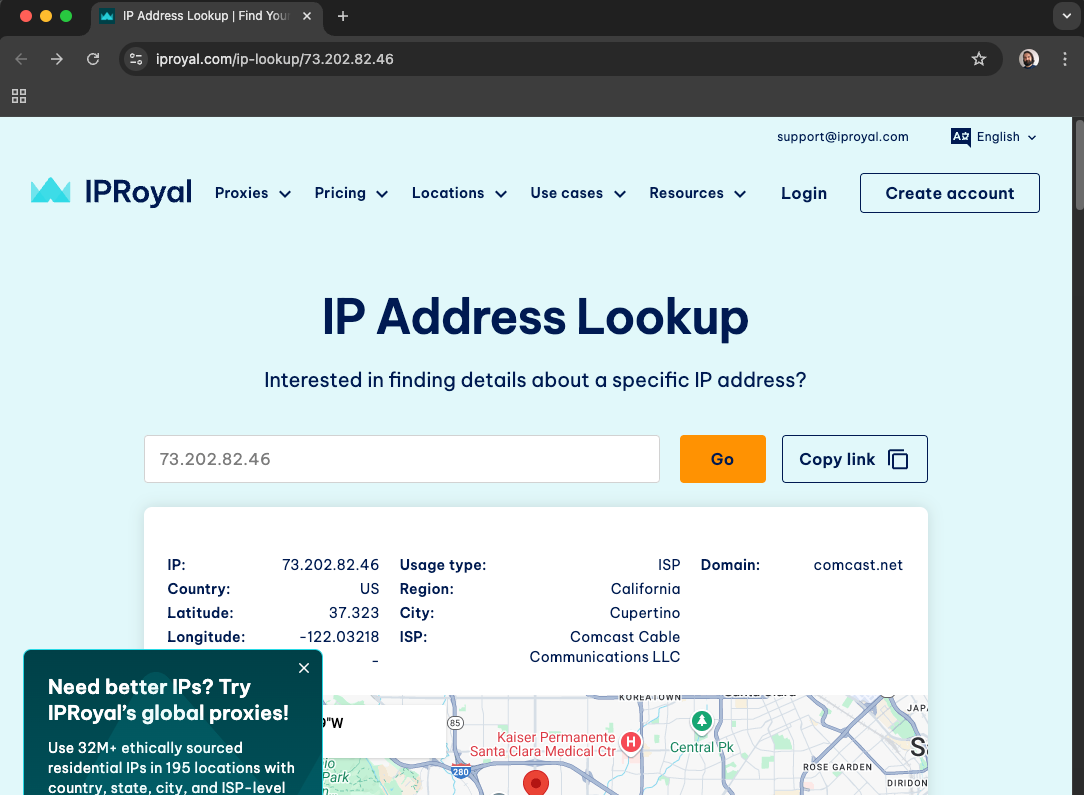
As expected, our new IP address is from Cupertino, California, so our proxy server is working correctly. You can also see some additional information here, including IP type, ISP, and more.
How to Disable Proxy on Mac?
Finally, disabling your Mac proxy is easy. Simply return to the proxy configuration window, uncheck everything, and click OK when done.
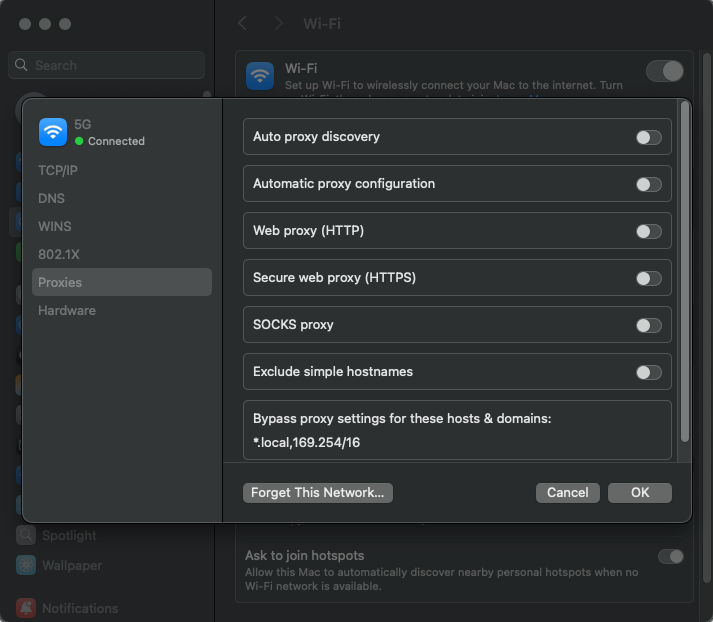
Note that macOS “remembers” your proxy settings even if you disable everything. This will come in handy if you ever need to use the same proxy again.
