'%20fill-rule='evenodd'%20clip-rule='evenodd'%3e%3cpath%20d='M21.9952%2012.2202c-.0019-.6851-.108-1.3688-.2269-2.0439h-9.6238v3.8768h5.4928c-.1125.6103-.3507%201.1919-.6999%201.7094-.3492.5175-.8022.9601-1.3315%201.3009v2.5105h3.3479c1.005-.9487%201.7951-2.0936%202.3191-3.3605.524-1.2668.7701-2.6273.7223-3.9932Z'%20fill='%234285F4'/%3e%3cpath%20d='M12.1415%2021.9954c2.5027.0755%204.9397-.7912%206.8092-2.4216l-3.3025-2.5105c-1.031.6482-2.2362.9808-3.4613.9553-1.266-.0247-2.49275-.4349-3.50967-1.1735-1.01691-.7385-1.81874-1.8128-2.20993-2.9916l-3.4048.0439v2.5438c.84005%201.6575%202.13352%203.0542%203.73642%204.0348%201.60291.9806%203.45238%201.5066%205.34258%201.5194Z'%20fill='%2334A853'/%3e%3cpath%20d='M6.46884%2013.8531c-.42382-1.2324-.42382-2.4897%200-3.7221V7.55469H3.06422C2.36423%208.93568%202%2010.4564%202%2011.998c0%201.5416.36423%203.0624%201.06422%204.4434l3.40462-2.5883Z'%20fill='%23FBBC05'/%3e%3cpath%20d='M12.1415%206.02167c1.4529-.02643%202.8572.46854%203.9039%201.45519l2.9053-2.87706c-1.8433-1.69203-4.2823-2.62308-6.8092-2.59936-1.8902.01282-3.73967.5388-5.34258%201.5194-1.6029.9806-2.89637%202.37735-3.73642%204.03478l3.40462%202.58828c.39118-1.17886%201.1478-2.20915%202.16472-2.94772%201.01691-.73857%202.24366-1.14874%203.50966-1.17351Z'%20fill='%23EA4335'/%3e%3c/g%3e%3c/svg%3e)
Web automation tools are in high demand. They save time and assist with scaling specific business tasks, such as social media marketing or search engine optimization. ZennoPoster is a robust web automation tool with a business-centric approach.
Such tools are often combined with proxy servers. Proxies support safe multi-account management, enhance web scraping, help bypass online geographical restrictions, and more.
If you're new to ZennoPoster, we've written a step-by-step guide on how to combine this tool with proxies. What's more, ZennoPoster has a built-in proxy settings manager, so it's easy to use even for web automation beginners.
What Is ZennoPoster
ZennoPoster is a web automation tool developed to streamline several business tasks. It is particularly efficient at automating repetitive browser actions, such as posting deals and advertisements or collecting publicly available data and parsing keywords for SEO.
At its core is browser action simulation. As ZennoPoster states, if you can do something using a web browser, then this tool can repeat and automate the actions. For example, it's a great tool for filling forms, creating accounts, scraping the web, scheduling posting, and emulating other browser actions.
ZennoPoster offers a limited free trial for 14 days, which is more than enough to test its features. It limits actions to a single thread, does not support proxies, and does not automatically solve CAPTCHAs.
The free ZennoPoster version is too limited for digital marketing, but it gives you a chance to familiarize yourself with this tool. If you are an SEO expert, digital marketing manager, data analyst, or quality assurance engineer, mastering ZennoPoster will streamline routine tasks and give you more time for creative tasks.
ZennoPoster is fully capable of scraping the web, offering extraction and context recognition features. It also lets you work with databases, Jason/XML files, and even sms services. What's more, it allows you to add custom code for solutions tailored to your business needs.
Why Use Proxies with ZennoPoster
You will need a ZennoPoster proxy to scale automation tasks. For example, social media marketing is an excellent channel for driving conversions, reaching millions of consumers with a few smartly placed posts.
However, social networks often impose limits on what a single account can do. For example, LinkedIn is very strict about multiple accounts, and Facebook can also ban batches of profiles if it considers them to violate its terms of service.
A good proxy provider offers millions of proxy servers with unique IPs. At IPRoyal, we offer over 32 million residential proxies in 195 countries. To minimize detection and ban risks, you can assign a unique IP address to each social network account. This way, your accounts do not trigger anti-bot protection algorithms, and you can manage multiple accounts safely.
Web scraping is another illustrative example. Many websites use bot protection, issuing CAPTCHASs or banning IPs that appear to be bots. This approach interferes with legitimate web scraping, denying access to crucial business data.
To solve these issues, you can get proxies with rotating IPs. A rotating proxy will assign a different IP address to each data collection request, significantly increasing web scraping success rates. Keep in mind that the paid ZennoPoster version offers automatic CAPTCHA solving, which speeds up online data collection.
Step-by-Step Proxy Integration with ZennoPoster
Now that we've got the theory sorted out, let's see how ZennoPoster performs in practice. Firstly, there are no special prerequisites to use this tool. Get the installation file from the download page, run it, and follow the instructions to complete the installation. We will use the Windows version for this example.
During installation, ZennoPoster asks you to create an account. You must enter your email address to receive instructions for account verification. Once verified, you can continue installing it on your device. Keep in mind that you may need to restart the installation process after the account verification.
Here are step-by-step instructions on ZennoPoster proxy integration.
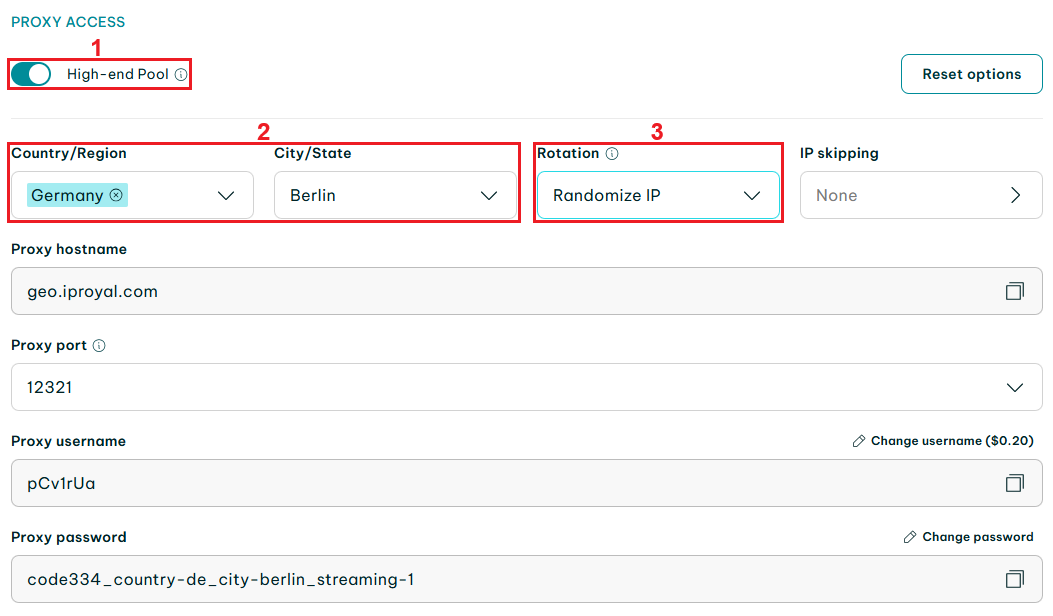
1. Visit the IPRoyal dashboard to configure your proxies and whitelist your IP address. We will use high-end (1) residential proxies from Berlin, Germany (2), with randomized sessions (3) that get a new IP address for each request.
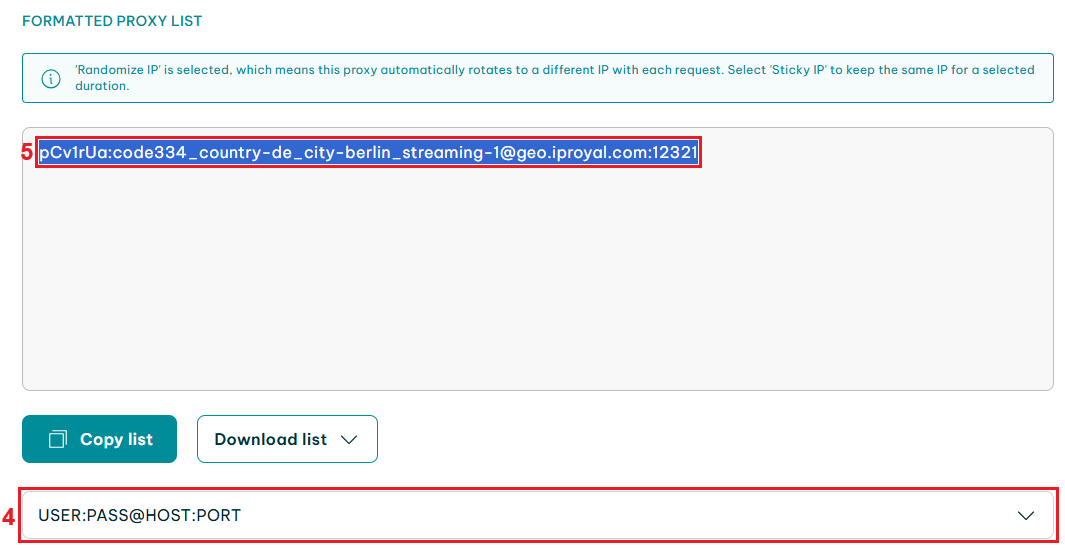
2. Scroll down to the ‘Formatted proxy list’ section. Make sure the proxy format (4) is set to user:pass@host:port, as this is the format ZennoPoster recognizes. Select your proxy string (5) and copy it to the clipboard.
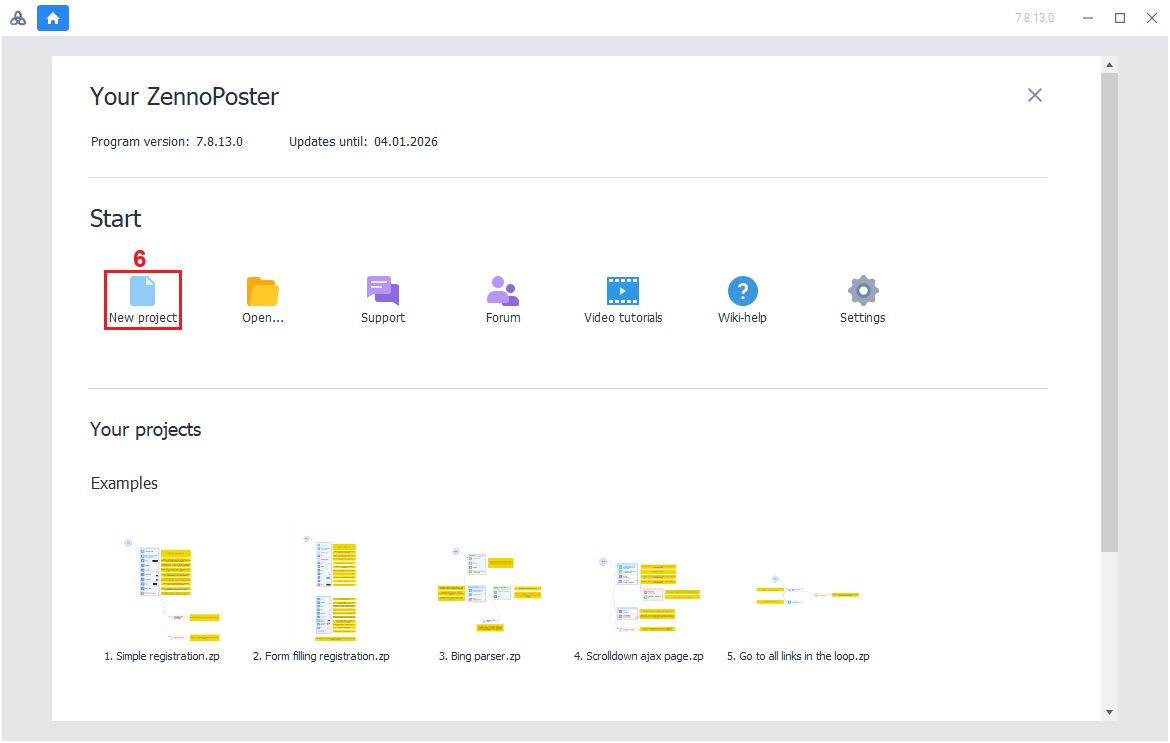
3. Launch the ZennoPoster ProjectMaker and select ‘New project’ (6).
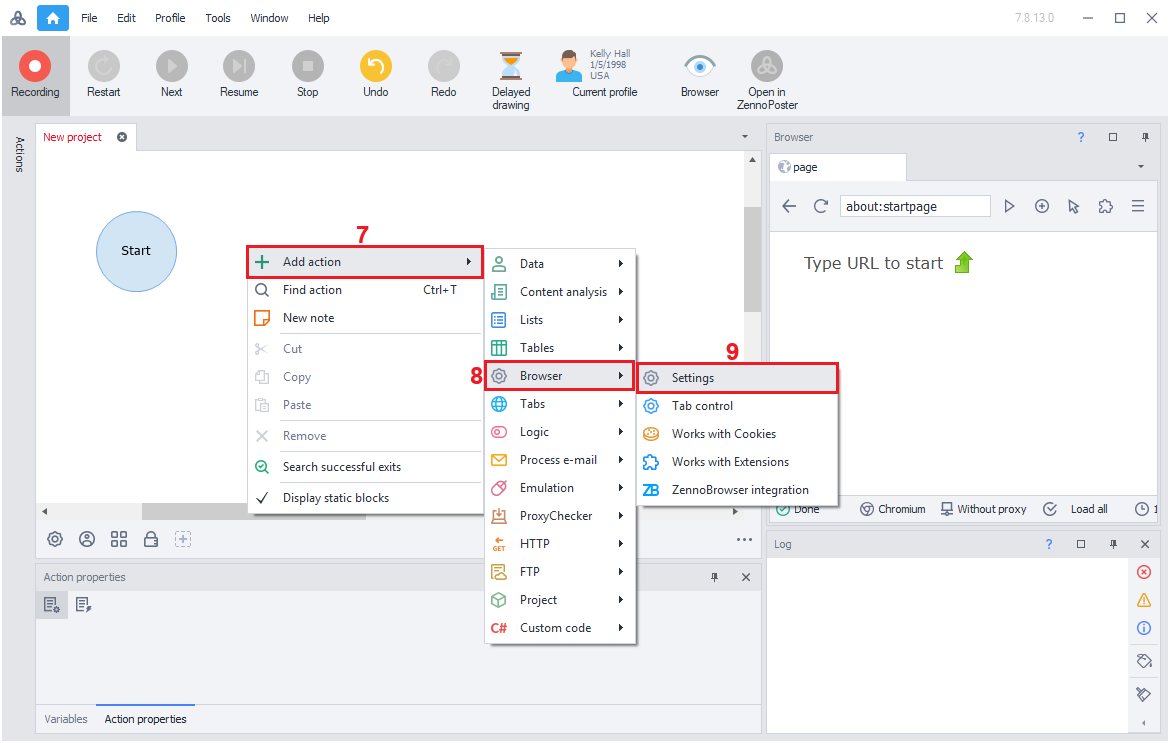
4. Right-click in the empty space next to ‘Start’. Select ‘Add action’ (7), followed by ‘Browser’ (8), and then ‘Settings’ (9).
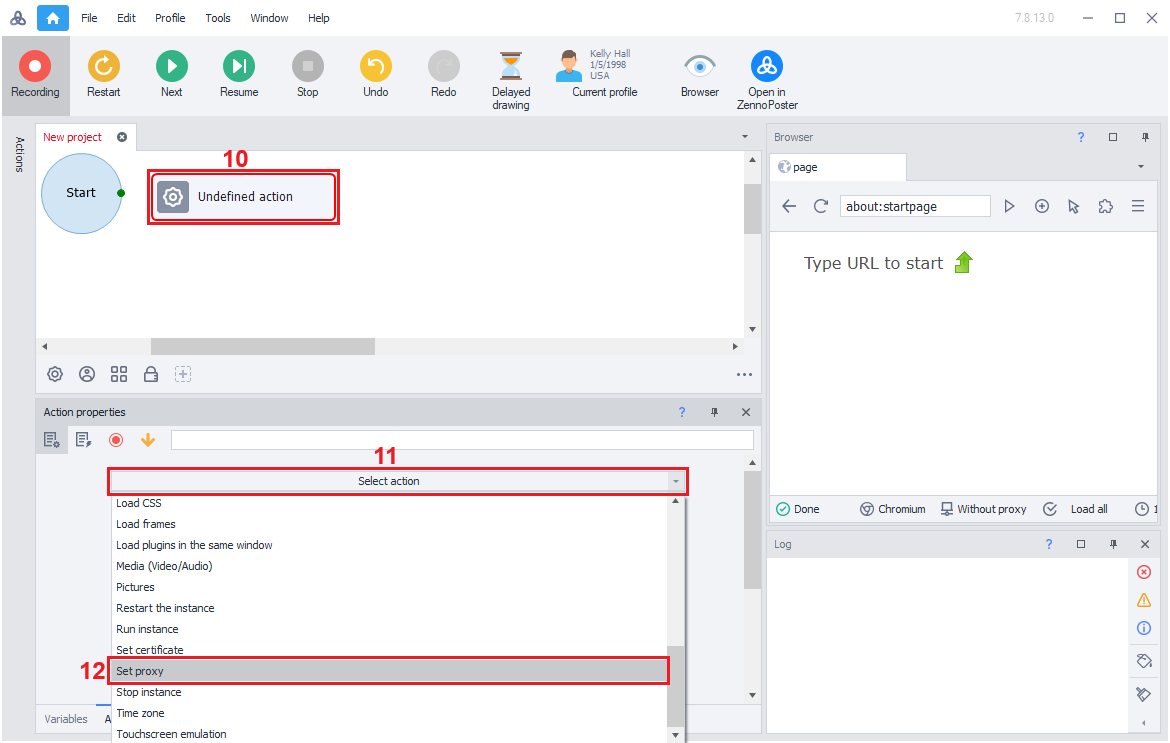
5. Double-click the ‘Undefined action’ (10) block. In the ‘Action properties’ section, click ‘Select action’ (11) and choose ‘Set proxy’ (12) from the list.
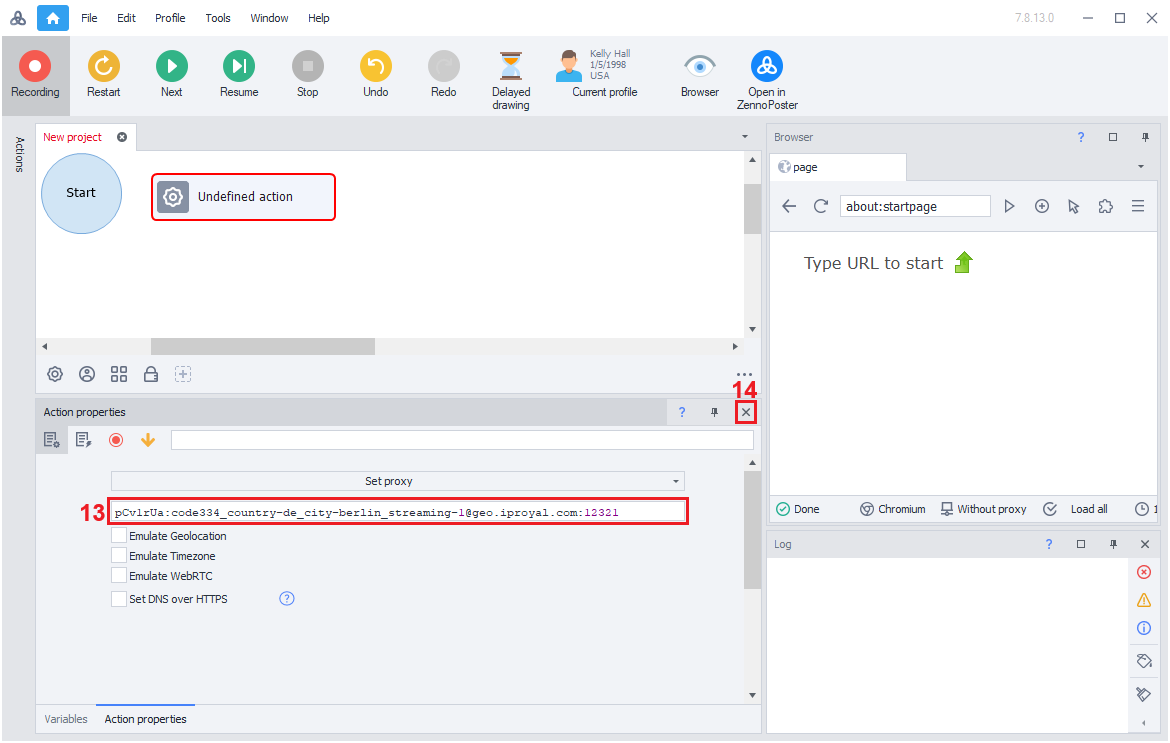
6. Paste your proxy credentials from the IPRoyal dashboard into the field (13) below and close (14) the ‘Action properties’ section.
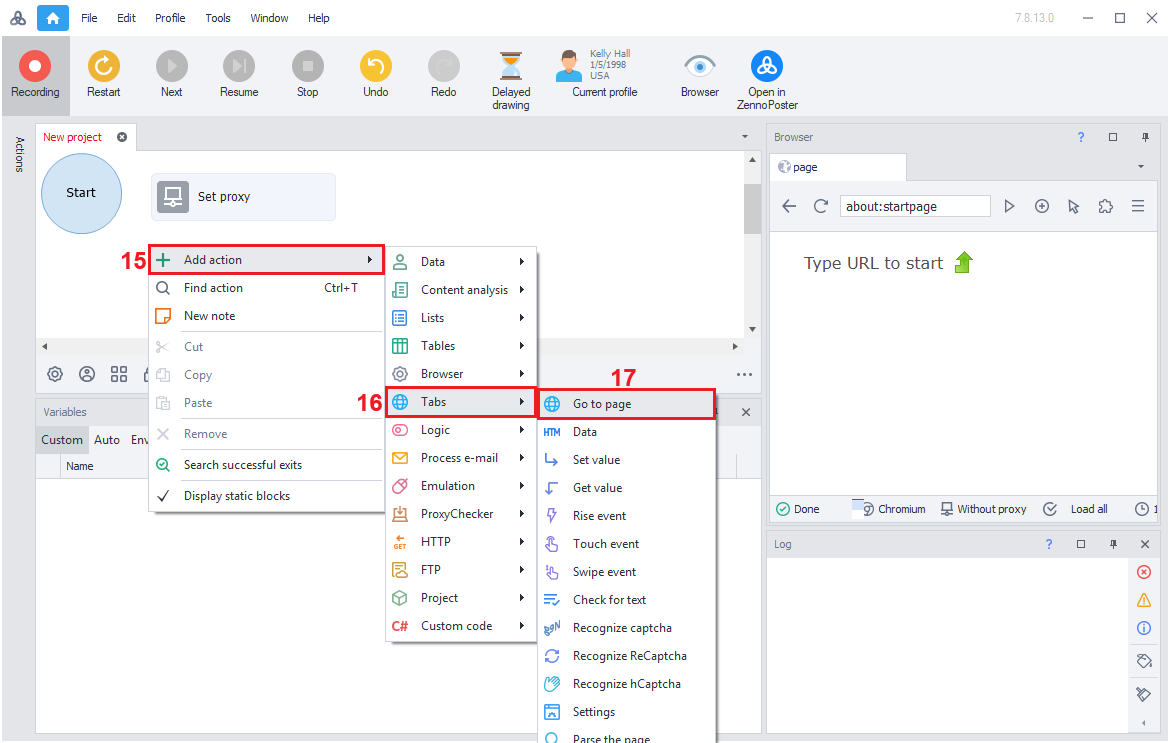
7. To test if your ZennoPoster proxy works correctly, right-click in the empty space next to ‘Start’ again. This time, choose ‘Add action’ (15), then ‘Tabs’ (16), followed by ‘Go to page’ (17).
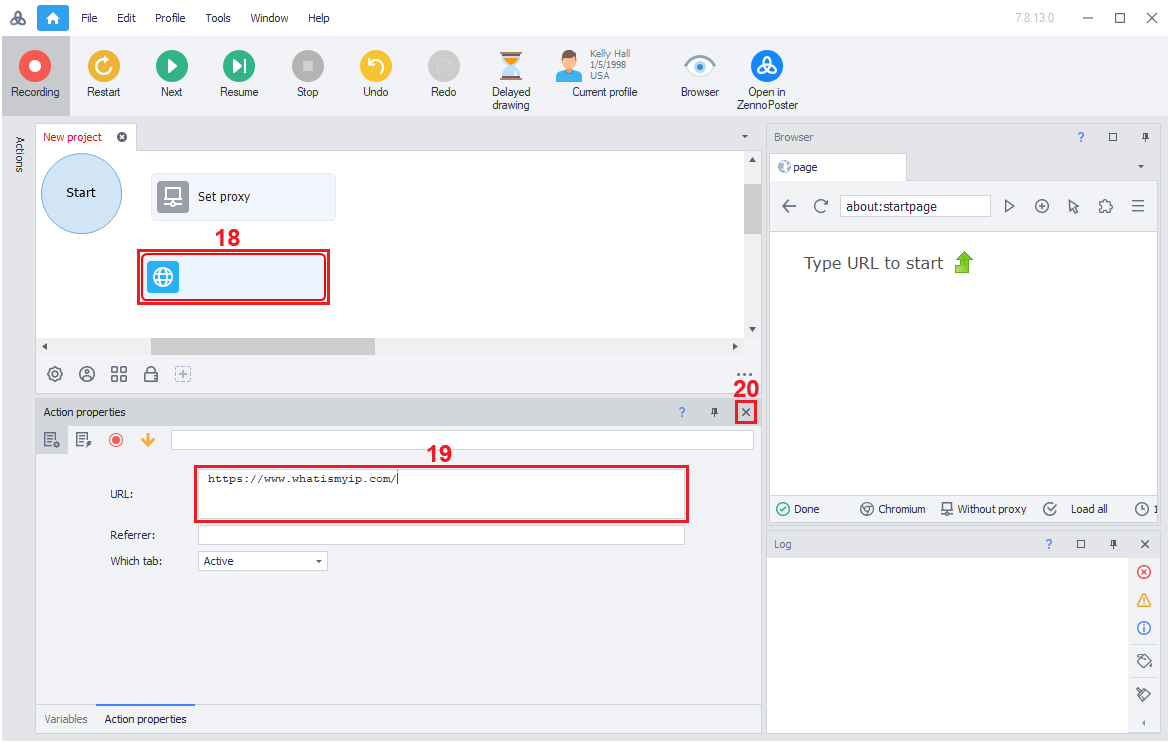
8. Double-click the new block (18). In the ‘Action properties’ section, paste the URL (19) of a website you want to visit. We’ll go with WhatIsMyIP. Close (20) the ‘Action properties’ section when you’re done.
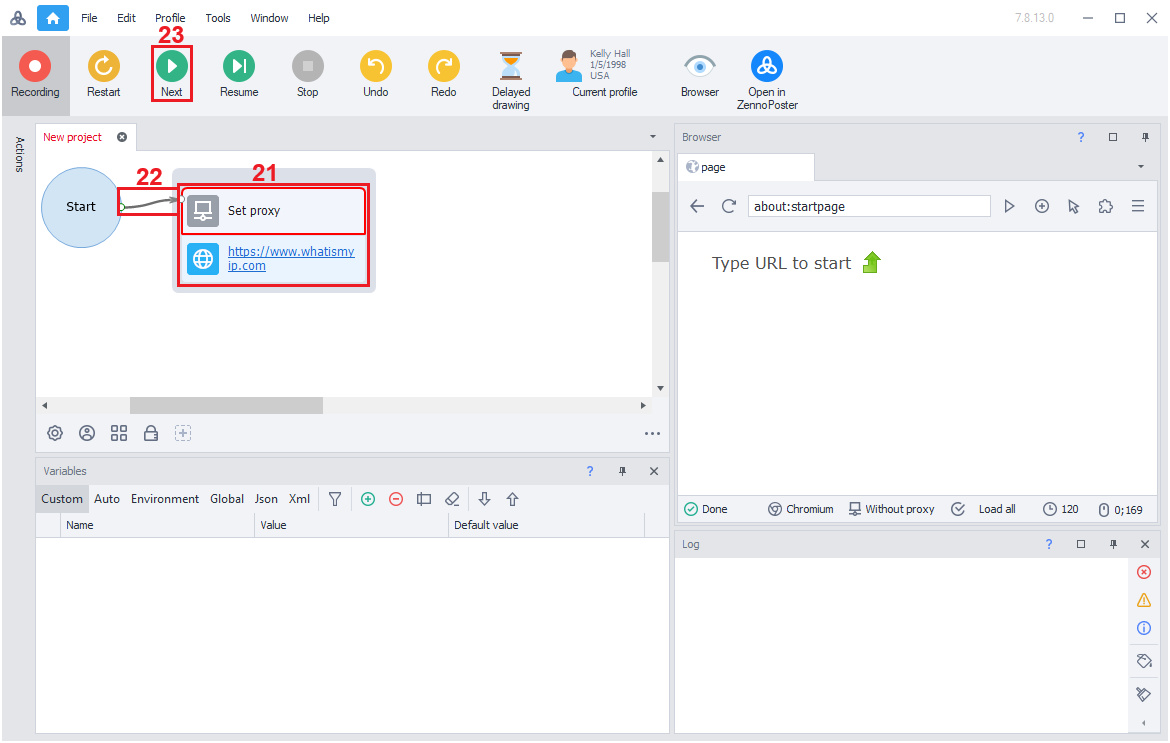
9. Move the URL block under the existing one so they’re in the same group (21). Finally, draw an arrow (22) from ‘Start’ to the ‘Set proxy’ block and press the ‘Next’ (23) button. Note that you may need to press it two times.
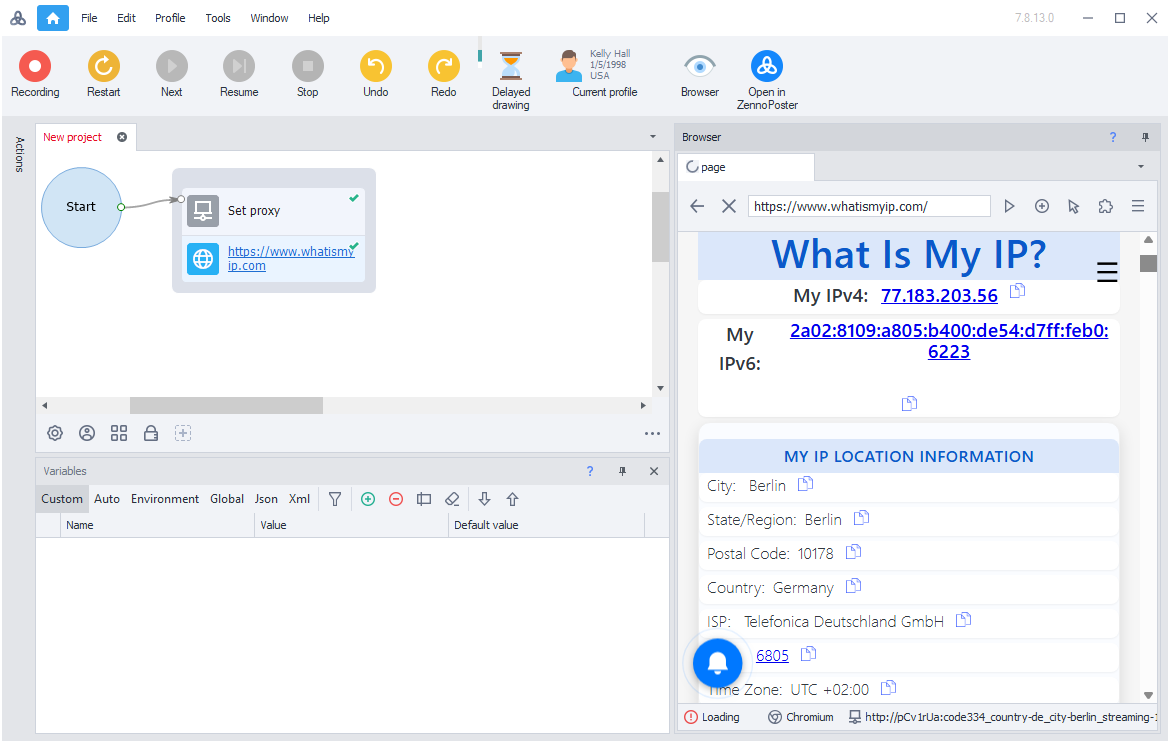
10. Once the page loads, we can see that our IP address is in Berlin, Germany, which means our residential proxies setup is working correctly. If you get the same results, you can remove the URL block and carry on with your project.
Conclusion
As you can see, the ZennoPoster app is easy to use. Although it's beginner-friendly, it can get somewhat complex for more demanding tasks. Fortunately, the ZennoLab website offers detailed documentation for all its products.
For example, scraping challenging websites includes modifying proxy settings, such as setting a delay parameter. Because ZennoPoster accepts custom code, you can define such parameters in Python and tailor ZennoPoster actions to your specific demands.