'%20fill-rule='evenodd'%20clip-rule='evenodd'%3e%3cpath%20d='M21.9952%2012.2202c-.0019-.6851-.108-1.3688-.2269-2.0439h-9.6238v3.8768h5.4928c-.1125.6103-.3507%201.1919-.6999%201.7094-.3492.5175-.8022.9601-1.3315%201.3009v2.5105h3.3479c1.005-.9487%201.7951-2.0936%202.3191-3.3605.524-1.2668.7701-2.6273.7223-3.9932Z'%20fill='%234285F4'/%3e%3cpath%20d='M12.1415%2021.9954c2.5027.0755%204.9397-.7912%206.8092-2.4216l-3.3025-2.5105c-1.031.6482-2.2362.9808-3.4613.9553-1.266-.0247-2.49275-.4349-3.50967-1.1735-1.01691-.7385-1.81874-1.8128-2.20993-2.9916l-3.4048.0439v2.5438c.84005%201.6575%202.13352%203.0542%203.73642%204.0348%201.60291.9806%203.45238%201.5066%205.34258%201.5194Z'%20fill='%2334A853'/%3e%3cpath%20d='M6.46884%2013.8531c-.42382-1.2324-.42382-2.4897%200-3.7221V7.55469H3.06422C2.36423%208.93568%202%2010.4564%202%2011.998c0%201.5416.36423%203.0624%201.06422%204.4434l3.40462-2.5883Z'%20fill='%23FBBC05'/%3e%3cpath%20d='M12.1415%206.02167c1.4529-.02643%202.8572.46854%203.9039%201.45519l2.9053-2.87706c-1.8433-1.69203-4.2823-2.62308-6.8092-2.59936-1.8902.01282-3.73967.5388-5.34258%201.5194-1.6029.9806-2.89637%202.37735-3.73642%204.03478l3.40462%202.58828c.39118-1.17886%201.1478-2.20915%202.16472-2.94772%201.01691-.73857%202.24366-1.14874%203.50966-1.17351Z'%20fill='%23EA4335'/%3e%3c/g%3e%3c/svg%3e)
Using proxies on your mobile device can serve many purposes. You may want to protect your privacy, reach geo-restricted content, test mobile apps, or manage marketing and ad verification tasks. The process itself is straightforward. We provide a detailed guide for Android proxy setup and another for iOS proxy setup to walk you through each step.
The challenge lies in how mobile operating systems handle proxies. On many mobile devices, when you manually set a proxy for a Wi-Fi or network connection, that setting routes much of your web browser and system traffic through the proxy, but not all app traffic.
Some apps, such as TikTok, YouTube, Gmail, or Netflix, use their own networking libraries or protocols and may bypass or ignore the system settings entirely. This limitation defeats the purpose of configuring a proxy manually.
That is where the Super Proxy app becomes useful. It lets you route all your mobile traffic through your chosen proxy. Keep reading to learn how to integrate it with proxies on iPhone and Android.
What Is Super Proxy and How Does It Work?
Super Proxy is a mobile app available for iOS and Android that routes all your mobile traffic through your proxy connection. It solves the limitations of manual proxy configuration by managing connections at the system level rather than relying on your phone’s built-in network settings.
When you configure a proxy manually, your device applies those settings only to traffic that uses the default HTTPS stack. Apps that use custom networking libraries, such as TikTok, Gmail, or YouTube, often bypass these settings entirely.
The Super Proxy app addresses this by creating a local VPN service on your device.
This VPN doesn’t connect to an external provider. Instead, it captures all outgoing traffic and routes it through the proxy you set up inside the app. Within its interface, you can enter your proxy details, including the proxy host, port, proxy username, and password.
Once activated, the app directs all connections on your device through your selected proxy, regardless of which app initiates them. This ensures consistent proxy coverage across both Wi-Fi and mobile data, forming the basis for seamless integration on Android and iOS devices.
Super Proxy Integration Tutorial
The first step depends on your device. Download the app from the Google Play Store if you’re on Android, or from the App Store if you’re using iOS. Once installed, follow the steps below to complete your integration.
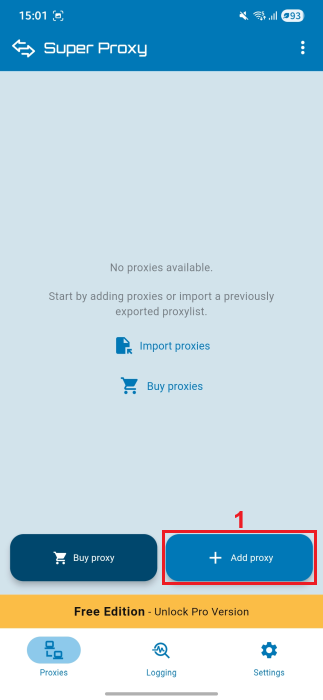
- Step 1: Open the app. At the bottom, there are two options: 'Buy Proxy' and 'Add Proxy'. Tap 'Add Proxy' (1).
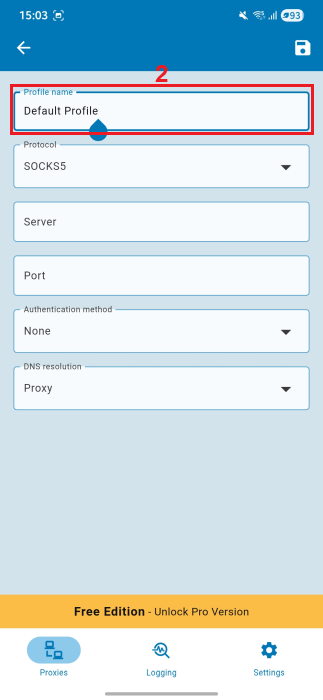
- Step 2: A form will appear prompting you to enter your proxy details. Give your profile a name (2).
- Step 3: After you purchase your Residential Proxies, visit the IPRoyal dashboard to configure them. We’ll use high-end (3) proxies from New York City, United States (4), with sticky sessions (5) and one-day rotation (6). Once configured, it’s time to prepare your credentials (7).
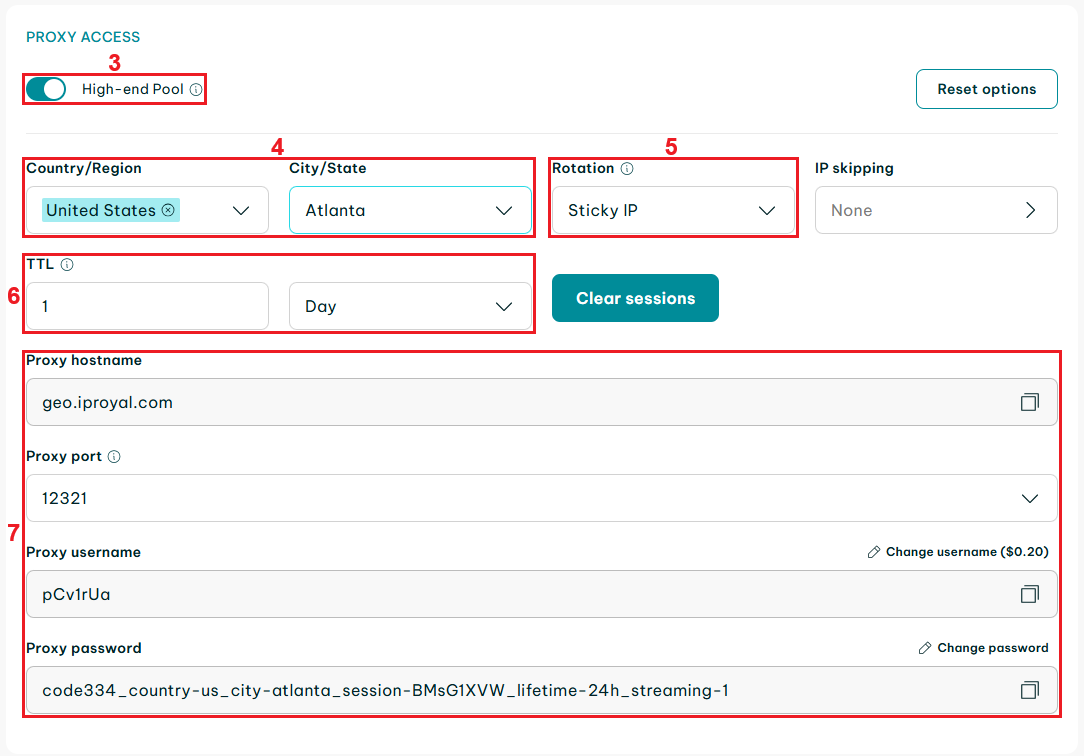
- Step 4: Return to the app and fill in the following fields (8):
- Protocol (set ‘HTTP’ or ‘SOCKS5’ - IPRoyal Residential Proxies support both)
- Server (‘Proxy hostname’ from the IPRoyal dashboard)
- Port number (‘Proxy port’ from the dashboard)
- Authentication method (set ‘Username/Password’)
- Username (‘Proxy username’ from the dashboard)
- Password (‘Proxy password’ from the dashboard)
- DNS resolution preference (set ‘Proxy’)
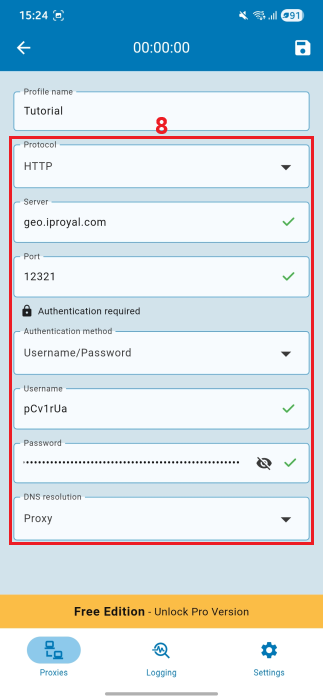
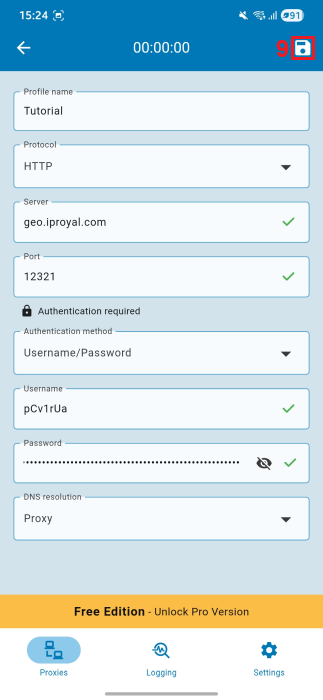
- Step 5: Double-check all your proxy details for accuracy, then tap the save icon (9) in the upper-right corner of the screen to save your profile.
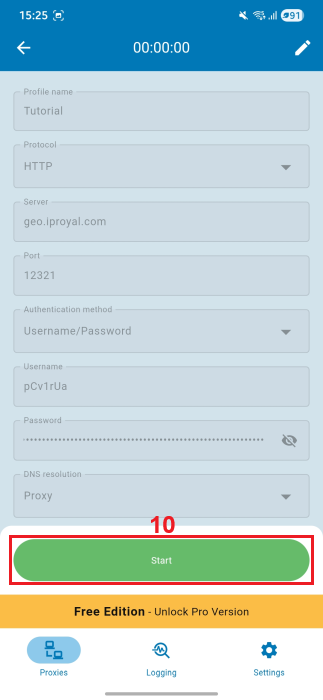
- Step 6: Press the 'Start' (10) button to activate the proxy connection you just configured.
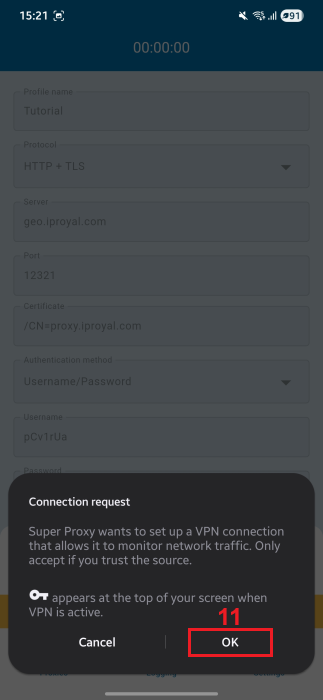
- Step 7: Your device will prompt you to approve a VPN connection request. Tap ‘OK’ (11) to allow it.
- Step 7: To confirm that your proxy is working, open your browser and visit WhatIsMyIP or a similar website. The IP address displayed should match the location of your selected proxy.
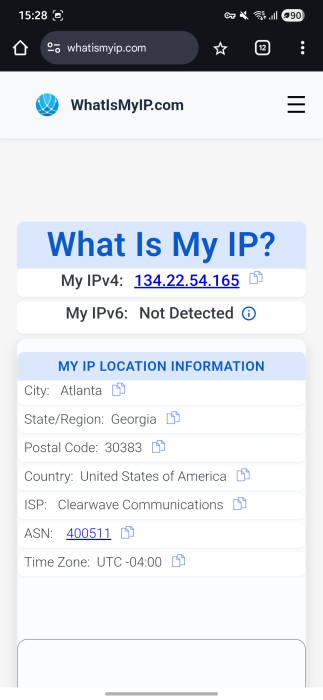
If your displayed location matches the proxy’s location, your integration was successful. You can now route all your mobile traffic through your IPRoyal proxy with full coverage across apps and networks.
Why Use IPRoyal Proxies With Super Proxy
IPRoyal offers a wide range of proxies that you can integrate with the Super Proxy app for every mobile or testing need. Each option is designed to work seamlessly, providing you with control, speed, and consistency across devices.
Our available proxy types include:
Access real household IPs from more than 195 locations. These proxies offer non-expiring bandwidth, city- and state-level targeting, and flexible session control - perfect for bypassing geo-restrictions, ad verification, and mobile testing.
These proxies combine datacenter reliability with residential legitimacy. They come with unlimited traffic, SOCKS5 support, and stable performance, making them ideal for long sessions or automated tasks.
Built for performance and scalability, our datacenter proxies provide unlimited traffic from over 40 global locations, full SOCKS5 support, and high throughput for speed-sensitive operations.
Designed for mobile-based workflows, these proxies deliver over 4.5 million IPs with 3G, 4G, and 5G support. They provide unlimited bandwidth and authentic mobile connections for accurate app testing and location validation.
Whether you’re using Super Proxy to test app performance, manage marketing campaigns, or browse securely, IPRoyal proxies integrate smoothly.
Conclusion
The Super Proxy app offers a practical way to route all your mobile apps through a single proxy endpoint that you configure inside the app. Instead of relying on your phone’s default network settings, it creates a local VPN service that tunnels all network requests through the proxy server you specify. Paired with robust residential or mobile proxies, it is an effective way to enhance mobile privacy, bypass geo-restrictions, run mobile tests, verify mobile ads, and more.